INVOICE MATCHING
INVOICE MATCHING MODULE (APPROVALS ON)
Eyvo’s eBuyerAssist has an Invoice Module that can be used to log invoices and payments into the system. This helps complete the Purchase-to-Pay (P2P) cycle of a robust eProcurement system and is especially useful to Purchase Managers and Accounts Managers if they are involved in this process.
Below are the statuses of Invoices:
- When there is no Invoice logged against an Order, the status shows us Not Invoiced
– If the Invoice Approver rejects the invoice, then the Approval Status next to that line item becomes Rejected and the Invoice Status becomes Invoice Pending.
– If an invoice on line item 1 is approved, its Approval Status shows as Approved. If the invoice for the next line item is sent for approval, the Approval Status next to that line item shows as InProcess and the Invoice Status becomes Invoice Pending.
– If all the invoices are approved and partial payments have been made, then the Invoice Status becomes Fully Invoiced and the Payment Status shows as Partially Paid..
Invoice Module (System Administrator perspective):
-
The System Administrator needs to activate Invoice Approvals. This can be done under Invoice and Payments> Assign Invoice Approver as shown in Screen: 1
Screen: 1 
-
Once the 'Invoice Approver' switch is on, the System Administrator would also need to assign some user(s) as Invoice Approvers. This can be done by switching Invoice Approver under Approver section for selected users as shown in Screen: 2:
Screen: 2 
-
Once the System Administrator has assigned user(s) as Invoice Approver, this user(s) will be seen in the Default Invoice Approver dropdown as shown on Screen: 3
Screen: 3 
-
The System Administrator needs to give access to the user(s) for this module. This can be done by the System Administrator under User Maintenance> User Register for each user as shown in Screen: 4
Screen: 4 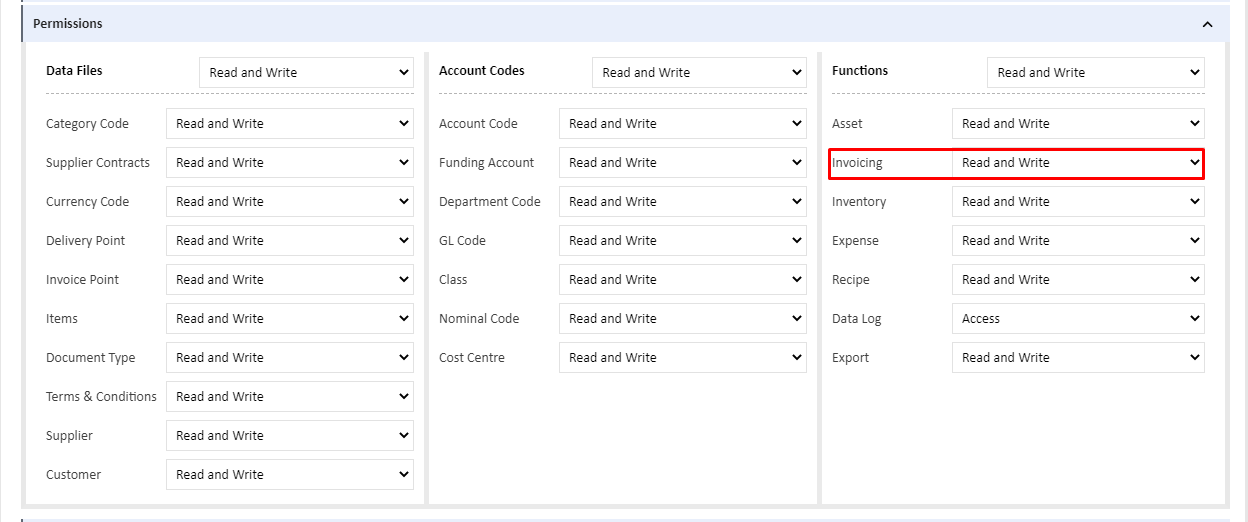
-
Lastly, the System Administrator can select the type of Invoice System to be defined in the system under Invoice and Payments> Invoice Number Uniqueness as shown in Screen 5:
Screen: 5 
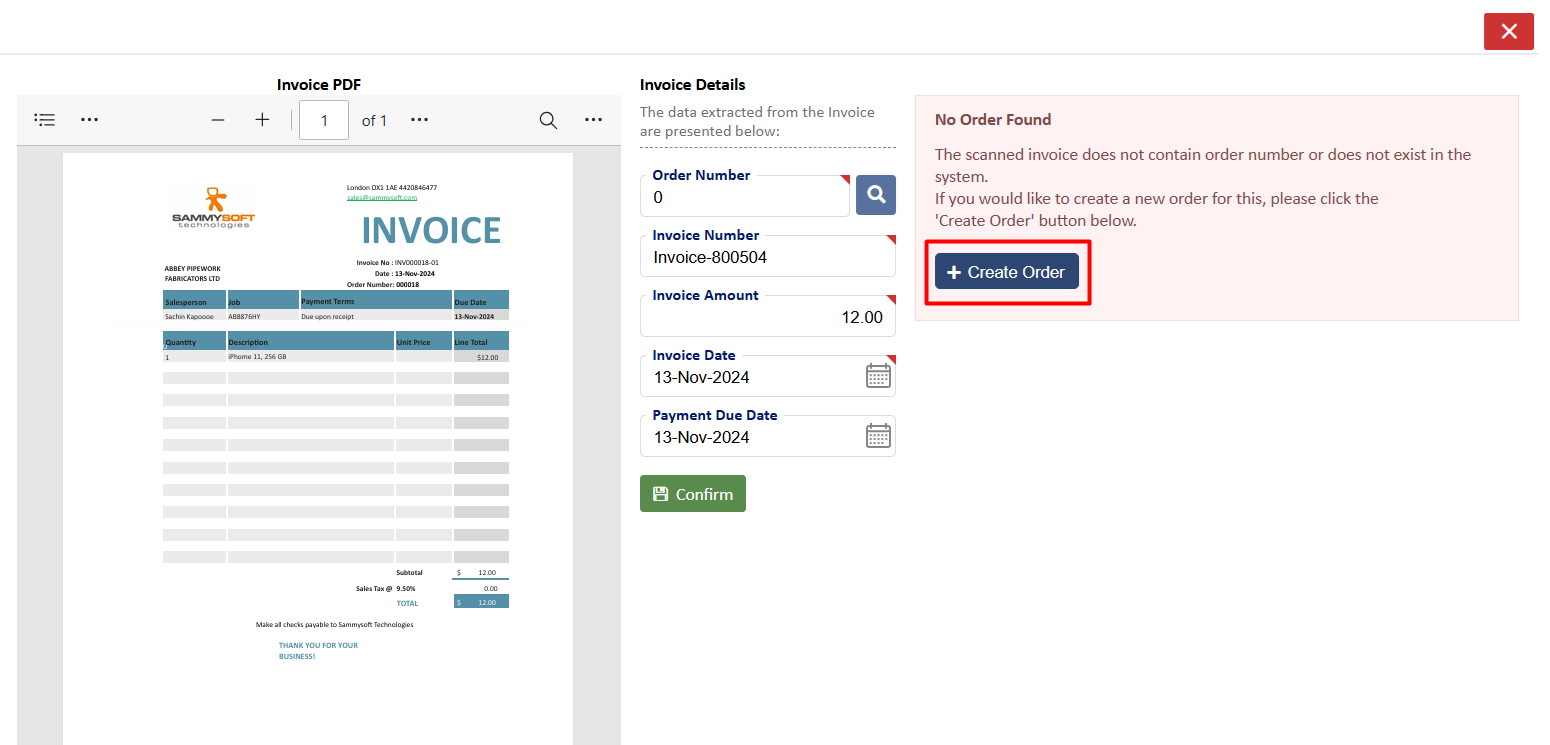
Note: This option can be changed later. However, in most companies, this is defined at the beginning.
Invoice Module (User perspective):
If you have been given the read and write permission to the Invoice Module, you will be, as a user able to see this on the left panel of your system upon logging in. The way invoices will work for you is as shqon below in Screen: 6.
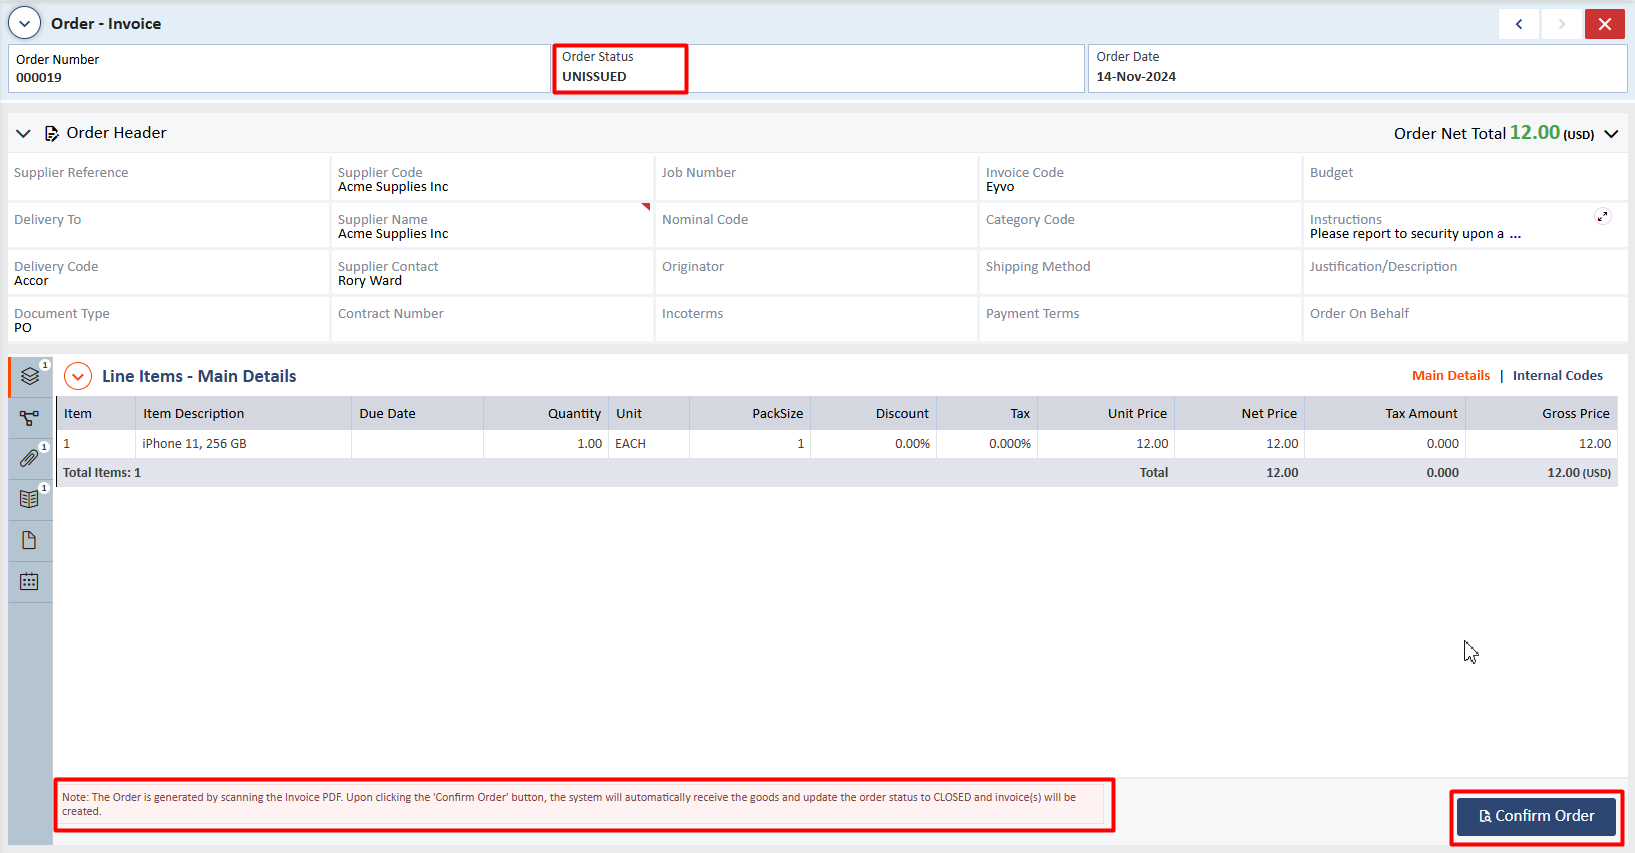
-
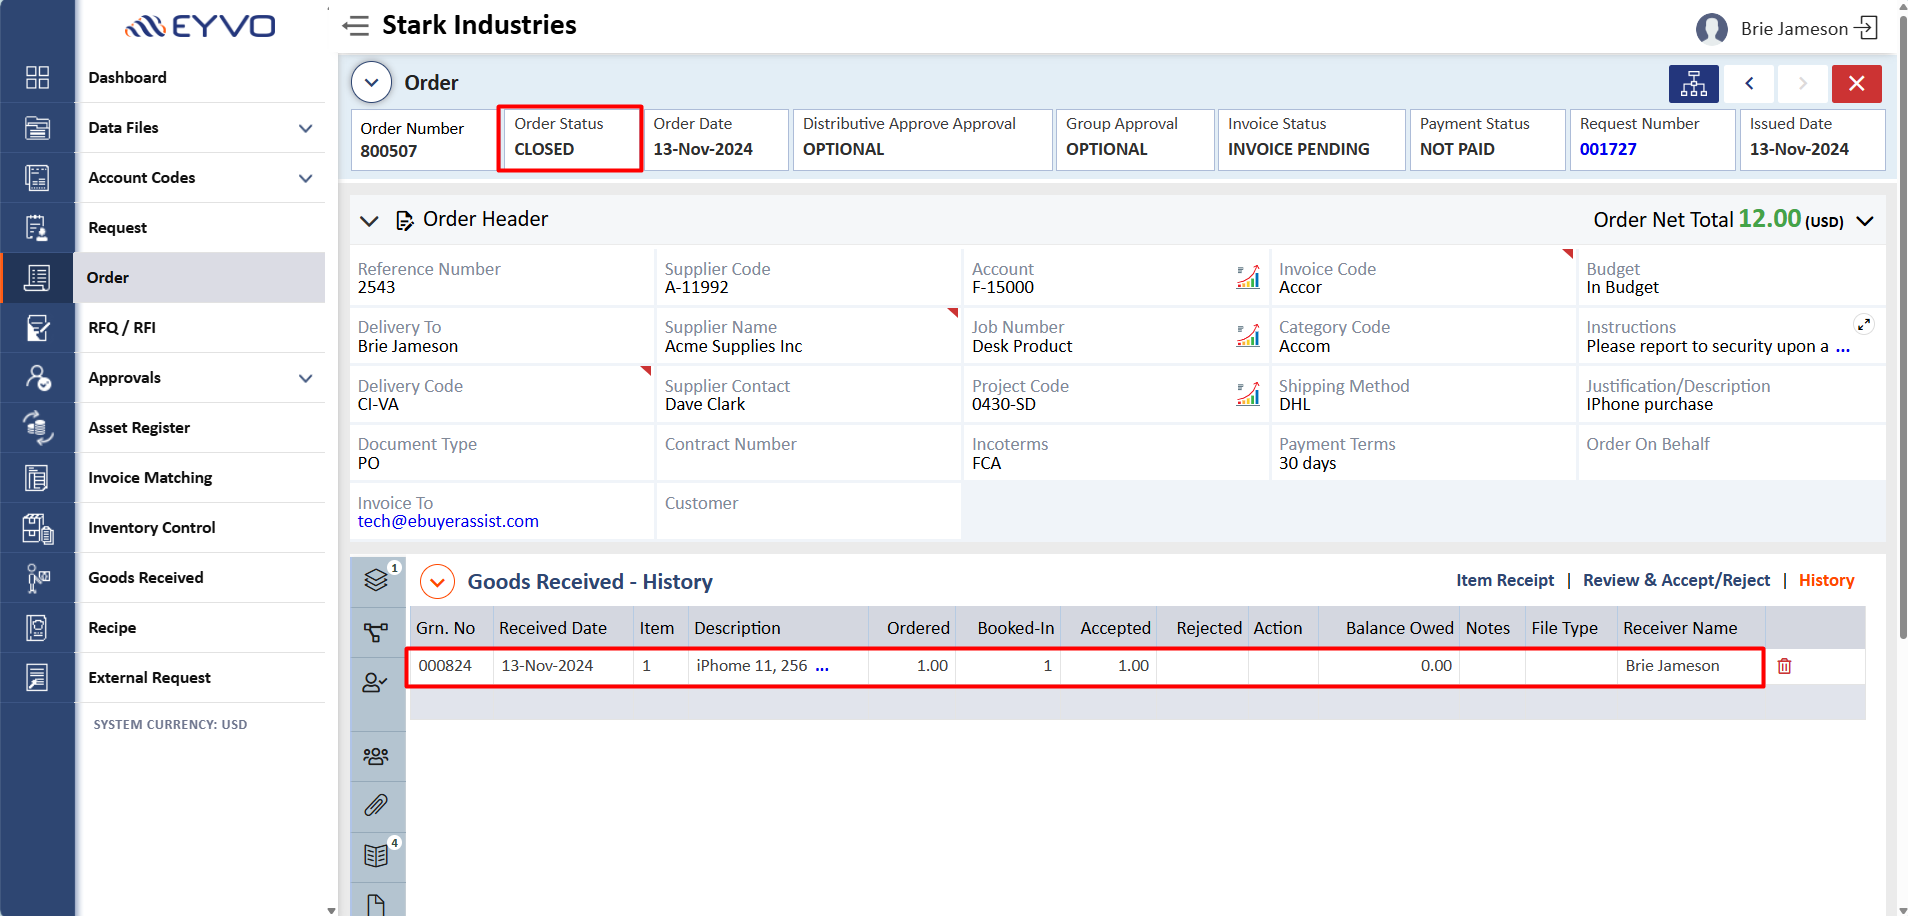
You can start by creating your Orders the way you usually do in the system. Once an order is issued, you will see the option for Invoices as highlighted in Screen: 1 with its 3 sub-sections:
Screen: 6 
-
If your supplier has sent you a copy of the invoice by email, then you can add the invoice document into the system by clicking on Attached Invoices> Attach Documents as highlighted in Screen 6.1 to see Screen 6.2:
Screen: 6.1 
Screen: 6.2 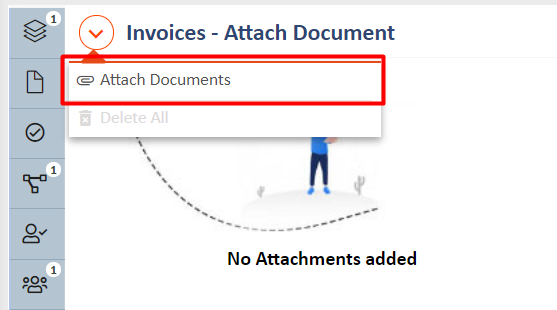
Note: You can browse for the file and attach it or click on File URL Upload as well.
Screen: 6.3 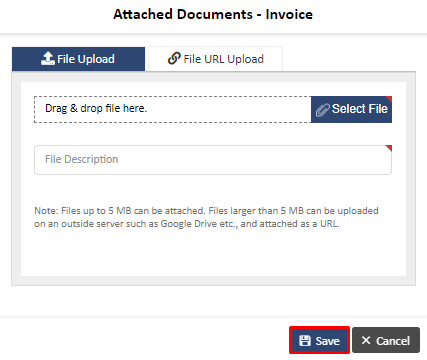
Click on Save once done.
You can also attach a document to be read using the OCR technology, The OCR technology also known as Text Recognition enables the system to scan and read documents for further processing. To attach, click on Log Invoice with OCR as shown on the below Screen to see Screen 6.4
Screen: 6.4 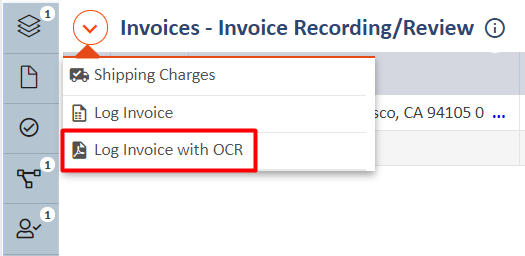
Drag and drop the Invoice file and allow the system to read it. This may take up to a few minutes.
Screen: 6.5 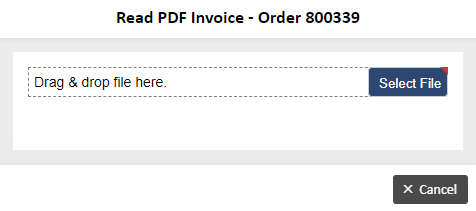
Once the system has read the invoice document, it will show you the Invoice Amount, Invoice Date and Invoice Number as shown on Screen. These details are mandatory and have been picked up by the system from the invoice.
Screen: 6.6 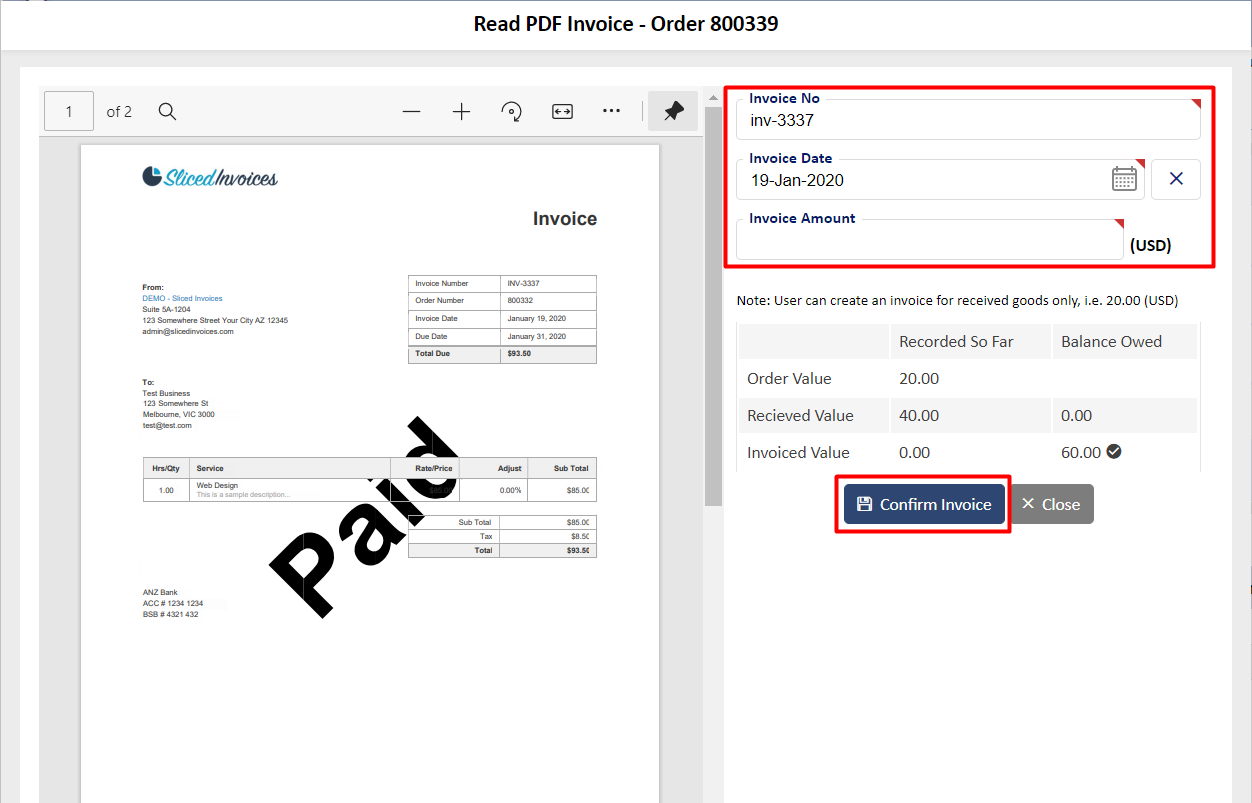
If the details that the system has read are correct, the click on Create Invoice to see Screen 6.7.
Screen: 6.7 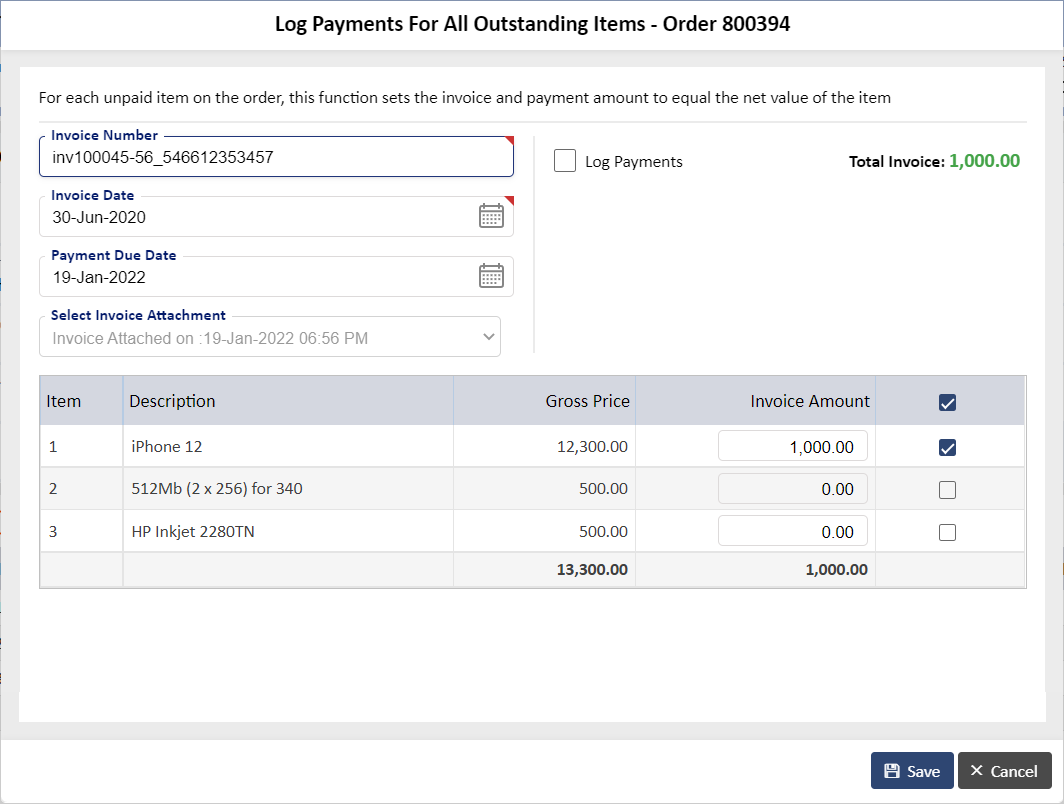
However, if the system has not read the details correctly or details are missing then you can manually enter these details and then click on Confirm Invoice. These fields are mandatory so they must have a value.
The rest of the process to submit the invoice for an approval is shown above in point
-
The option Invoice Recording/Review allows you to log an invoice against individual items or log an invoice against all the items collectively. It also shows you the invoice and payment breakup.
-
To log an invoice for individual items, click on Submit Invoice for Item icon as highlighted on 7.1
Screen: 7.1 
Screen: 7.2 
You can add the invoice number or select the existing invoice from the dropdown, confirm the date, add the invoice amount and notes if any and click on Submit for Approval as highlighted on Screen 7.2. You will notice that the Invoice Status and Payment Status on the order show as Not Invoiced and Not Paid respectively till invoices are logged.
Note: The invoice amount can be the entire Gross Price or a partial amount as well. The option to select an existing invoice will show only if invoices are attached. If not, you can add the invoice number only.
-
You will also see the Invoice the Payment Breakup icon next to each line item as highlighted in Screen 8.1 to see details as shown in Screen 8.2
Screen: 8.1 
Screen: 8.2 
-
You can also log one invoice for all the items by clicking on the Log Invoice button as shown in Screen 9.1 to see Screen 9.2:
Screen: 9.1 
Screen: 9.2 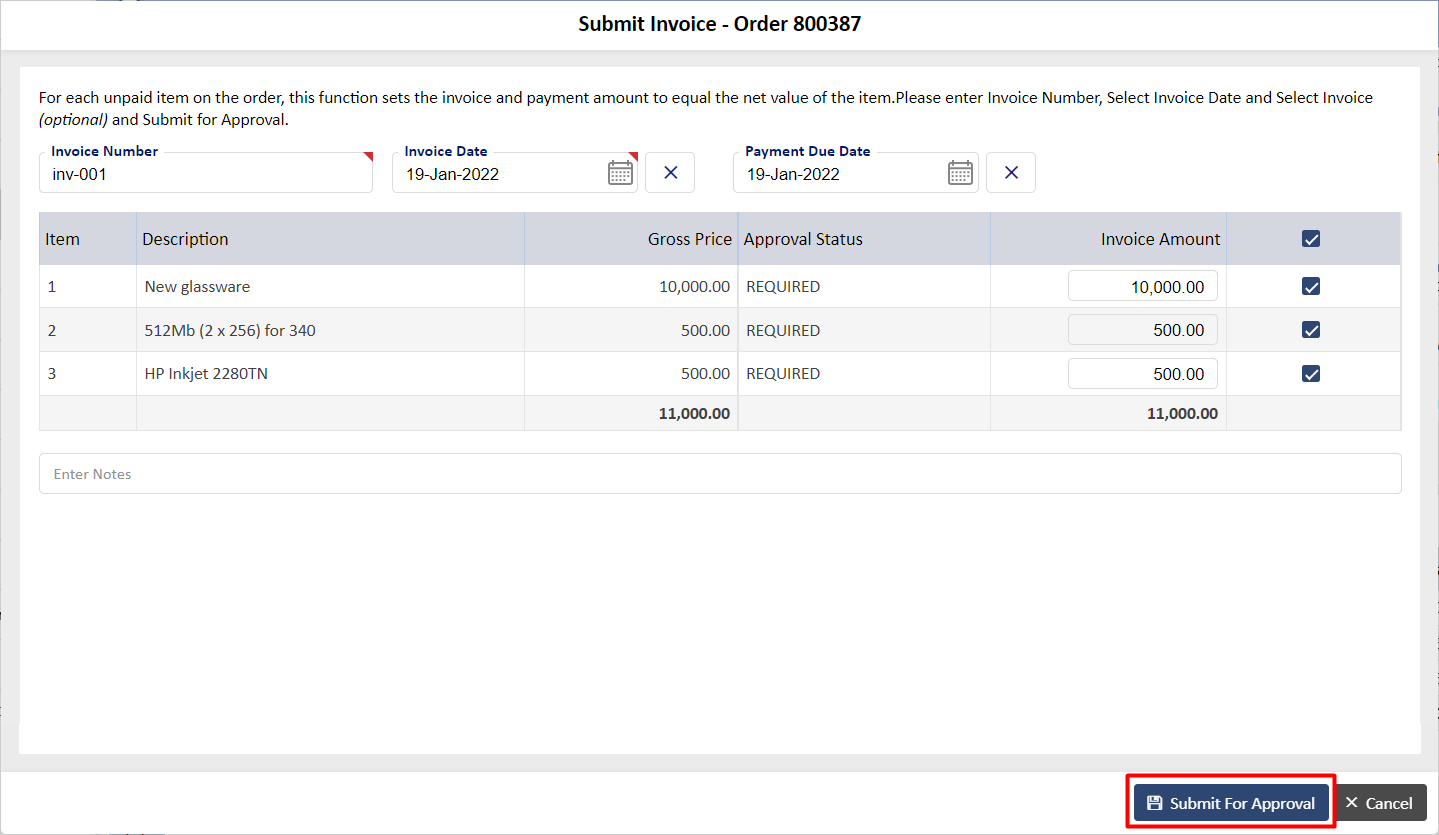
You can add the invoice number, invoice date, select the invoice as attached earlier, tick the checkboxes for the amounts to be invoiced, add notes and click on Submit for Approval as highlighted in Screen 9.2:
-
For this document, we will proceed with the above option of logging one invoice against all the items for the entire amount. Once you submit this for approval, an email will be sent to the Invoice Approver for approval. The invoice approver can accept or reject this invoice as shown in Screen 10.1:
Screen: 10.1 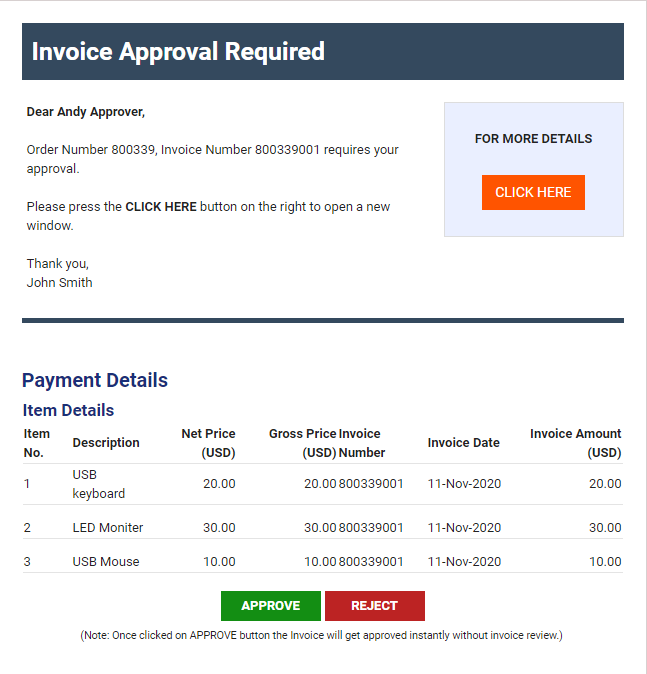
The invoice approver can approve by clicking on the Approve button or check the details of the invoice via the Click Here button from the above screen.
If the Invoice approver approves, the originator will receive an email confirming this as shown in Screen 10.2
Screen: 10.2 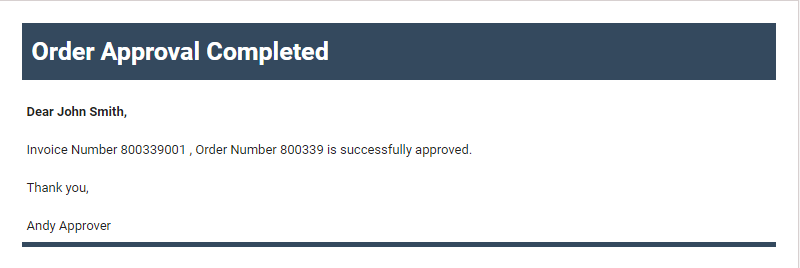
You will see now that Invoice Status on the order has changed to Fully Invoiced, but the Payment Status remains Not Paid and only the icon for View Payment and Invoice Breakup is visible. The Submit for Invoice Icon is no longer visible as you have logged all the invoices for the items with the full amounts.
Clicking now on the View Payment and Invoice Breakup icon will show you Screen 10.3:
Screen: 10.3 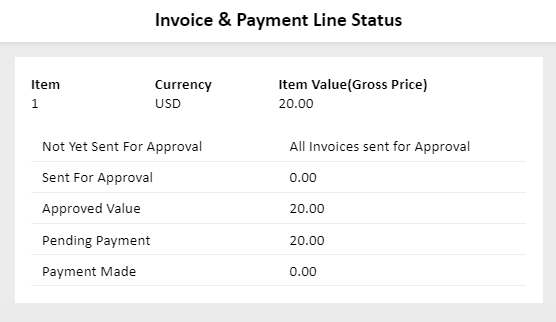
-
The next step would be to log the payments. To do so, click on Log Payment as shown in Screen 11.1 to see Screen 11.2:
Screen: 11.1 
Enter the Payment Date, with details such as Cheque Number and Cheque Clear Date if available with you, tick the checkboxes next to the line items with their payment amounts and click on Save.
Screen: 11.2 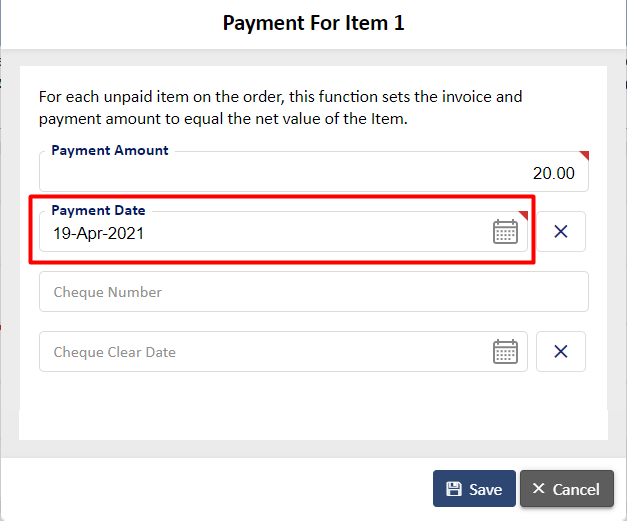
You will see in Screen 11.3 that the Approval Status shows as Approved and the Payment Status shows as Fully Paid:
Screen: 11.3 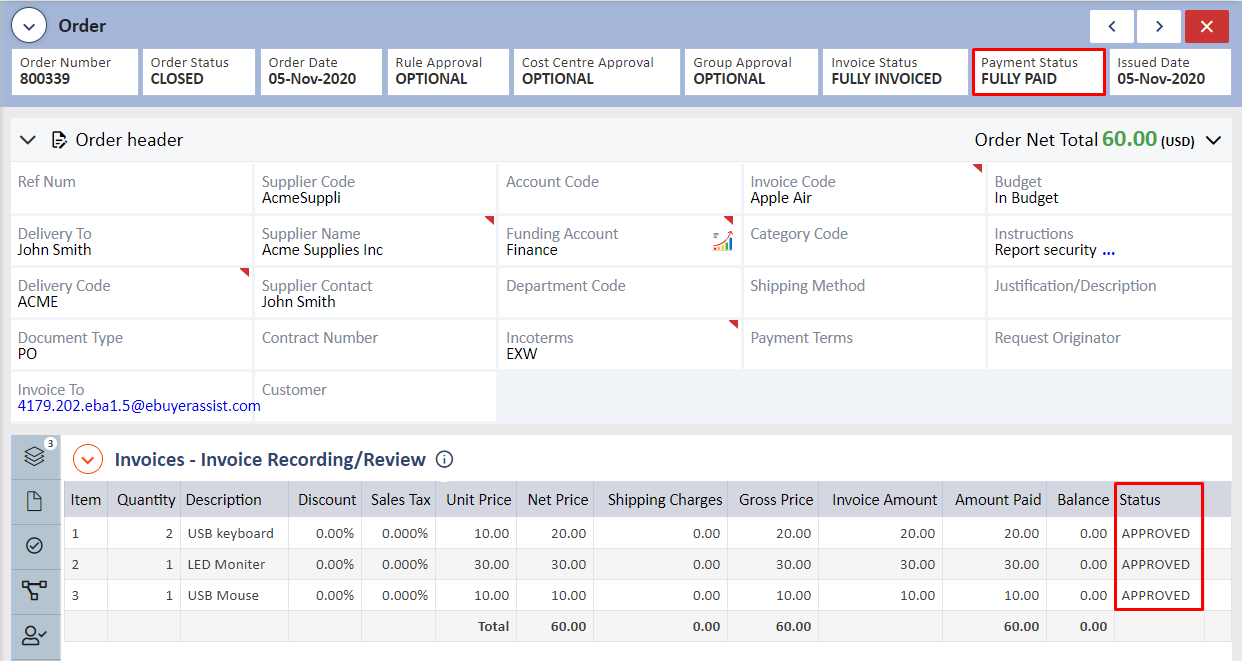
Another option under Invoices - invoice Recording/Review is Shipping Charges as shown in Screen 11.4
Screen: 11.4 
Clicking on it will show you Screen: 11.5 where you can add the shipping charges that will be split equally across all the line items. Once you add the amount, click on Adjust to see the individual charges applied to the items and then click on Save.
Screen: 11.5 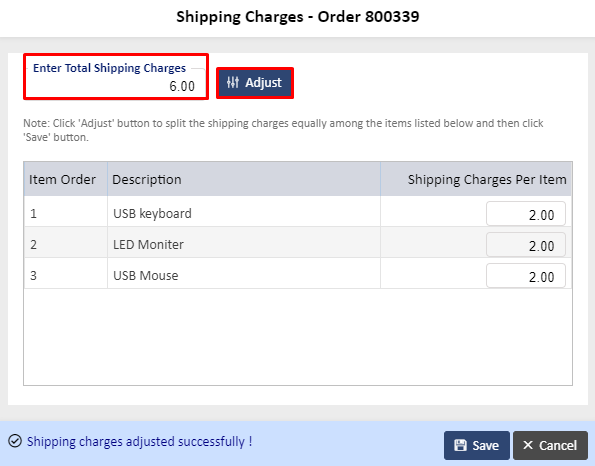
-
-
The option that says History & Matching will show the details of each item when clicking on selected line item to see the next screen as shown in Screen 12.2 and Screen 12.3.
Screen: 12.1 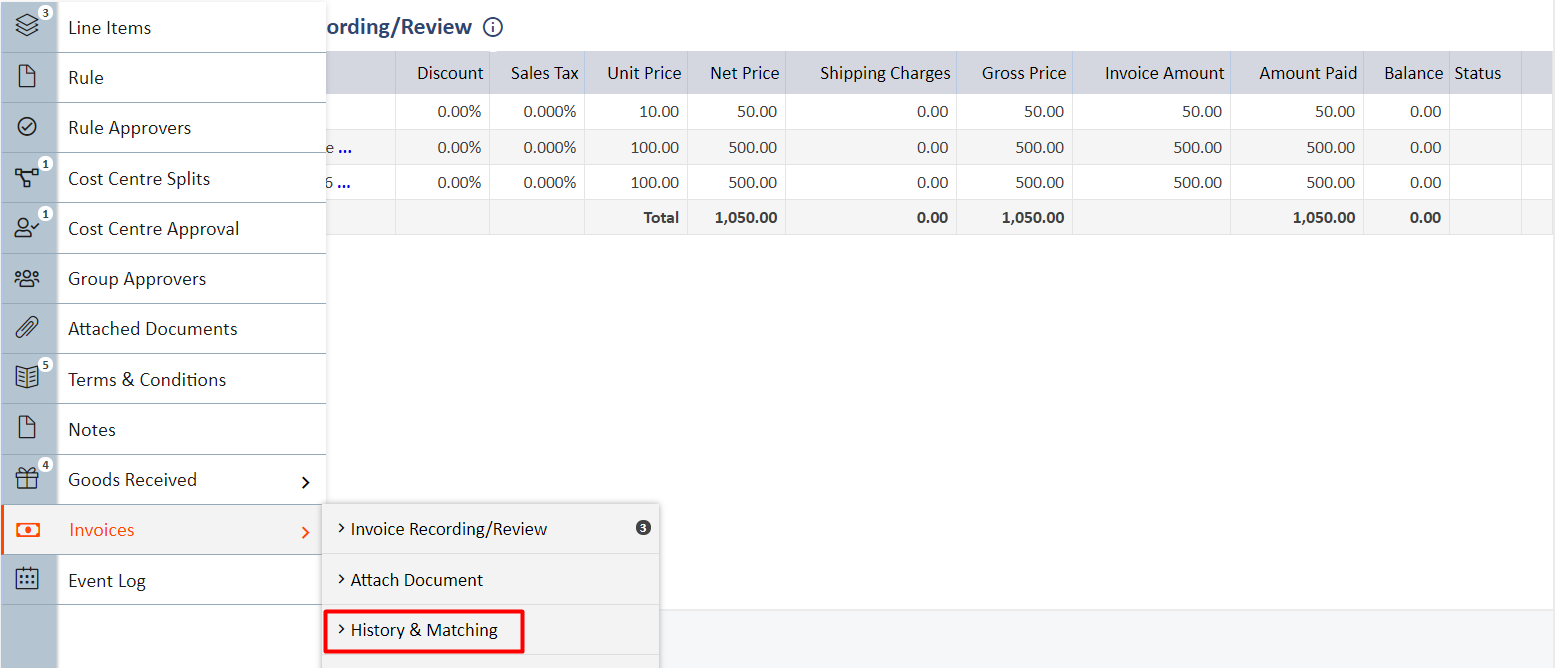
Screen: 12.2 
Screen: 12.3 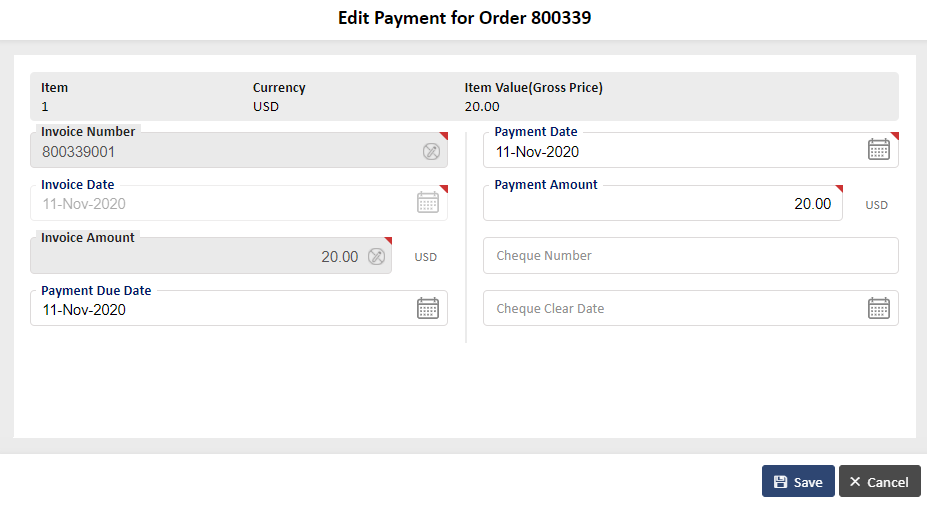
Invoice - Payment Details report shows the Item Gross Value, Invoice Amount and Payment Amount as shown in Screen 12.5:
Screen: 12.4 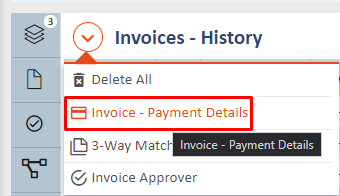
Screen: 12.5 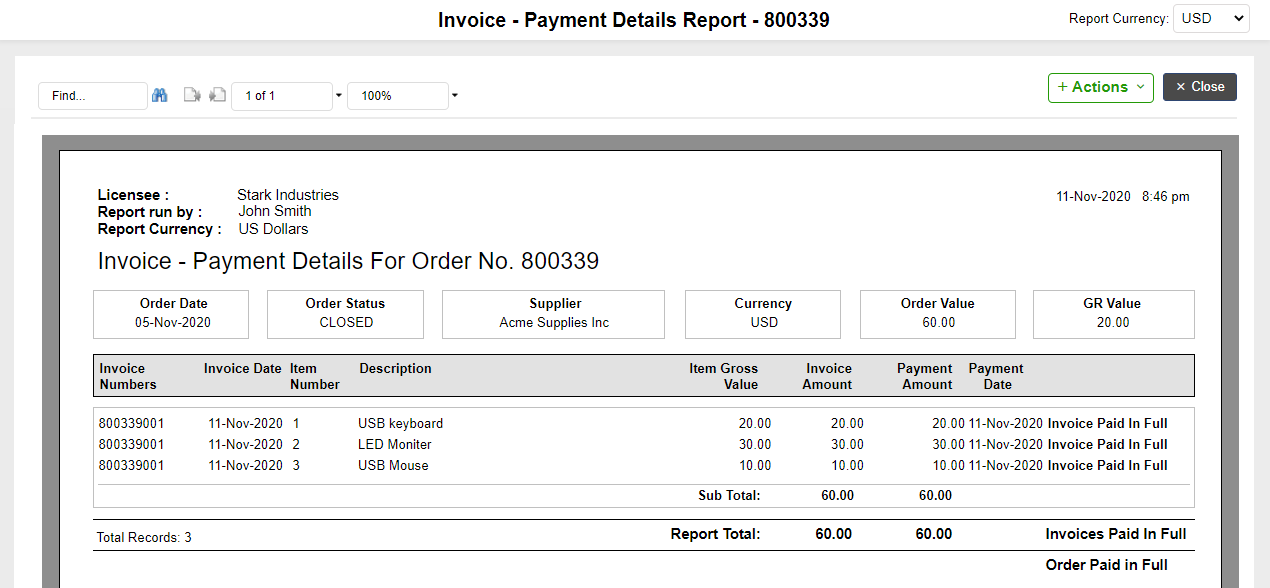
Matching Report shows Item Gross Value, Received Amount, Invoice Amount, Uninvoiced Balance, Payment Amount and Unpaid Balance as
shown in Screen 12.7:Screen: 12.6 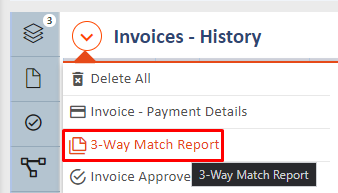
Screen: 12.7 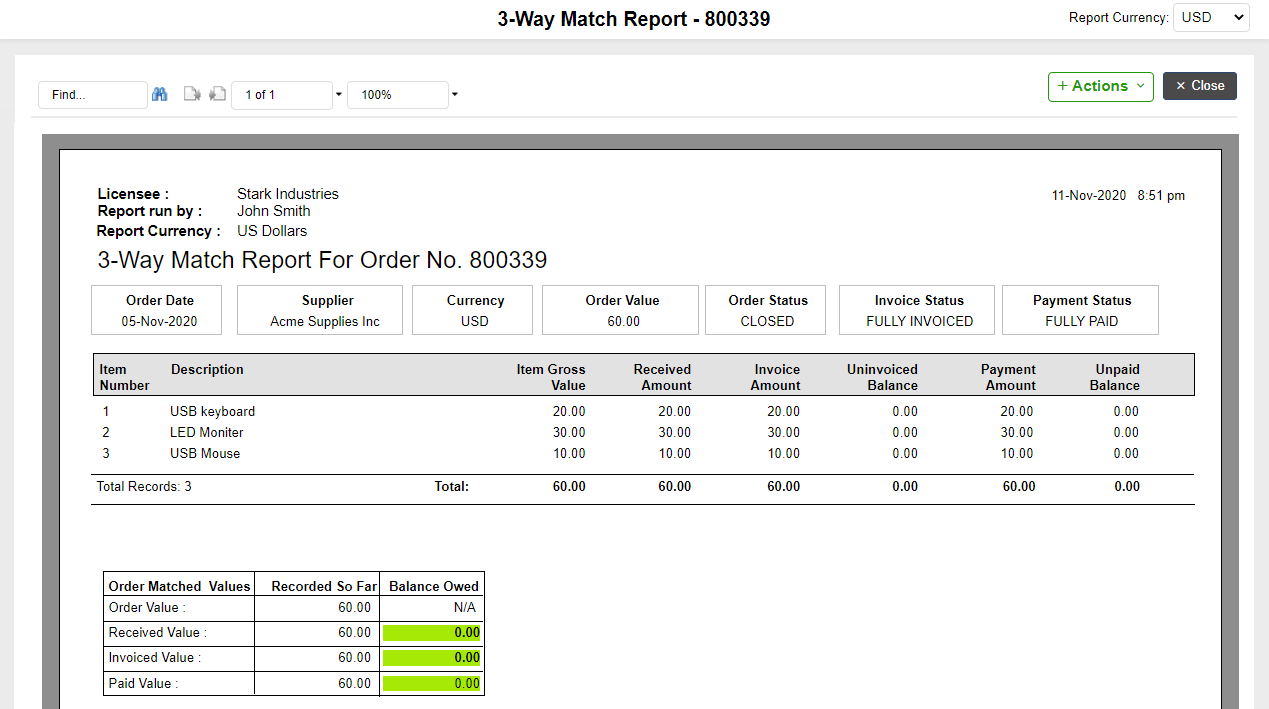
This report can be exported to a PDF, Excel, Word, HTML or RTF and can be printed or emailed.
Other Scenarios:
- If the Invoice Approver rejects the invoice, then the Approval Status next to that line item becomes Rejected and the Invoice Status becomes Invoice Pending.
- If an invoice on line item 1 is approved, its Approval Status shows as Approved. If the invoice for the next line item is sent for approval, the Approval Status next to that line item shows as InProcess and the Invoice Status becomes Invoice Pending.
- If all the invoices are approved and partial payments have been made, then the Invoice Status becomes Fully Invoiced and the Payment Status shows as Partially Paid.
Quick Links I Reports
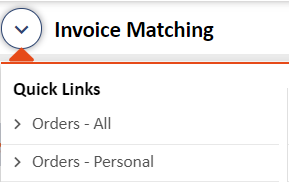
The Invoice Matching Module has its own quick links and reports as shown below:
- Orders All – this will show you all the orders created in the system.
- Orders – Personal - this will show you all the orders that you have created in the system.
-
Invoice Matching Listing – This report will give you details such as Order Number, Order Status, Order Date, Supplier Name and when the order was last updated as shown below:
Screen: 14 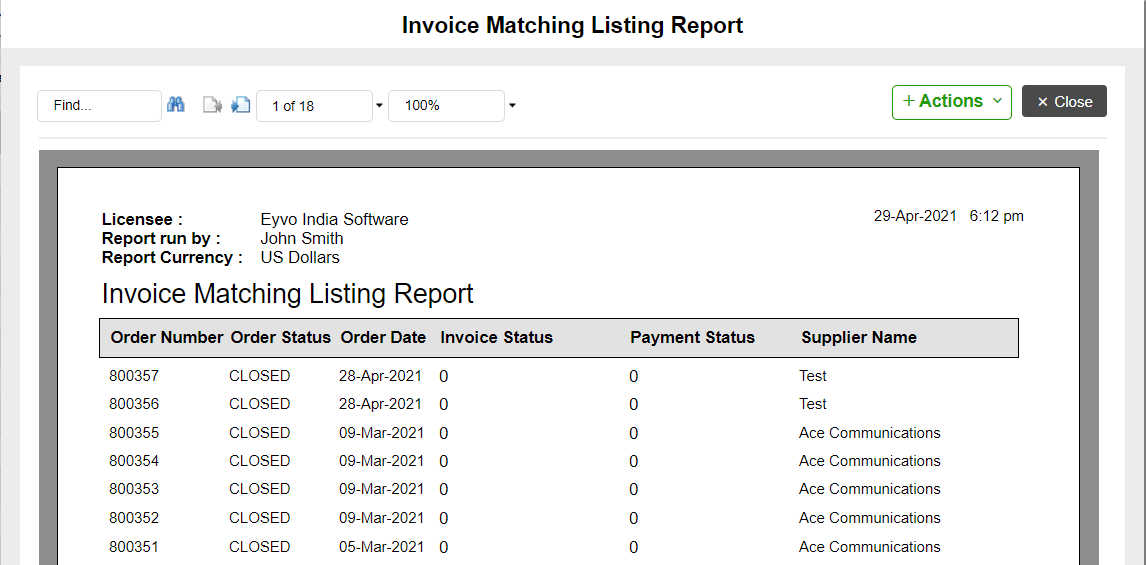
-
Invoice Outstanding Liability Report – this report shows the pending payment balances on the orders as shown below:
Reports
All reports can be exported to a PDF, Excel, Word, HTML or RTF and can be printed or emailed.
Note: We also integrate with third party accounting packages to make payments. The way that works is our system logs in the invoices which through an automated sync process carries the invoice data into the accounting package. Once the payment is made through the accounting package, the sync process once again brings the payment details back into our system thus completing the process and updating the purchase system (eBuyerAssist) as well as the third part accounting package (such as QuickBooks, etc).
INVOICE MATCHING MODULE (APPROVALS OFF)
Eyvo’s eBuyerAssist has an Invoice Module that can be used to log invoices and payments into the system. This helps complete the Purchase-to-Pay (P2P) cycle of a robust eProcurement system and is especially useful to Purchase Managers and Accounts Managers if they are involved in this process.
Invoice Module (System Administrator perspective):
-
To start with, users need to be given access to this module. This can be done by the System Administrator under User Maintenance> User Register for each user as shown in Screen: 1:
Screen: 1 
-
The System Administrator needs to ensure that the Invoice Approver option under Invoice and Payments> Assign Invoice Approver is not checked as shown in Screen: 2:
Screen: 2 
-
The System Administrator can select the type of Invoice System to be defined in the system under Invoice and Payments> Invoice Number Uniqueness as shown in Screen 3:
Screen: 3 
Note: This option can be changed later. However, in most companies, this is defined at the beginning.
Invoice Module (User perspective):
If you have been given the read and write permission to the Invoice Module, you will be, as a user able to see this on the left panel of your system upon logging in. The way invoices will work for you is as shqon below in Screen: 4.
-
You can start by creating your Orders the way you usually do in the system. Once an order is issued, you will see the option for Invoices as highlighted in Screen: I with its 3 sub-sections:
Screen: 4 
-
If your supplier has sent you a copy of the invoice by email, then you can add the invoice document into the system by clicking on Attached Invoices> Attach Documents as highlighted in Screen 5.1 to see Screen 5.2:
Screen: 5.1 
Screen: 5.2 
Note: You can browse for the file and attach it or click on File URL Upload as well.
Screen: 5.3 
Click on Save once done.
You can also attach a document to be read using the OCR technology, The OCR technology also known as Text Recognition enables the system to scan and read documents for further processing. To attach, click on Attach with OCR as shown on the below Screen to see Screen 5.4
Screen: 5.4 
Drag and drop the Invoice file and allow the system to read it. This may take up to a few minutes.
Screen: 5.5 
Once the system has read the invoice document, it will show you the Invoice Amount, Invoice Date and Invoice Number as shown on Screen. These details are mandatory and have been picked up by the system from the invoice.
Screen: 5.6 
If the details that the system has read are correct, the click on Create Invoice to see Screen 5.7.
Screen: 5.7 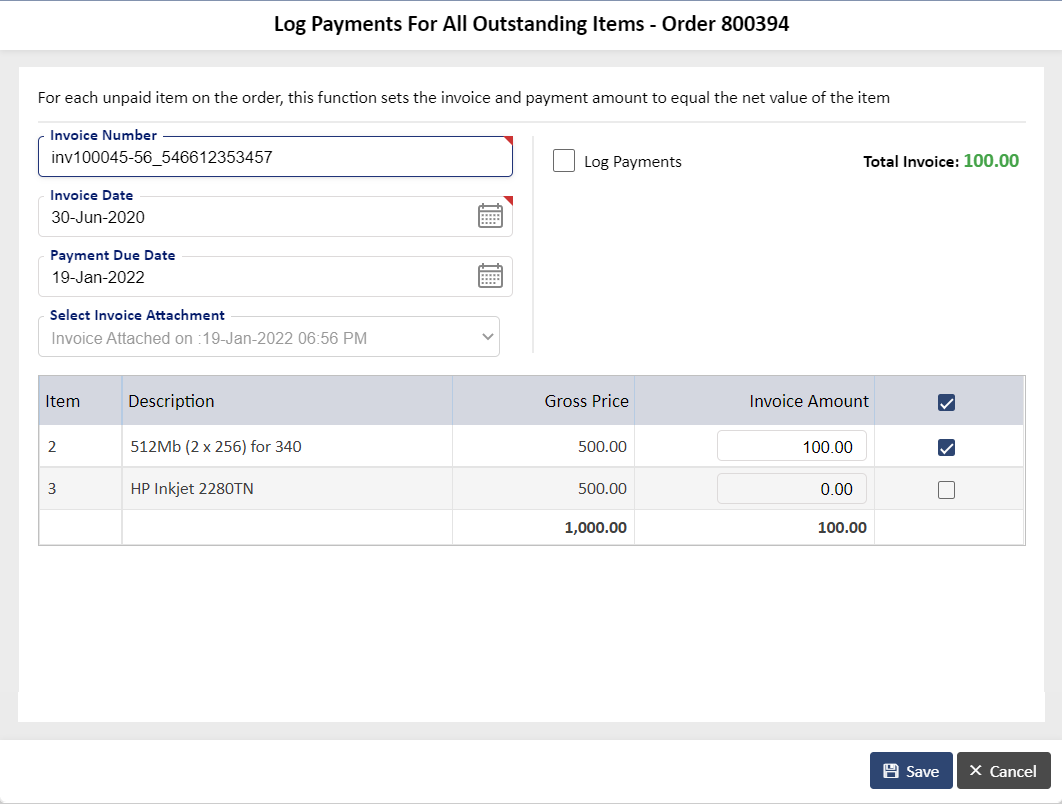
However, if the system has not read the details correctly or details are missing then you can manually enter these details and then click on Save Buttton. These fields are mandatory so they must have a value.
-
The option Invoice Recording/Review allows you to log an invoice against individual items or log an invoice against all the items collectively. It also shows you the invoice and payment breakup.
- To log an invoice/payment for individual items, click on the Log Payment for Item icon as highlighted on Screen 6.1.
Screen: 6.1 
You can add the invoice and payment details and select the invoice attached earlier as highlighted in Screen 6.2. You will notice that the Invoice Status and Payment Status on the order show as Not Invoiced and Not Paid respectively till invoices/payments are logged.
Screen: 6.2 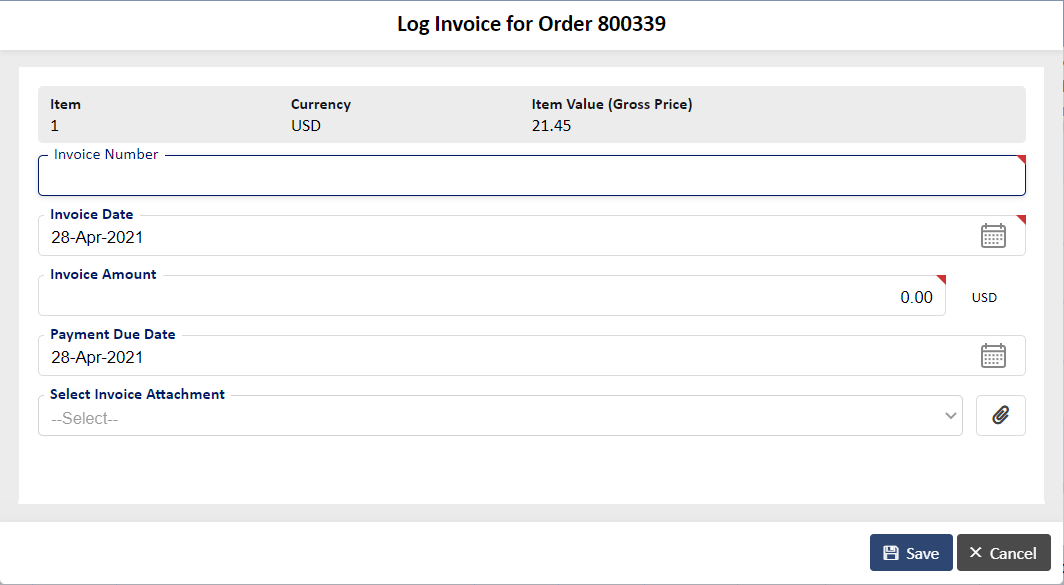
Note: The invoice and payment amount can be the entire Gross Price or a partial amount as well. The option to select an existing invoice will show only if invoices are attached. If not, this option will be disabled.
-
You can also choose to only log only invoices and not payments. To do so, uncheck the box next to Make Payments as highlighted in Screen 6.2 to see only invoice details as shown in Screen 6.3:
Screen: 6.3 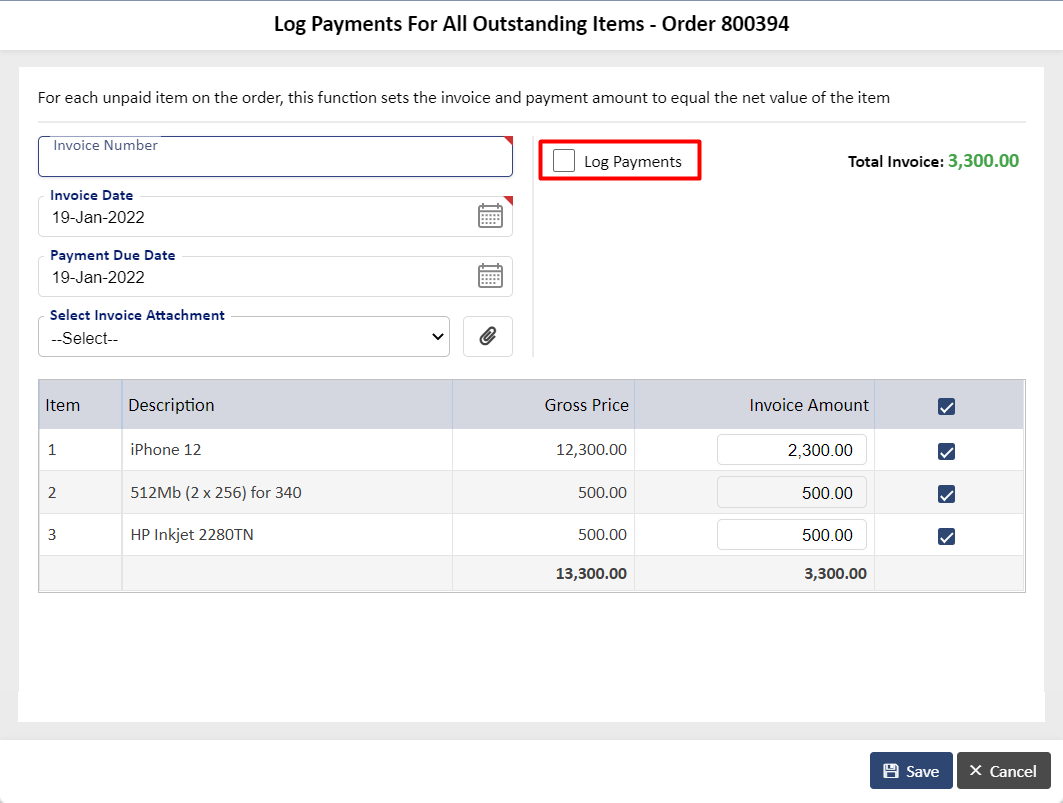
-
You can also log one invoice and payment for all the items by clicking on the Log Invoice button under Invoices> Invoice Recording/Review as shown in Screen 7.1 to see Screen 7.2:
Screen: 7.1 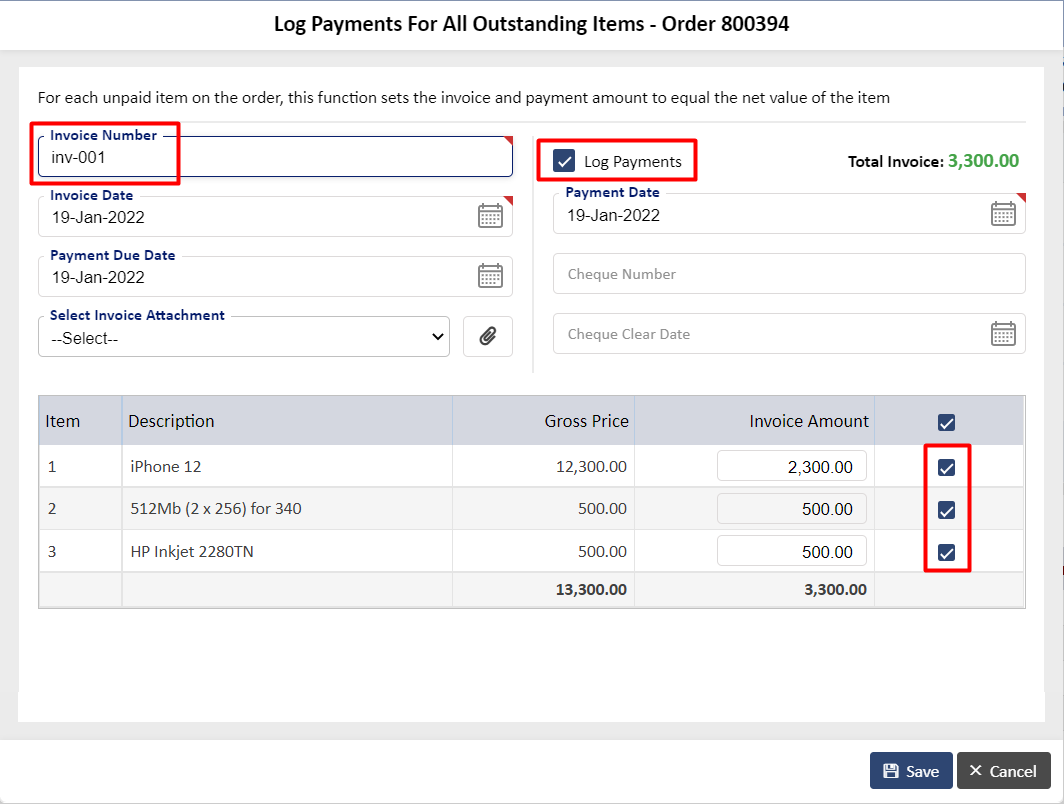
When you add the invoice and payment details, you can also attach an invoice attachment by clicking on the 'Attach New Invoice' icon as highlighted in Screen 7.2:
Screen: 7.2 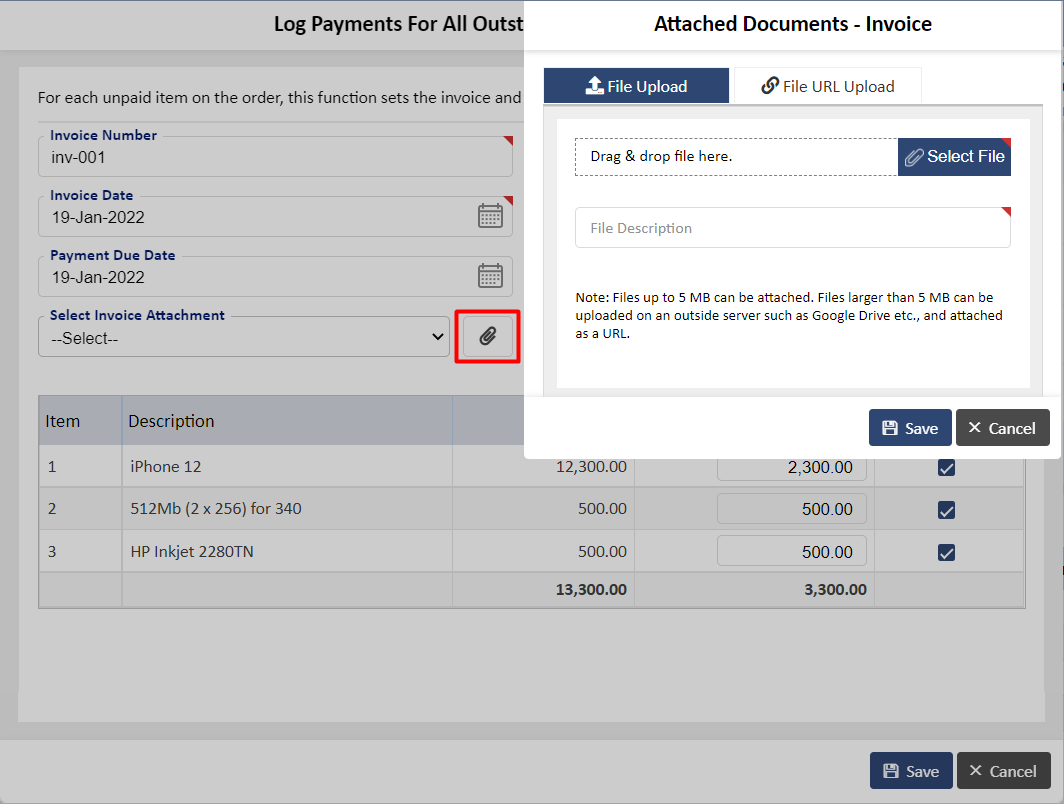
For this document, we will proceed with the above option of logging an invoice and making a payment against all the items for the entire amount.
Note: Once this is done, the status of the Invoice and Payment on the Order will change to Fully Invoiced and Fully Paid respectively.
- To log an invoice/payment for individual items, click on the Log Payment for Item icon as highlighted on Screen 6.1.
-
The third option under Invoices is History. You can see the details of each item by clicking on the green button next to each item as highlighted in Screen 8.1:
Screen: 8.1 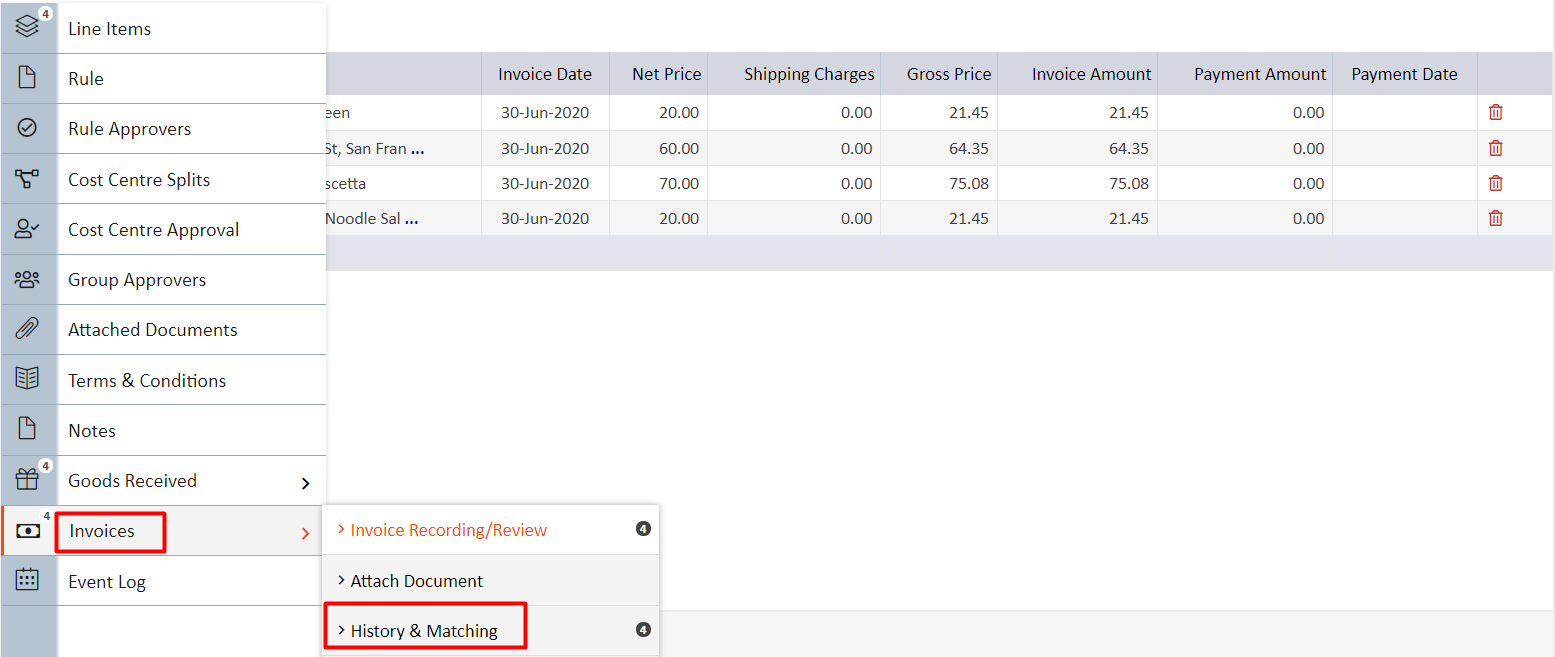
Note: You can also delete the invoices/payments made for a line item by clicking on the delete icon next to it. You can log details in once again.
Screen: 8.2 
Screen: 8.3 
Here you can see the details entered earlier.
-
You will also see a 3-Way Match Report under History as shown in Screen 9.1 to see details in Screen 9.2:
Screen: 9.1 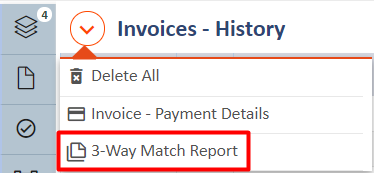
Screen: 9.2 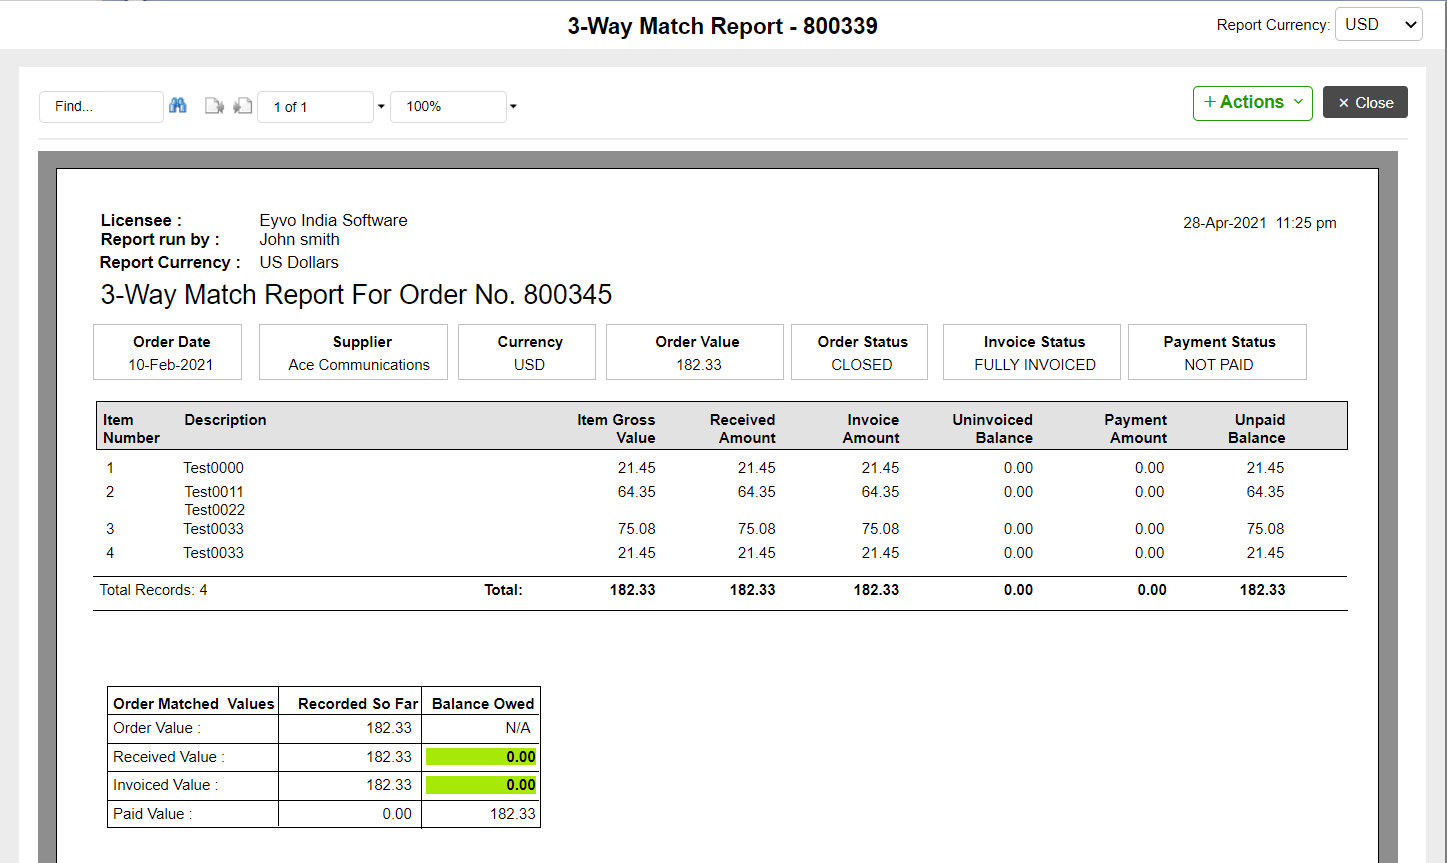
This report shows the Item Gross Value, Invoice Amount and Payment Amount and can be exported to a PDF, Excel, Word, HTML or RTF and can be printed or emailed.
External Invoice
A dynamic invoice email system with OCR automates the extraction of invoice data from email attachments. It involves parsing incoming emails, extracting invoice files, applying OCR to convert them into text, extracting relevant information, generating an invoice, and logging it into the system. The system streamlines the invoice processing workflow and improves efficiency.
1. The system administrator should login to the system and navigate to the Invoice And Payment-> External Invoice - OCR. The initial step in this process would be to switch on the “Invoice Email” switch, as shown in the screen below. Clicking on 'Invoice Email' will display two options: Auto Generated Email and Generic Email.

2. The system administrator should select the 'Generic Email' radio button to activate it. This will allow the system to create a company-specific email ID that suppliers can use for sending invoices, as shown in the screen below.

3. The system administrator should then select an External Invoice Validator by clicking on the highlighted dropdown menu, as shown in the screen below. The External Invoice Validator will receive all invoices sent by the supplier using the generic email. The Validator can manually adjust any invoices that do not match the existing order or have failed for specific reasons.

3.1. If the system administrator wants multiple External Invoice Validators in the system, they can select users under 'Additional External Invoice Validator'. These users will have the same features and functionality as the primary External Invoice Validator. Click on the folder icon to add user(s) as Additional External Invoice Validator'.

4. The “Allow external invoice validator to create Invoices” switch allows the External Invoice Validator to log invoices into the system, as shown in the screen below. In the above scenario, Brie Jameson is the External Invoice Validator and the user will receive all the invoice emails from the supplier.

5. The system administrator should then toggle the 'Using OCR' switch to 'ON' to enable the system to read supplier email invoices and extract values using OCR technology, as shown in the screen below.

6. This will then open up the “Auto Log Invoice” switch and turning it “ON” allows the system to automatically log invoices with the correct order number and unique invoice number, as shown in the screen below. When an Invoice is received in PDF format via the Generic Email ID, the system will process it using OCR technology to extract and match it with the corresponding PO number in the system. Upon a successful match, the Auto Log Invoice feature will automatically log the Invoice on behalf of the Buyer linked to the Order. Simultaneously, notifications about the logged Invoice will be sent to both the External Invoice Validator and the Buyer. The External Invoice Validator will still access the invoice record in the external invoice section.

7. If the 'Auto Log Invoice' switch is turned off, all invoices sent by suppliers will appear on the External Invoice Detail Listing page, and the External Invoice Validator will need to log each invoice manually. Once all the switches have been turned on, the user will need to click on the “Save” button as shown in the screen below. For demonstration purpose, we have turned off 'Auto Log Invoice' switch.

'Auto Log Invoice' switch is turned off
8. In the main application, when the buyer issues an order, the order status will change to 'Issued,' and the invoice status will show as 'Not Invoiced.' The user can also view the 'Invoice To' field, which contains the generic email ID for suppliers to send invoices, as shown in the screen below.
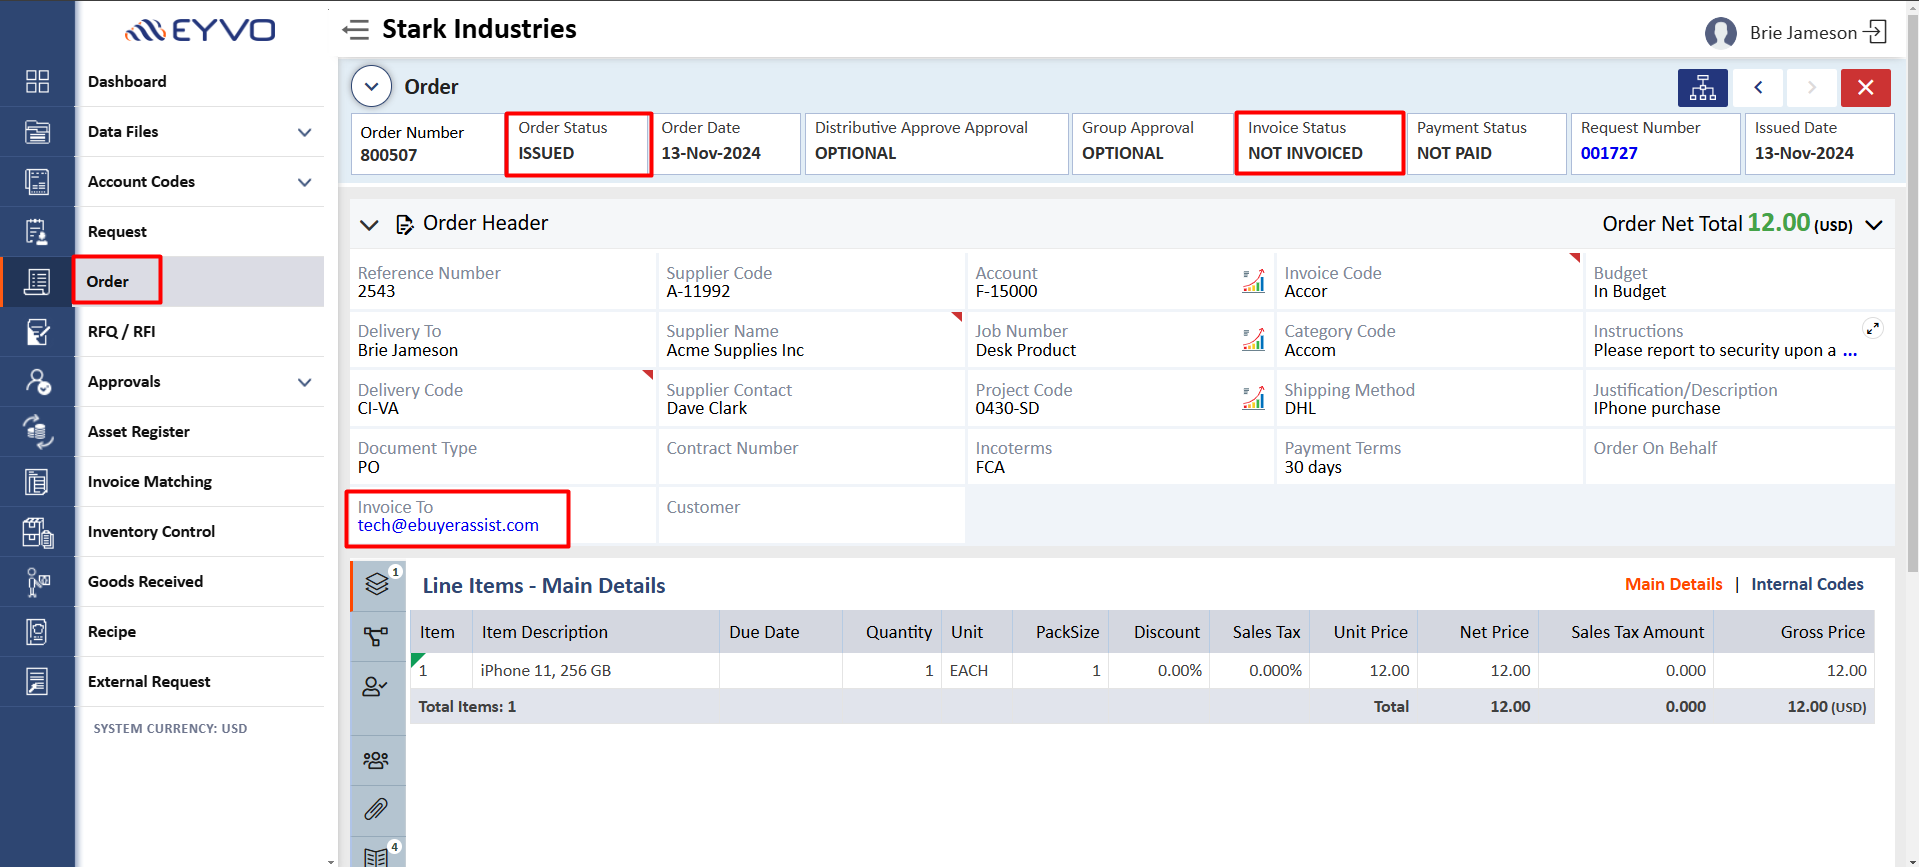
9. When the supplier sends an invoice PDF with the correct order number and a unique invoice number, the system will log the invoice under the specified order number and send an email notification with the attachment to the External Invoice Validator, as shown in the screen below.
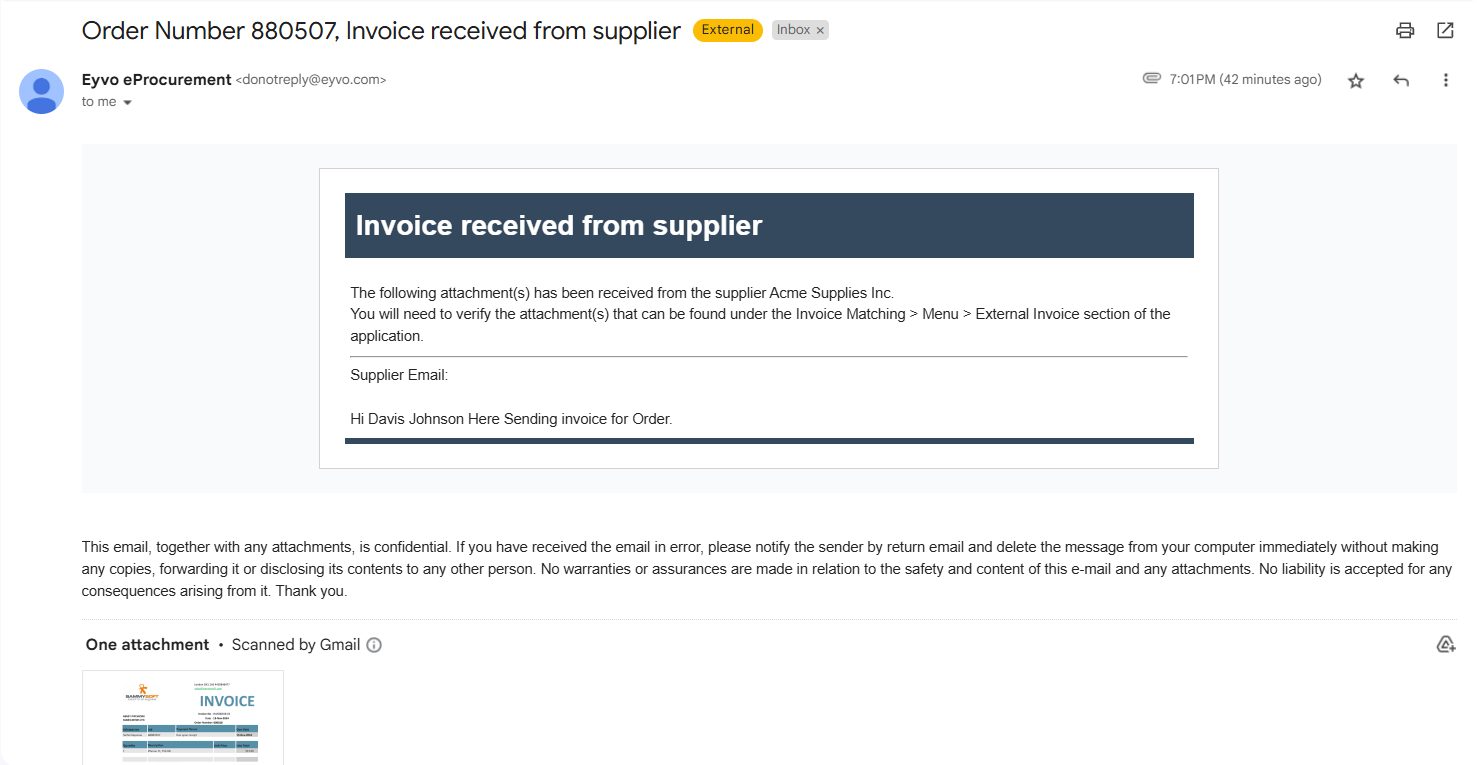
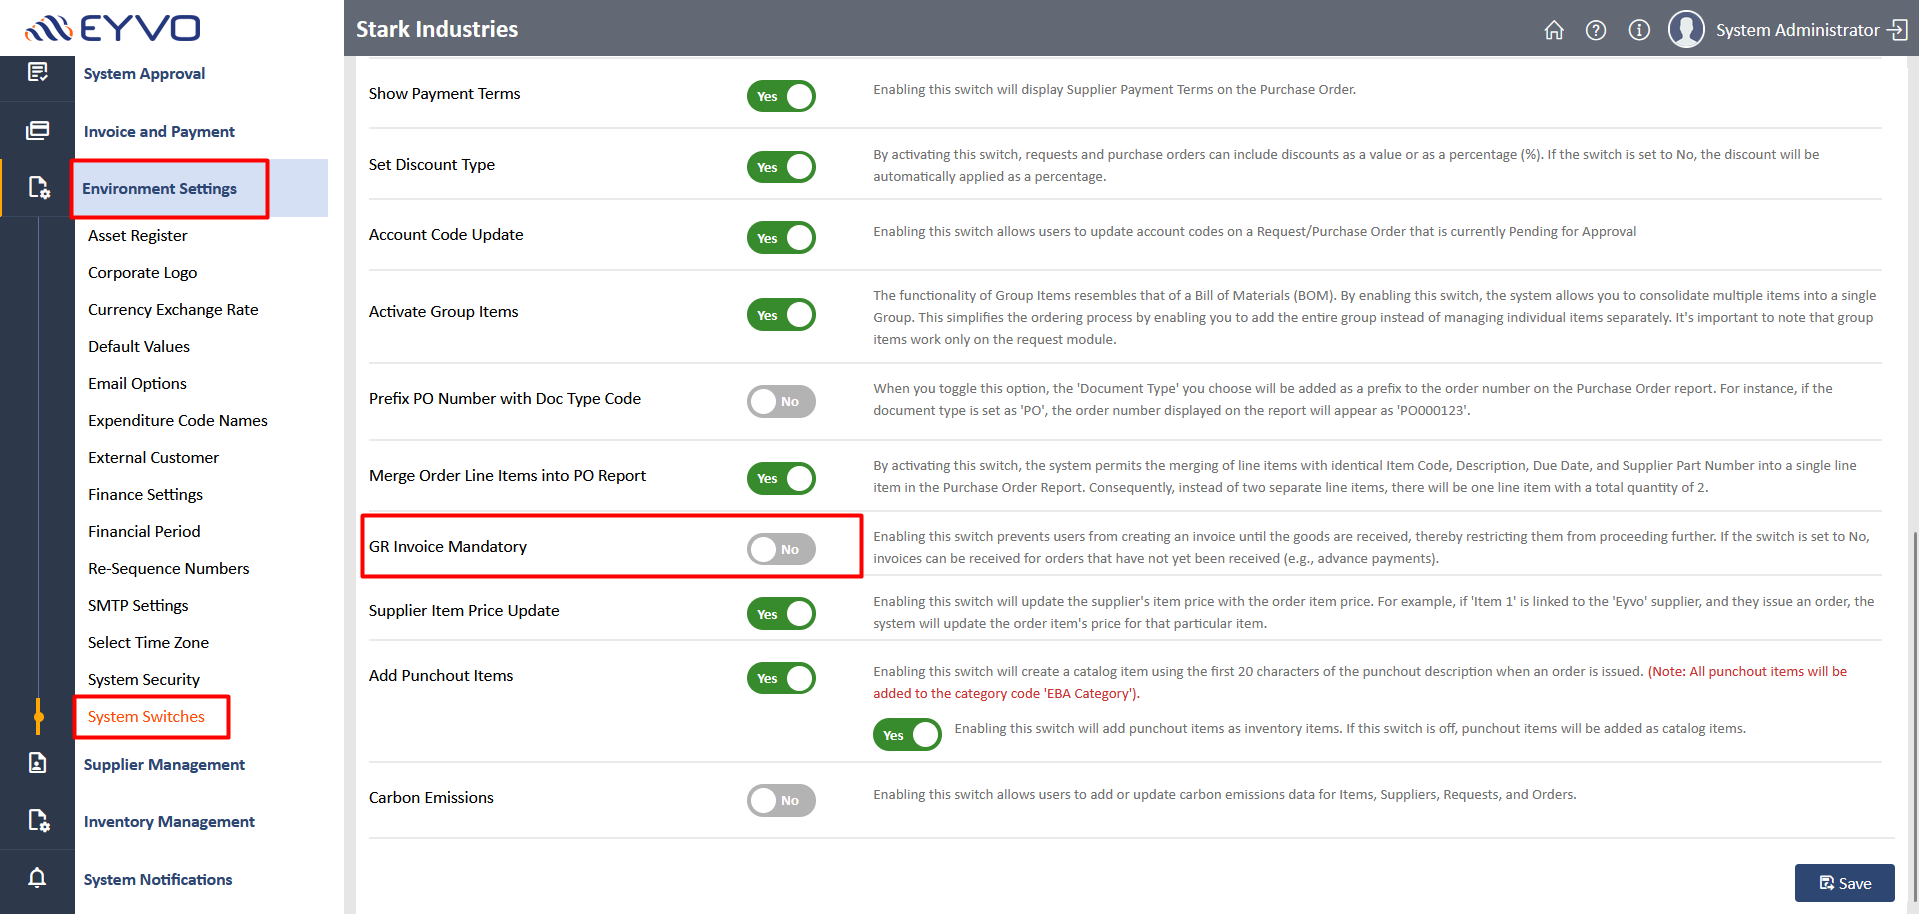
Note: If the company prefers to receive invoices from the supplier only after the goods have been received, they can activate the "GR Invoice Mandatory" switch. Enabling this switch allows the user to log the invoice in the system only after the items have been received. For turning this switch on, the system administrator should login to the system and navigate to the Environment Settings-> System Switches-> GR Invoice Mandatory switch. For demonstration purposes, we have currently disabled the "GR Invoice Mandatory" switch.
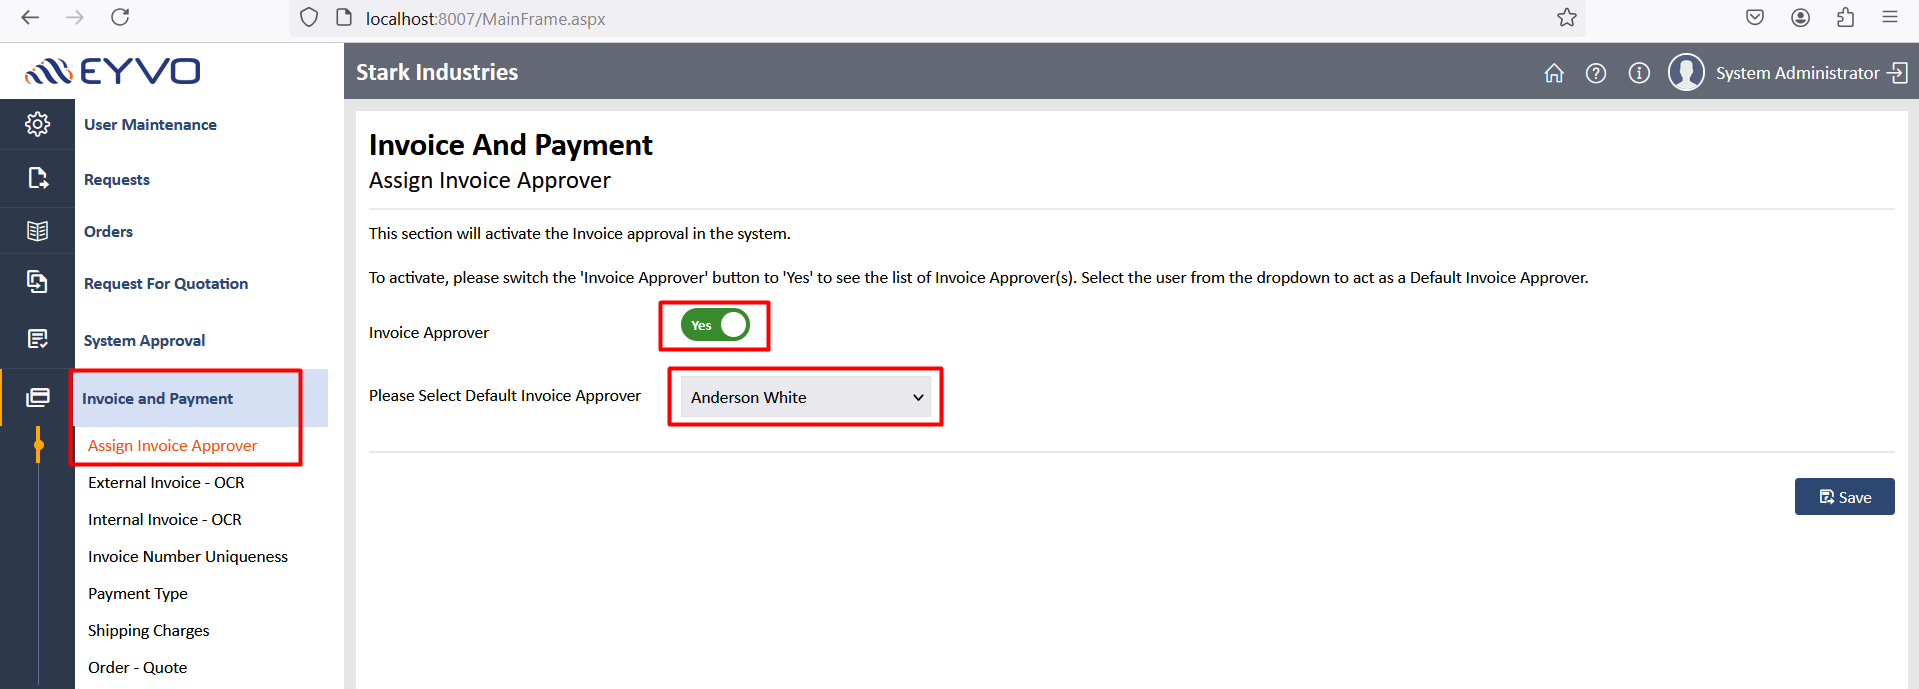
Similarly, if the company wants to enable the 'Invoice Approver' switch, which allows the invoice approver to approve or reject invoices, the system administrator must log in, go to Invoice and Payments -> Assign Invoice Approver, and select an invoice approver.
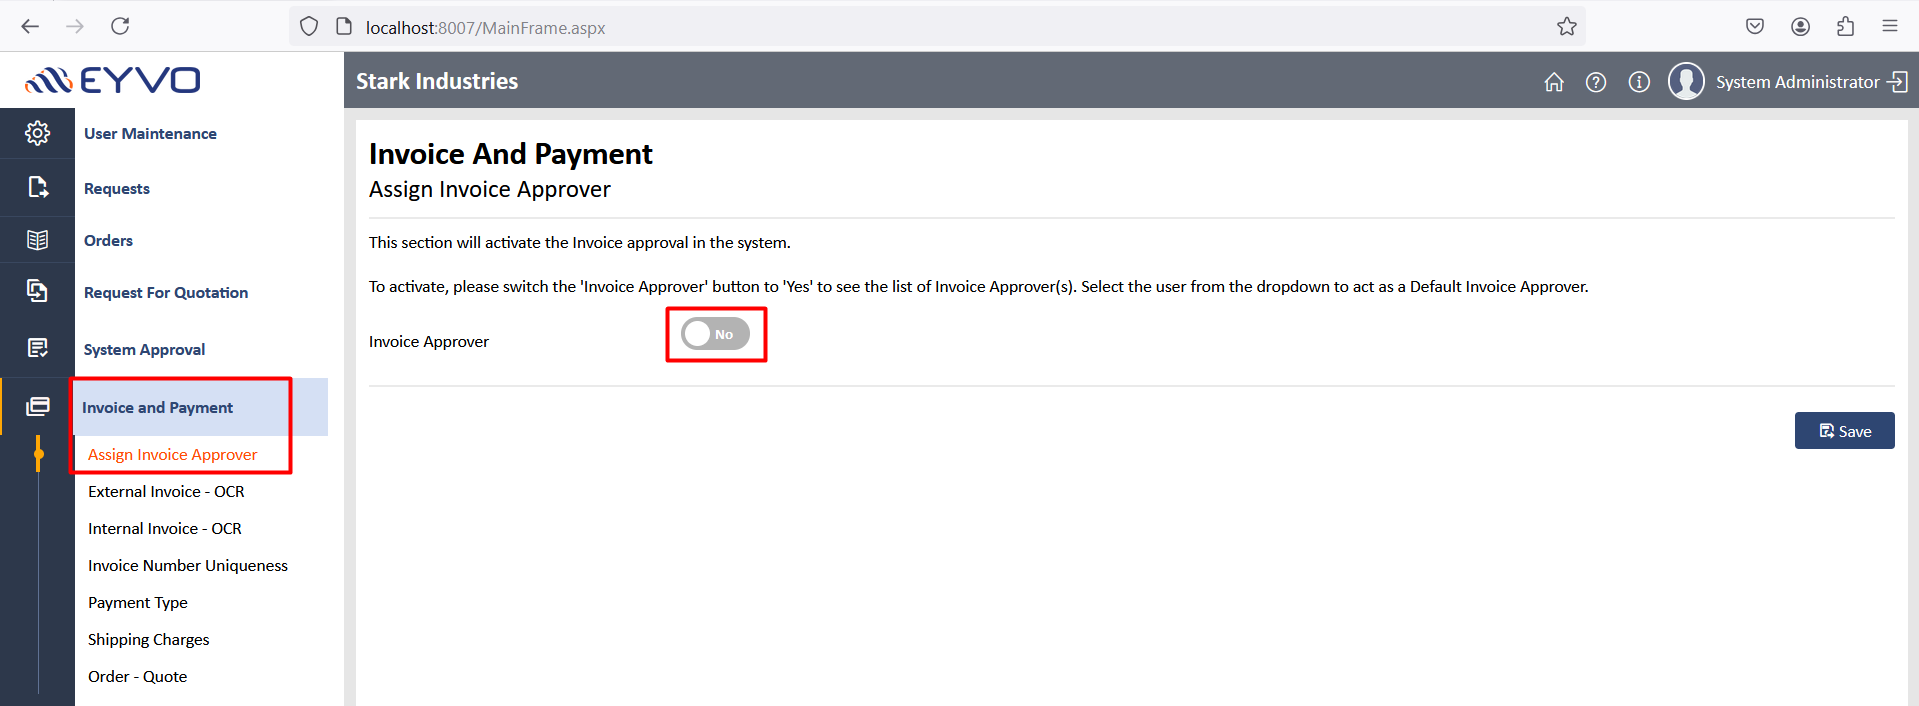
Likewise, if the company does not require the invoice approval process, the system administrator should leave the 'Assign Invoice Approver' switch disabled.
For demonstration purposes, we have currently enabled the "Assign Invoice Approver" switch.
10. The External Invoice Validator should log in to the Main Application, go to the Invoice Matching Module-> click on the dropdown icon-> select 'External Invoice' to review the invoices sent by the suppliers, as shown in the screen below.

11. On the External Invoice Detail Listing page, the External Invoice Validator can view & download the supplier’s sent PDF, along with order and invoice details. Based on the received invoice PDF, the system displays three statuses: 'Assigned,' 'Failed,' and 'Invoiced, as shown in the screen below.
We have provided detailed explanations of all three statues below.

Assigned Status
12. The file status will display 'Assigned' status when the scanned invoice includes an order number that matches the order number in the system. Additionally, the Reason/Result field will indicate that the invoice has been scanned and order has been matched. The system will extract the order number and invoice number from the invoice PDF using OCR technology, while it will retrieve the order status, reference number, supplier name, and buyer name from the order, as shown in the screen below.

13. When the External Invoice Validator clicks on an 'Assigned' record, the system will display the scanned 'Invoice PDF' on the left side and the matched 'Order PDF' on the right side of the page. The invoice details shown are extracted from the invoice PDF. The External Invoice Validator can modify this information if needed and must click 'Confirm' to proceed, as shown in the screen below.
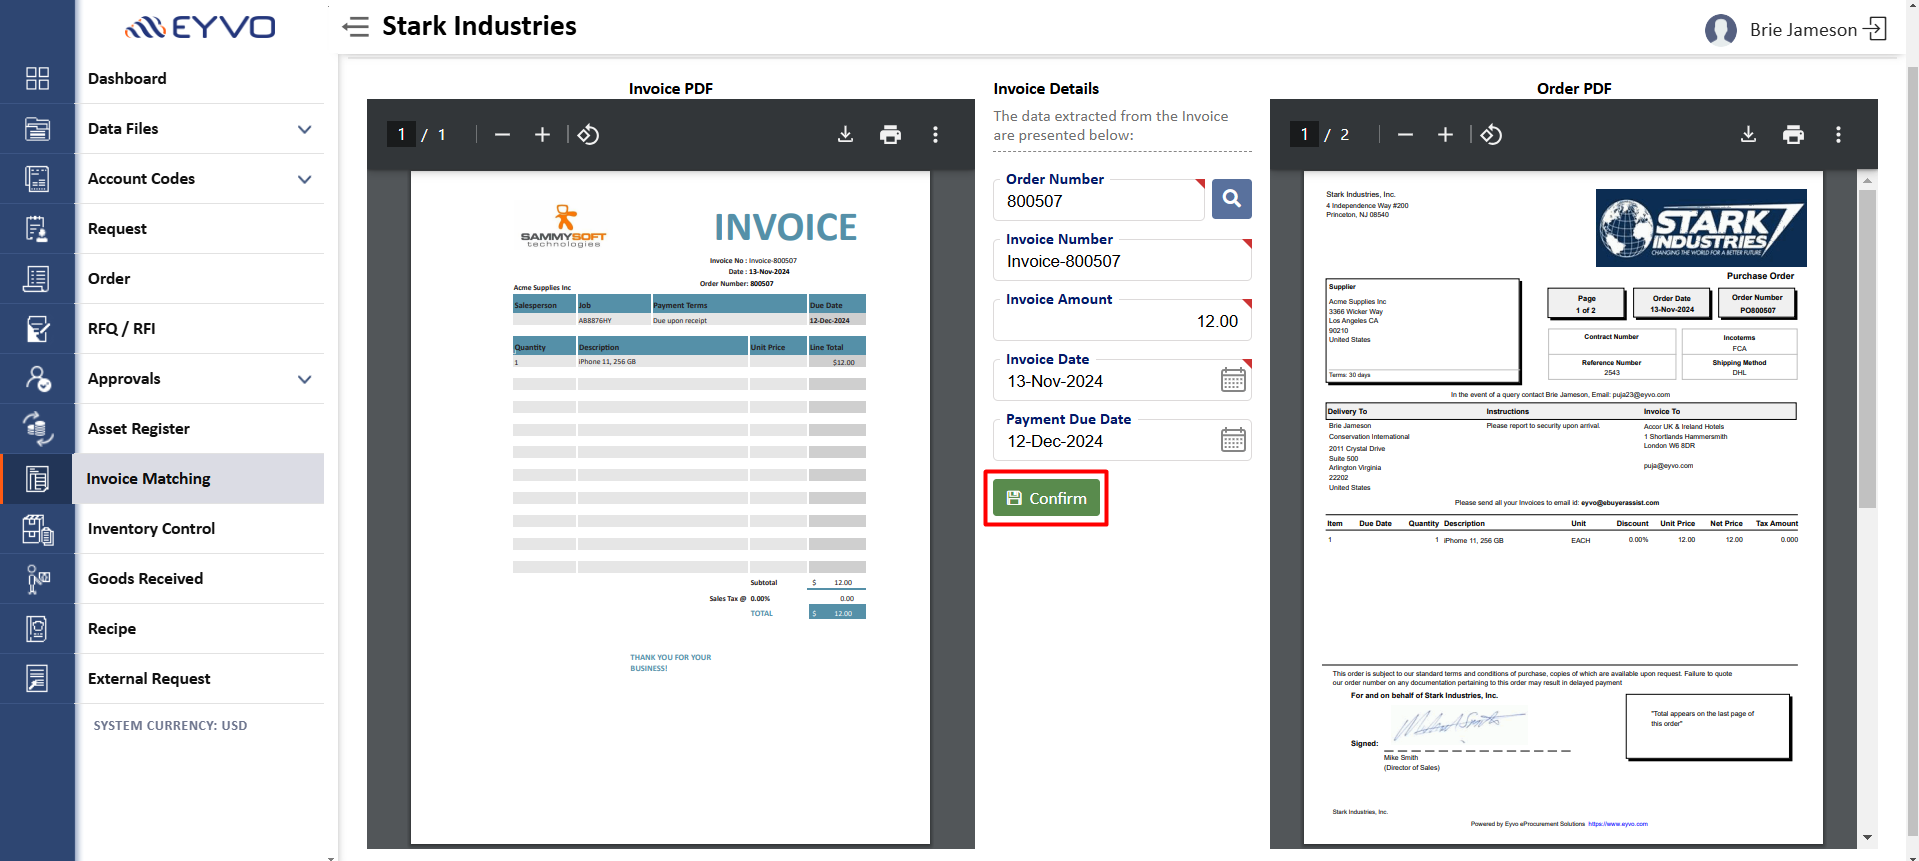
14. Upon clicking the 'Confirm' button, a pop-up will appear for confirmation. Click 'OK' to proceed, as shown in the screen below.

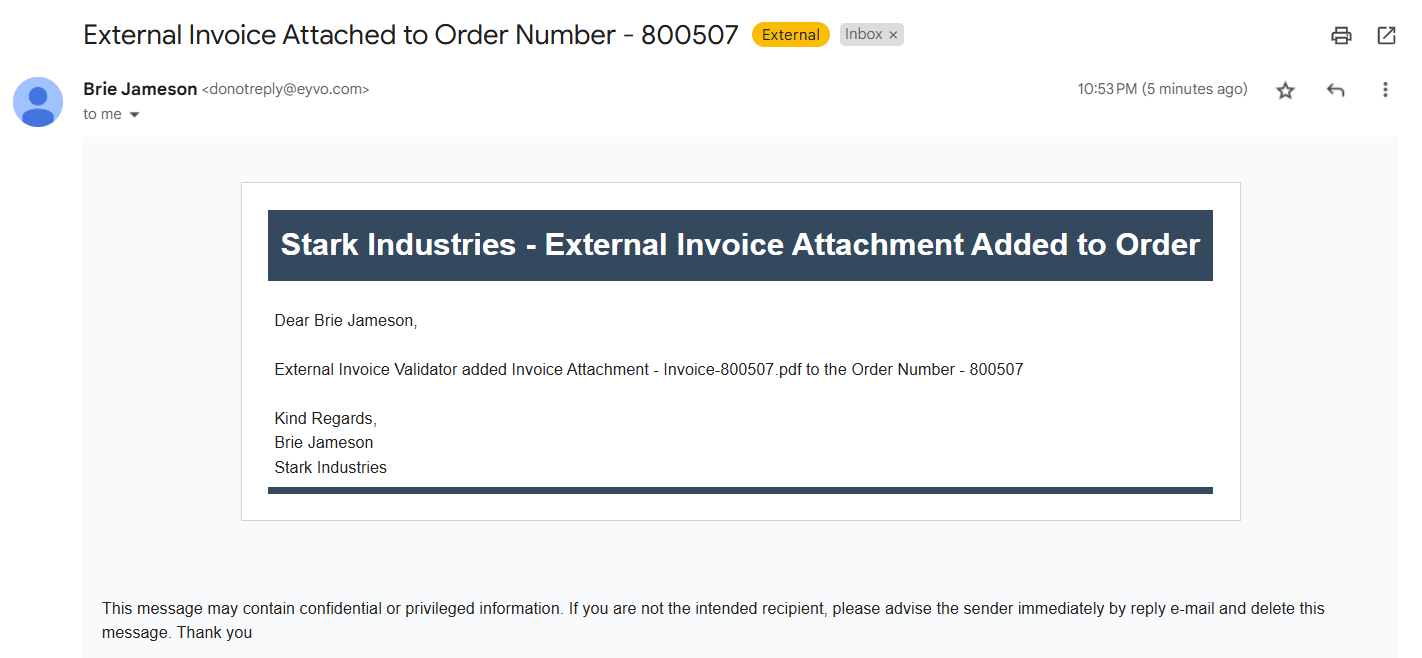
15. After the External Invoice Validator confirms the action, an email will be sent to the buyer, notifying them that the External Invoice Validator has added an invoice attachment to the order, as shown in the screen below.
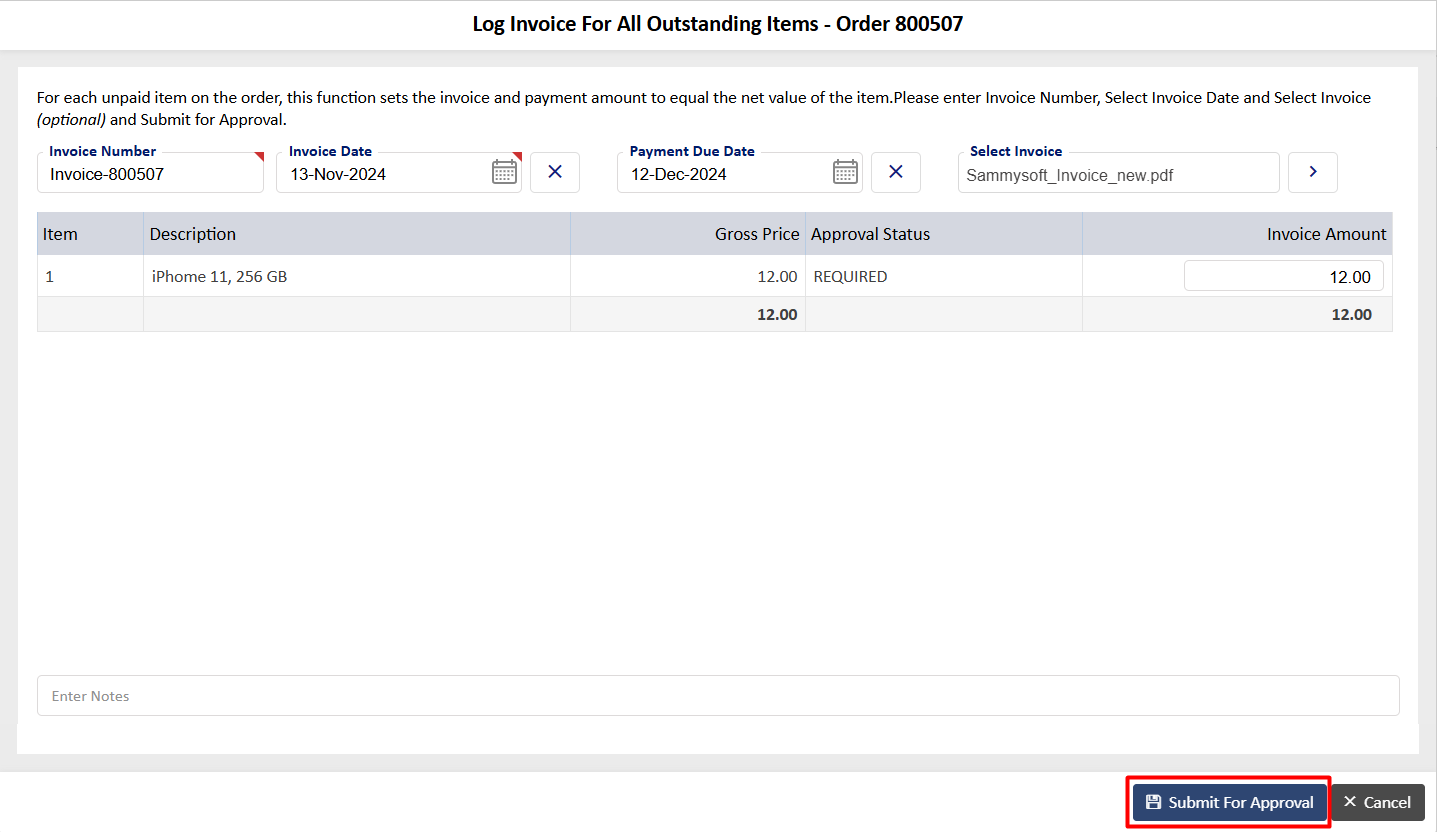
16. For demonstration purposes, we have enabled the swith to allow the External Invoice Validator to log the invoice, as shown in Point 4. The validator can now view the screen below, where they can access the invoice PDF by clicking on the 'View Attachment' icon. They may also modify the invoice number, invoice date, payment due date, and invoice amount if needed, and should then click the 'Submit for Approval' button, as shown in the screen below.
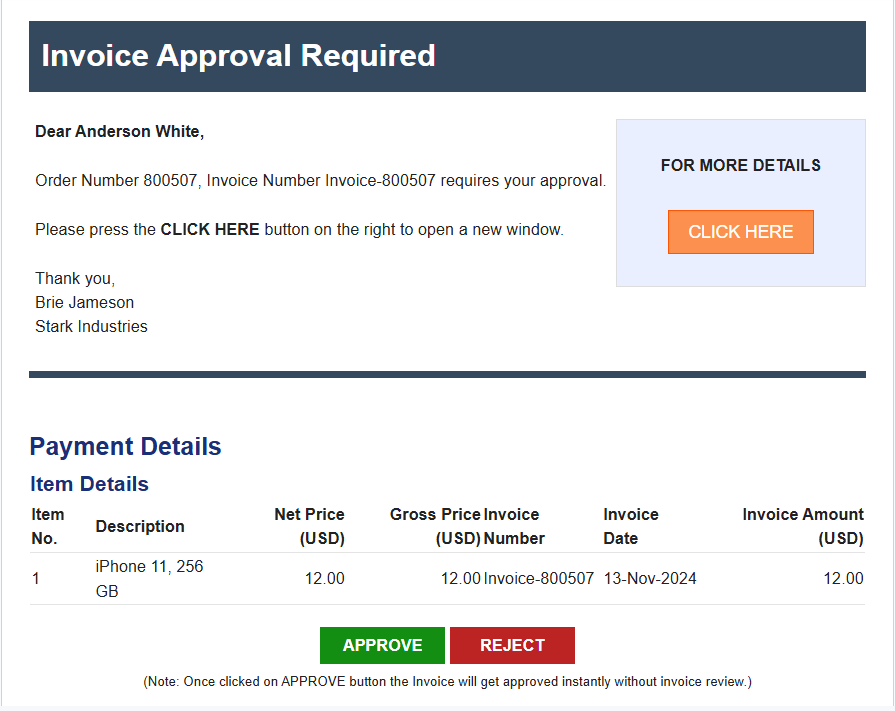
17. Upon clicking 'Submit for Approval', an email will be sent to the Invoice Approver, allowing them to either approve or reject the invoice, as shown in the screen below.
18. On the External Invoice Detail Listing, once the invoice is sent for approval, the File Status will update to 'Invoiced'. Additionally, the Reason/Result field will indicate that the invoice has been scanned and logged, as shown in the screen below.

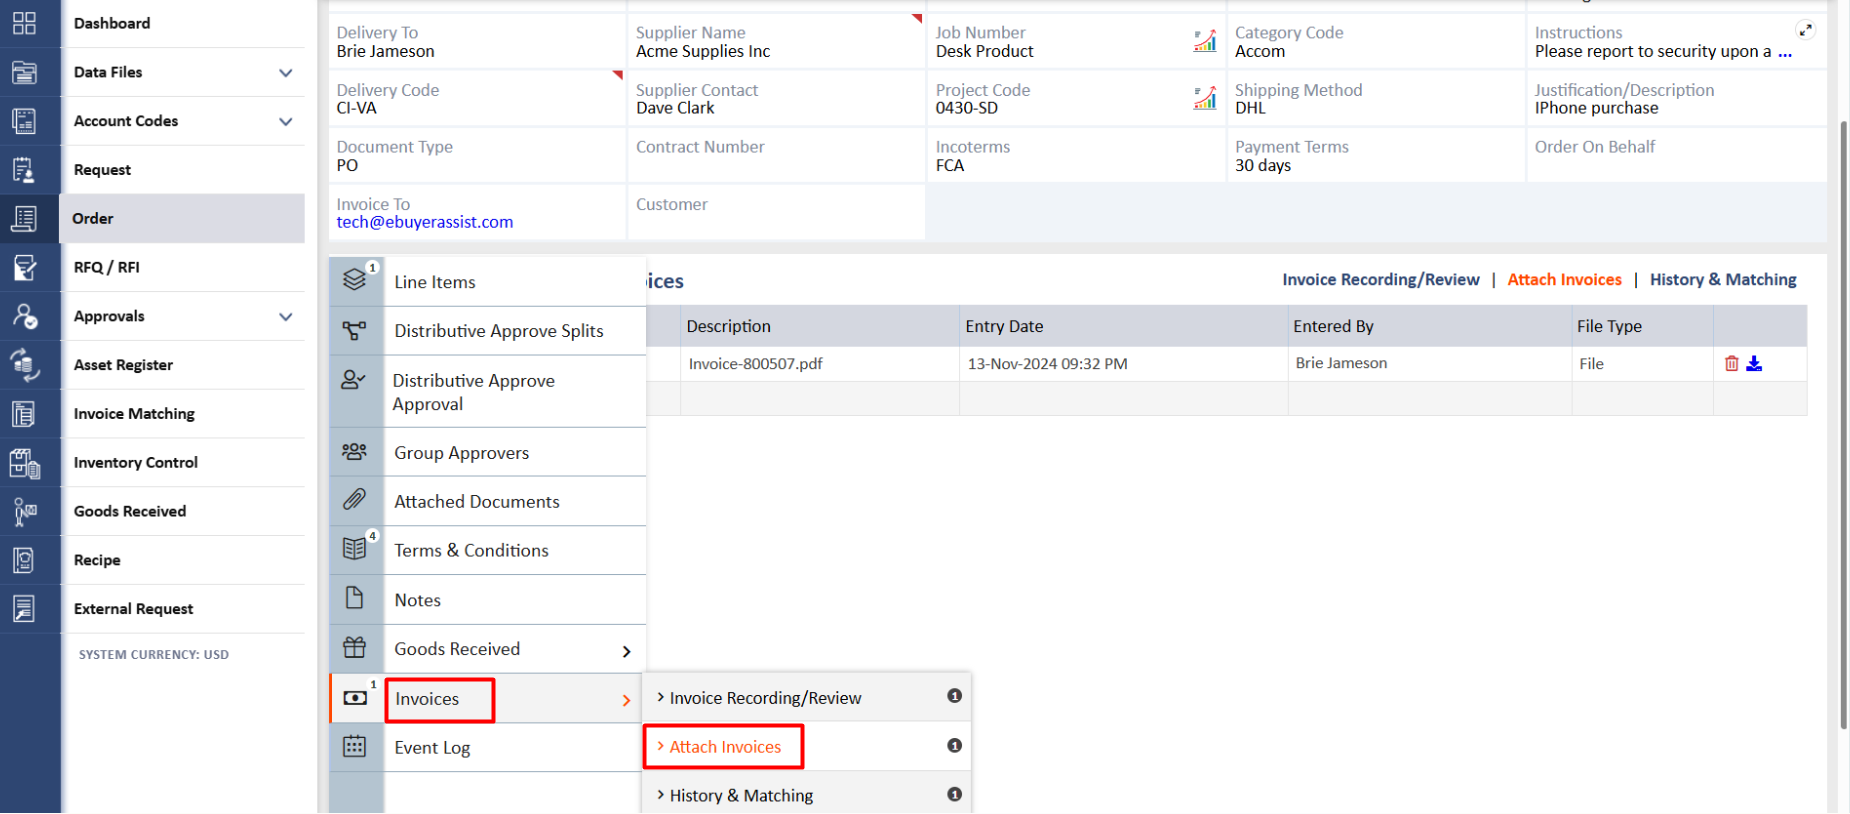
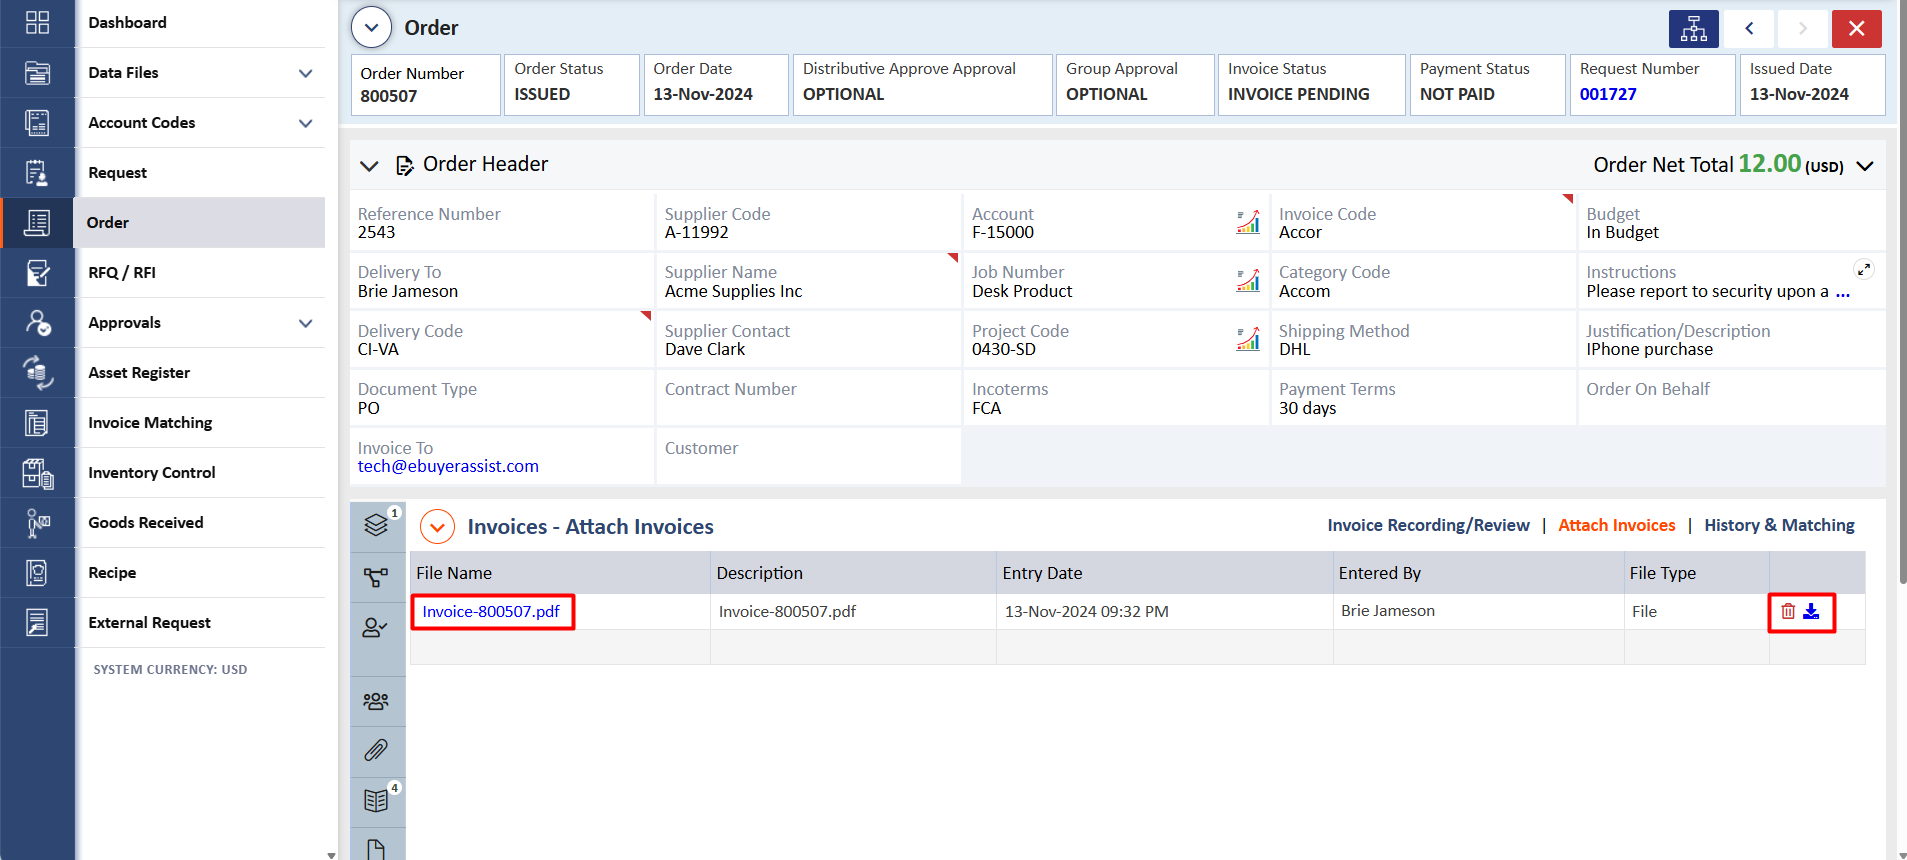
19. The invoice PDF attached by the External Invoice Validator will be visible under the Invoices-> Invoices - Attach Invoices section, as shown in the Screen: 19. The attached pdf is highlighted on the left side & the pdf could also be “Deleted/Downloaded” using respective icons highlighted on the right side of the screen, as shown in the Screen: 19.1.
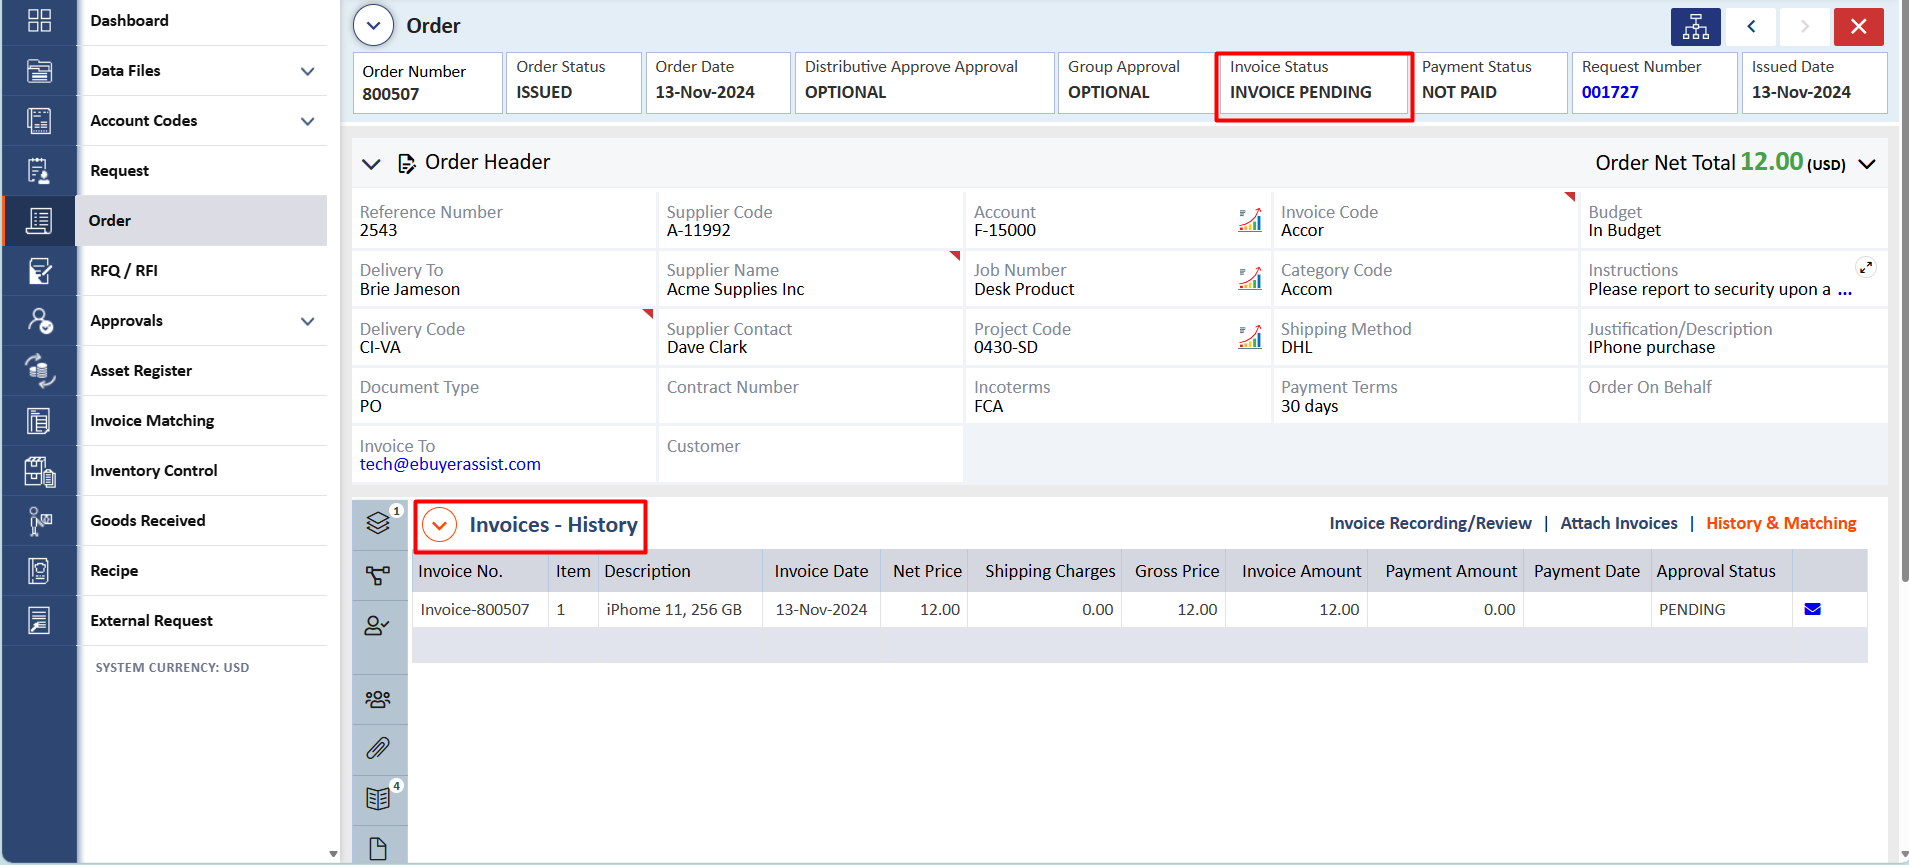
20. Similarly, the invoice submitted by the External Invoice Validator will change the invoice status to 'Invoice Pending', and the invoice will be visible under the Invoices -> Invoices - History section, as shown in the screen below.
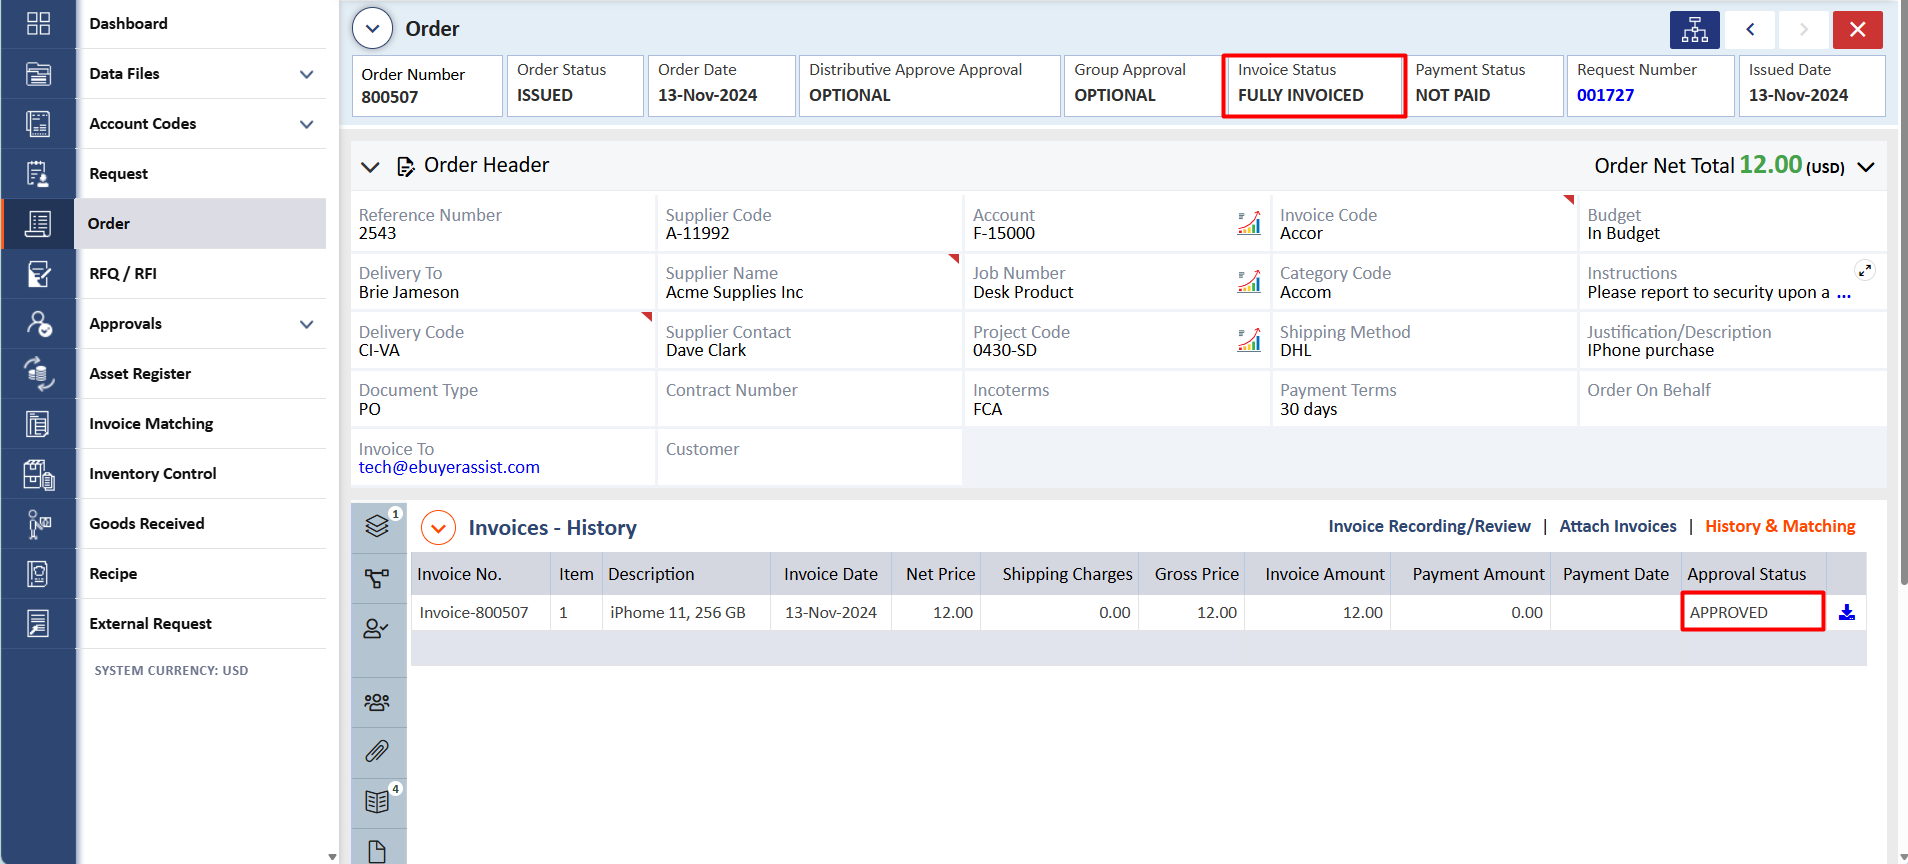
21. The invoice status will be seen in 'Invoice Pending' until the invoice approver either approves or rejects it. If the invoice approver approves the invoice, the invoice status will update to 'Fully Invoiced', as shown in the screen below. Incase, if the invoice approver rejects the invoice, the invoice status will change to 'Invoice Rejected'.
Note: If the invoice approval switch is off, when the External Invoice Validator creates an invoice from the external invoice page, the invoice status will automatically change to 'Fully Invoiced' if the invoice amount matches the gross price.
If the invoice amount is lower than the order's gross price, the status will be 'Partially Invoiced'.
If the invoice amount exceeds the order's gross price, the status will be 'Over Invoiced.
Failed Status
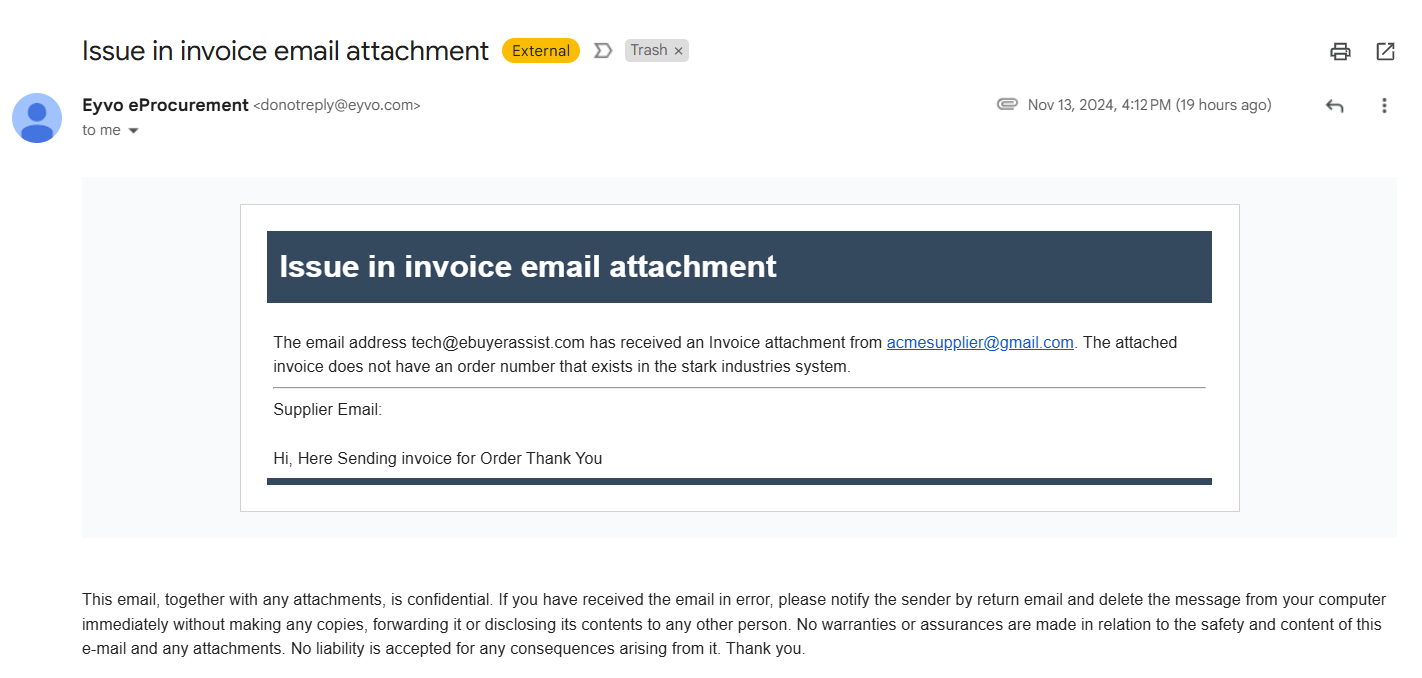
22. The file status will display as 'Failed' if the scanned invoice contains an incorrect order number that does not exist in the system, or if the order number is missing from the PDF. Additionally, the Reason/Result field will indicate that the order does not exist in the system. The system will extract the order number and invoice number from the invoice PDF, as shown in the screen below.

Below are some other reasons of “Failed” invoice status:
23. The External Invoice Validator will receive an email notification, informing them about an issue with the invoice attachment. The email will include the specific failed reason, as shown in the screen below.
24. When the External Invoice Validator clicks on a 'Failed' record, the system will display the scanned 'Invoice PDF' on the left side of the page. The invoice details shown are extracted from the invoice PDF using OCR technology, and the External Invoice Validator can modify this information if necessary. On the right side of the screen, the validator will see a message stating 'No Order Found,' indicating that the order number does not exist in the system. The validator will then have the option to create an order for the same invoice by clicking the 'Create Order', as shown in the screen below.
25. When the External Invoice Validator clicks on 'Create Order,' a page will open displaying all the 'Invoice Details' and 'Line Details,' with the invoice information extracted from the invoice PDF. The 'Item Details' section includes the expenditure fields 4, 5, and 6, while the 'Header Details' shows the order's gross price, which will match the invoice amount, along with expenditure fields 1, 2, and 3. The External Invoice Validator can modify any of these fields if needed. Additionally, the validator has the option to select the 'Auto Goods Received' checkbox to automatically receive the goods. If the validator does not wish to automatically receive the goods, they should leave the 'Auto Goods Received' checkbox unchecked. After making any necessary changes, the validator should click the 'Create & Edit Order' button, as shown in the screen below.
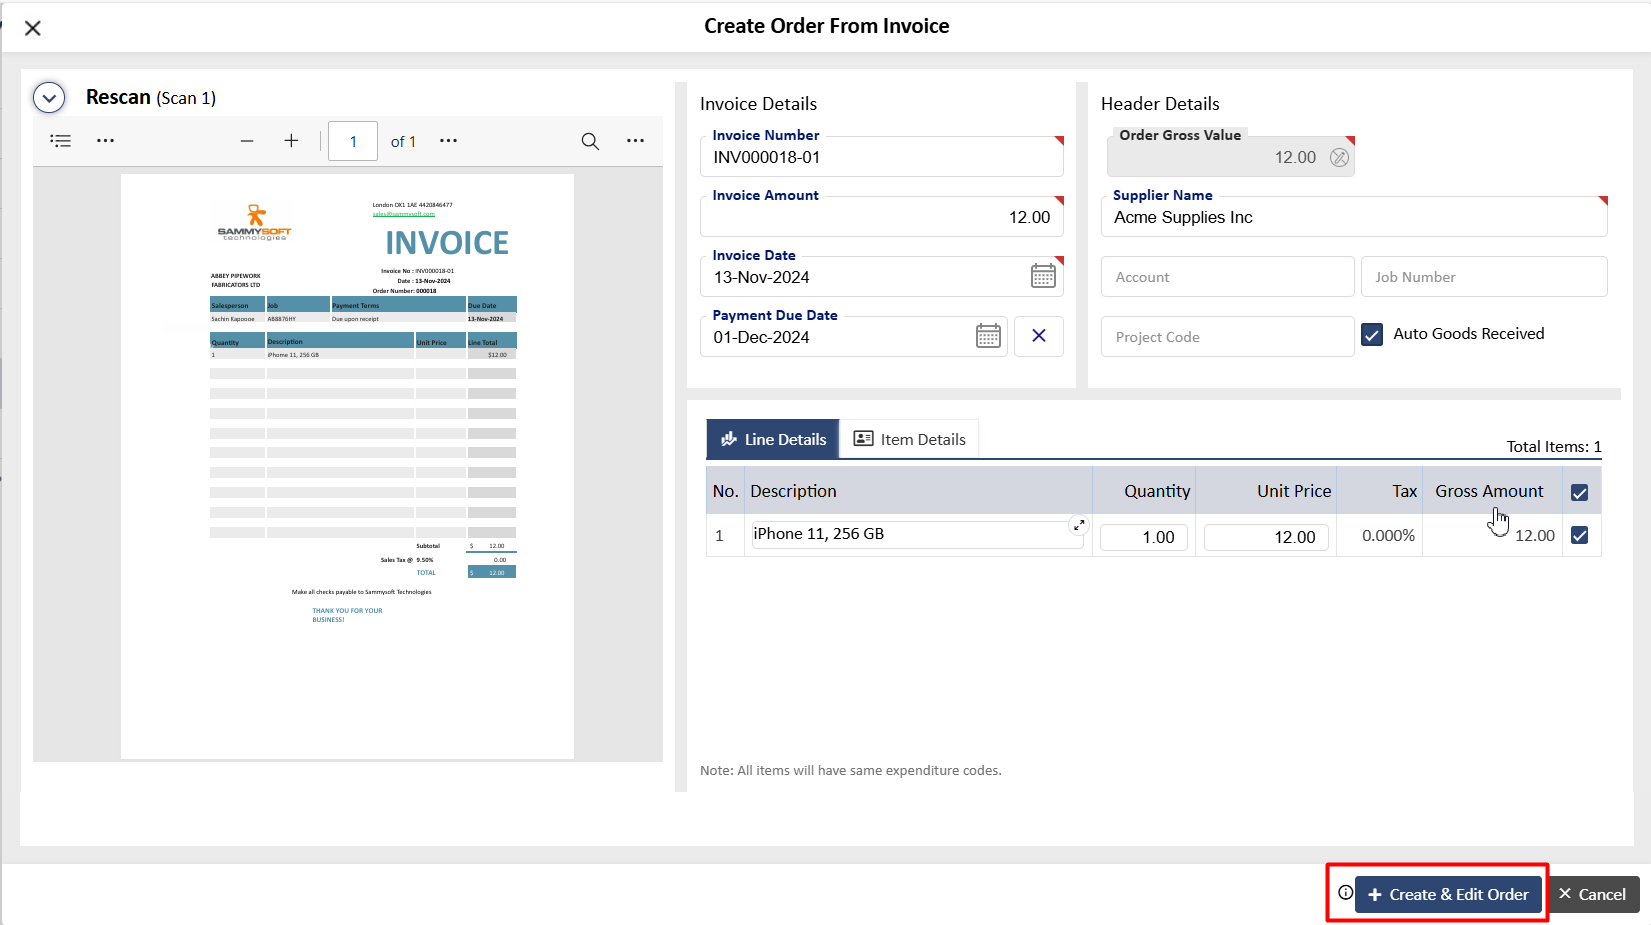
Note: If the user wishes to create order according to the sites, the Site Function needs to be activated. The system administrator can login to the application and navigate to Sites -> Activate Site Function switch. For demonstration purposes, we have disabled the Site Function. Site can be switched On/Off as per company's requirement.
26. Upon clicking the 'Create & Edit Order' button, a pop-up will appear for confirmation. Click 'OK' to proceed, as shown in the screen below.

27. The External Invoice Validator will then be taken to the new order created in the system. They could see that the order status as “Unissued”. If the External Invoice Validator selects the 'Auto Goods Received' checkbox on the 'Create Order From Invoice' page, a note will appear at the bottom left of the screen. This note will indicate that the order was generated from a scanned invoice, the goods will be received automatically, the order status will change to 'CLOSED,' and the invoice(s) will be created. The External Invoice Validator can modify any field if needed and must click 'Confirm Order' to proceed, as shown in the screen below.
28. The External Invoice Validator could see that the Order Status has changed to “Closed” as the goods are received automatically, as shown in the Screen: 28. Also, the Invoice Status will changed to “Invoice Pending” as the invoice(s) are sent for approval to the invoice approver and the invoice details will be visible under "Invoice - History", as shown in the Screen: 28.1.
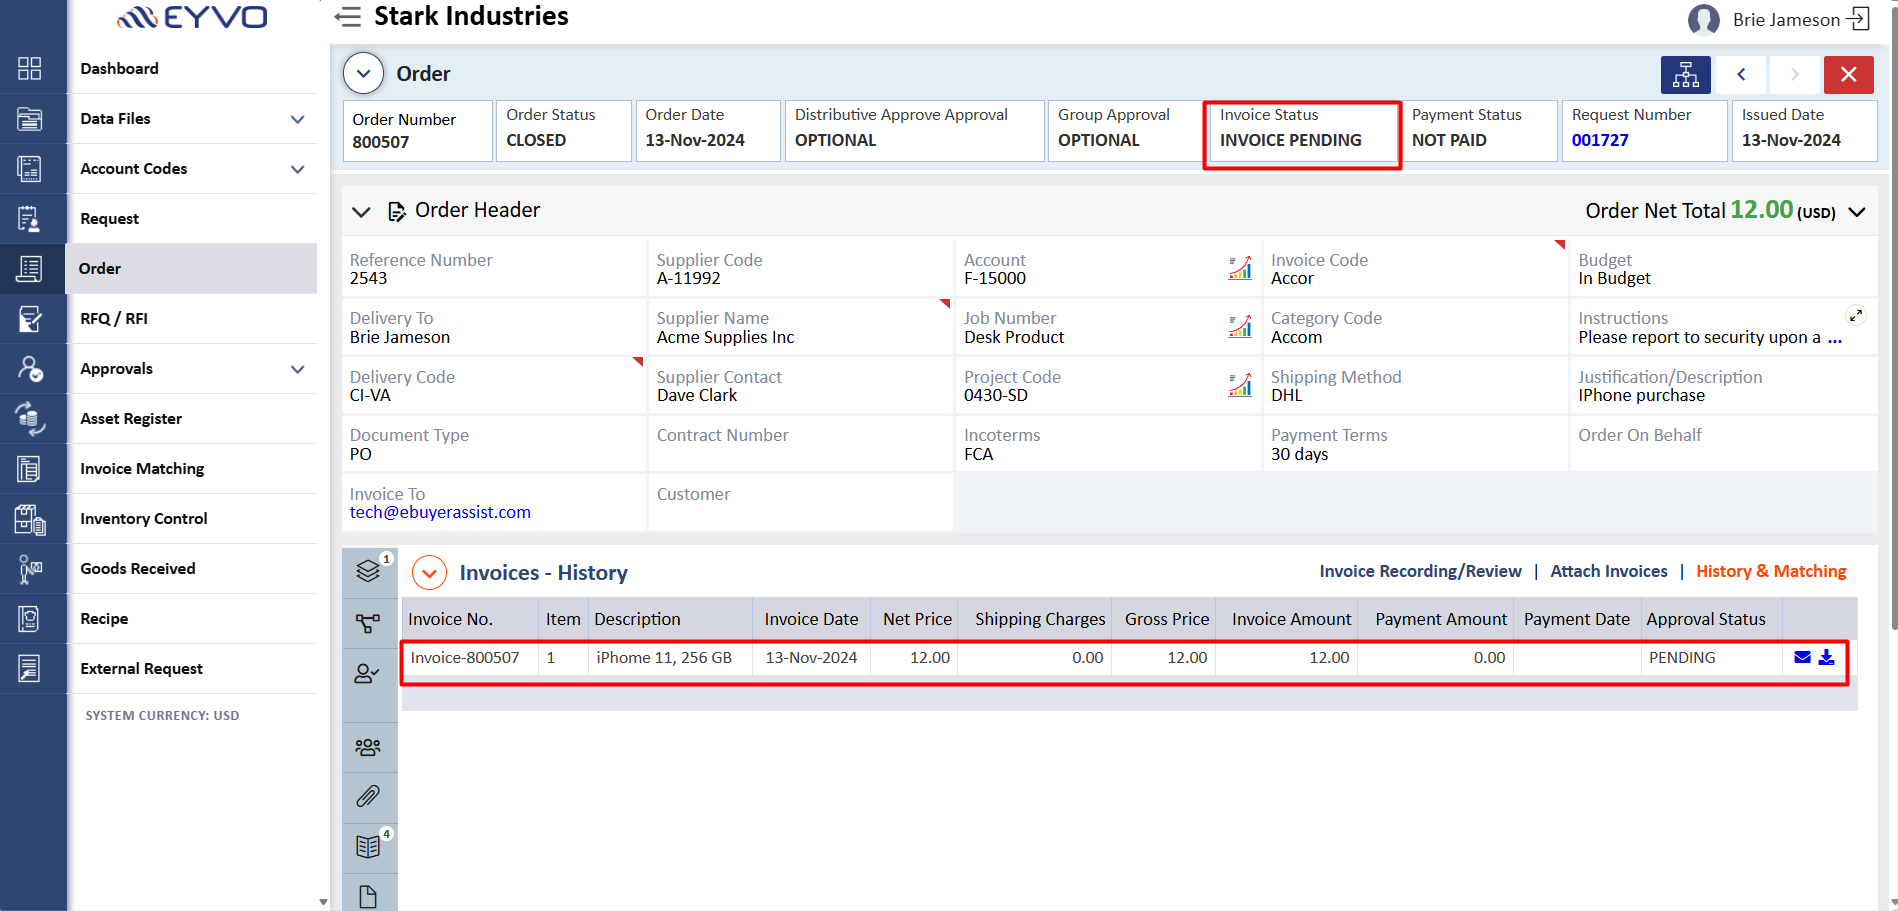
29. On the External Invoice Detail Listing, once the order is created from 'Failed' record, the File Status will update to 'Invoiced'. Additionally, the Reason/Result field will indicate that the invoice has been scanned, new order created and invoice has been logged, as shown in the screen below.

Note: If the External Invoice Validator does not select the 'Auto Goods Received' checkbox on the 'Create Order From Invoice' page while creating a new order, a note will appear at the bottom left of the screen. This note will indicate that the order was generated from a scanned invoice, the order status will change to 'ISSUED,' and the invoice(s) will be created. Rest of the process remains the remains as demonstrated above.
Invoiced Status
30. When the external invoice validator creates an invoice for records marked as "Failed" or "Assigned," the status will update to "Invoiced". Additionally, the reason/result field will display comments regarding the invoice.


