Expense Management
Expense Management for employees helps in keeping track of detailed records of employee expenses, including the nature of the expense, amount spent, date, and any additional relevant information incurred while conducting business activities on behalf of an organization. It also helps in timely reimbursement of approved employee expenses.
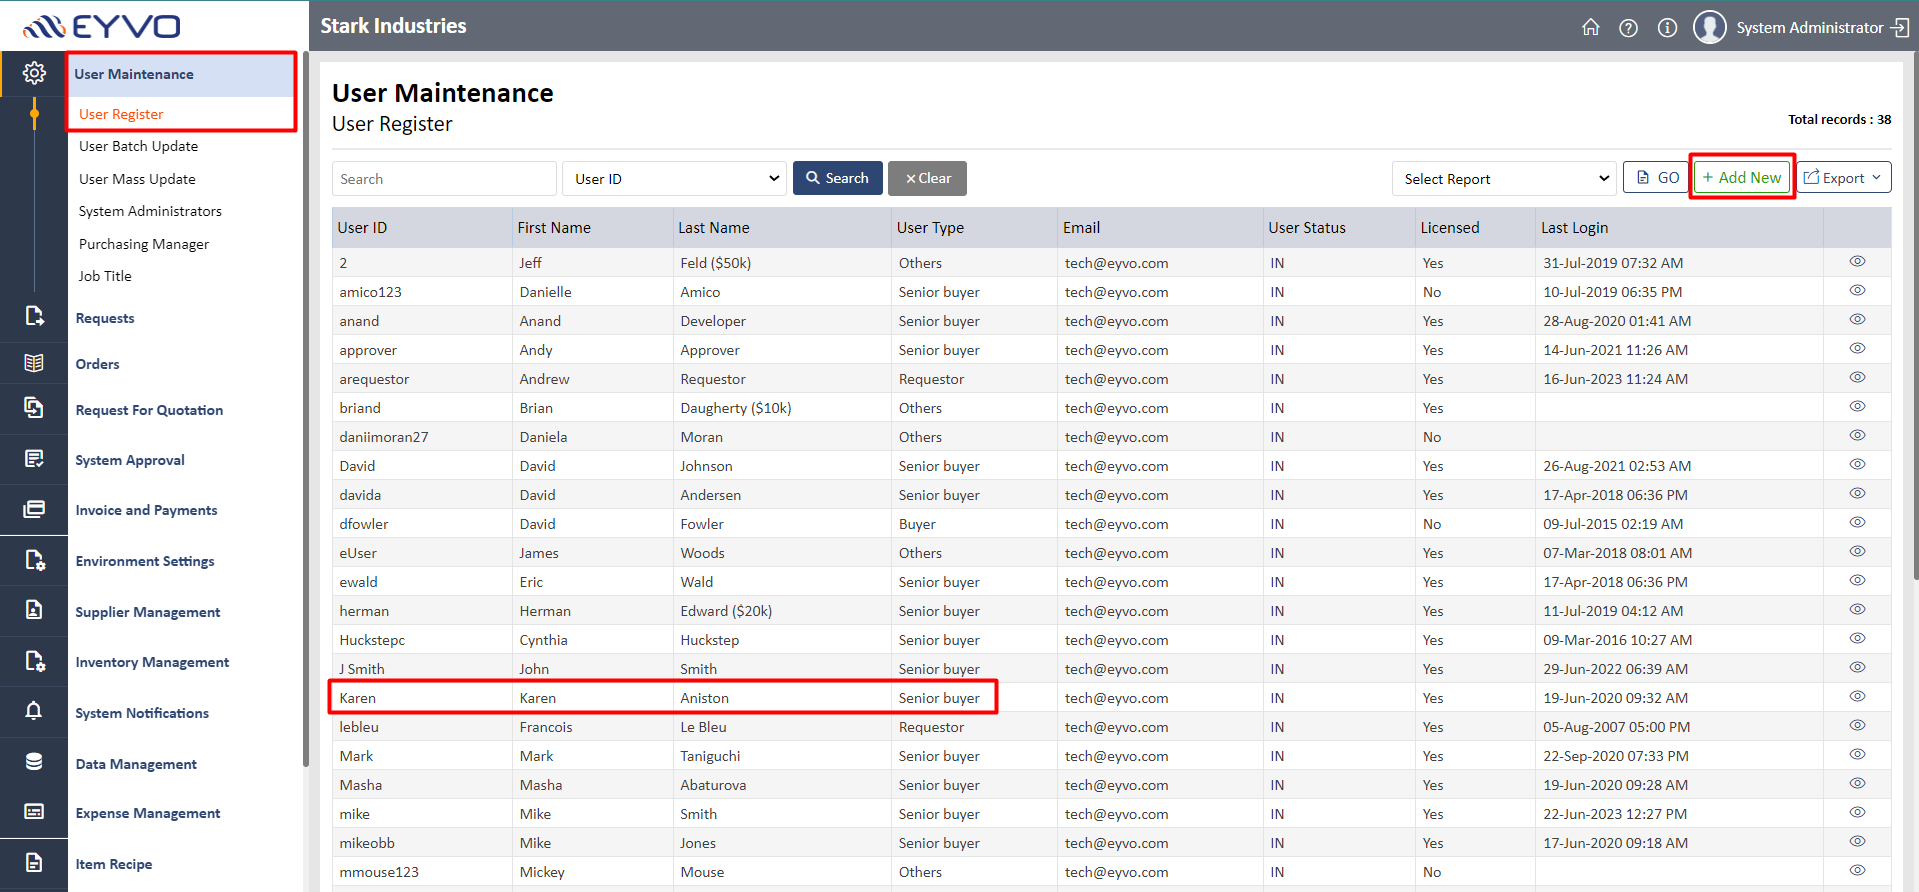
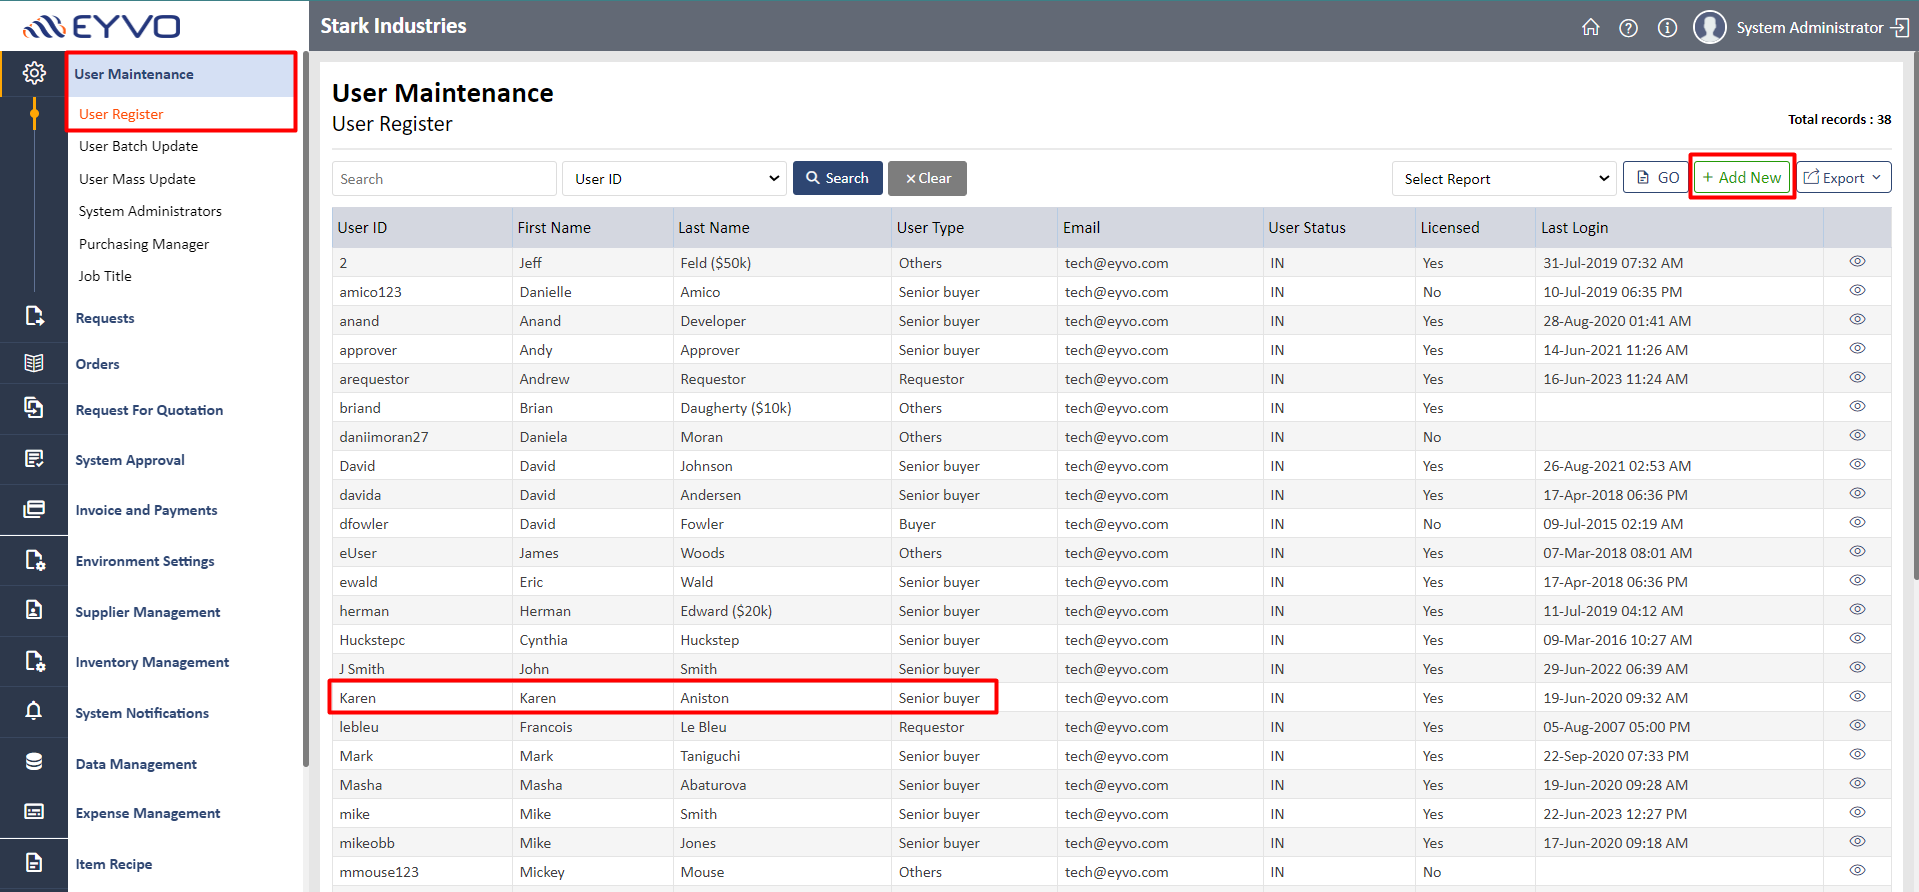
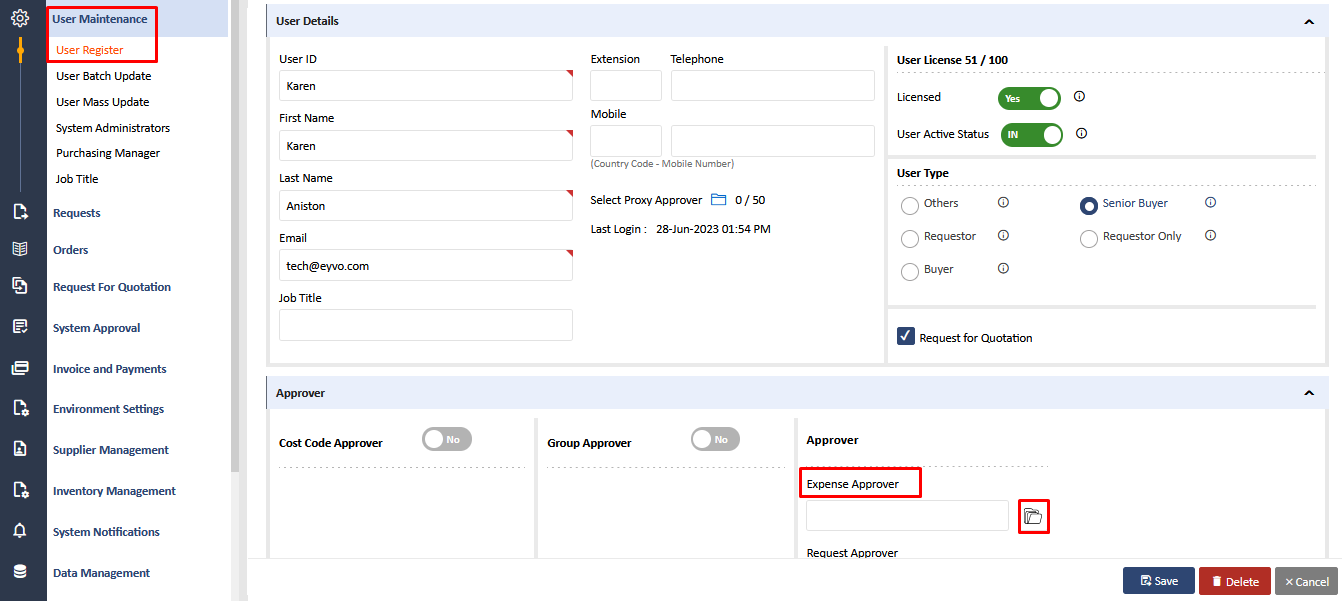
1. First step in this will be providing “Expense” permission to users by the System Administrator. For this you will need to login into the system administration section, click on User Maintenance-> User Register and this will display the list of users in the system or else add new user by clicking on “Add New” button as shown in the screen below.
For the purpose of demonstration, we will utilize the user 'Karen Aniston' as the expense originator. Consequently, we will grant the user Read-Write permissions to perform necessary actions within the system.
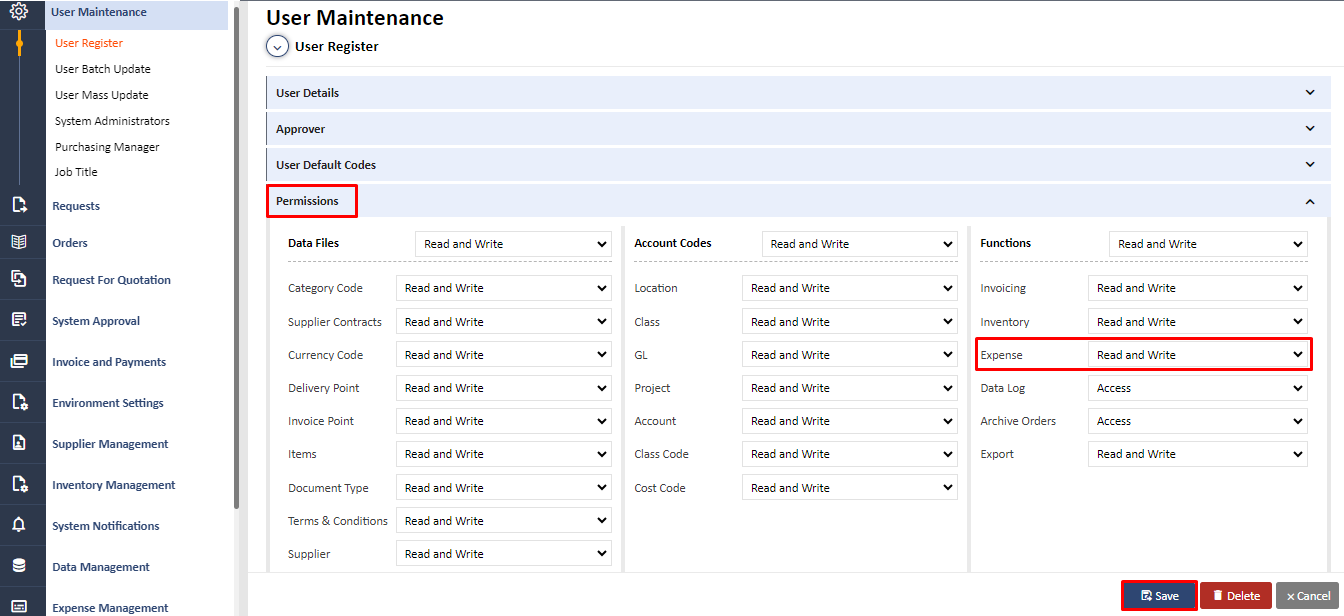
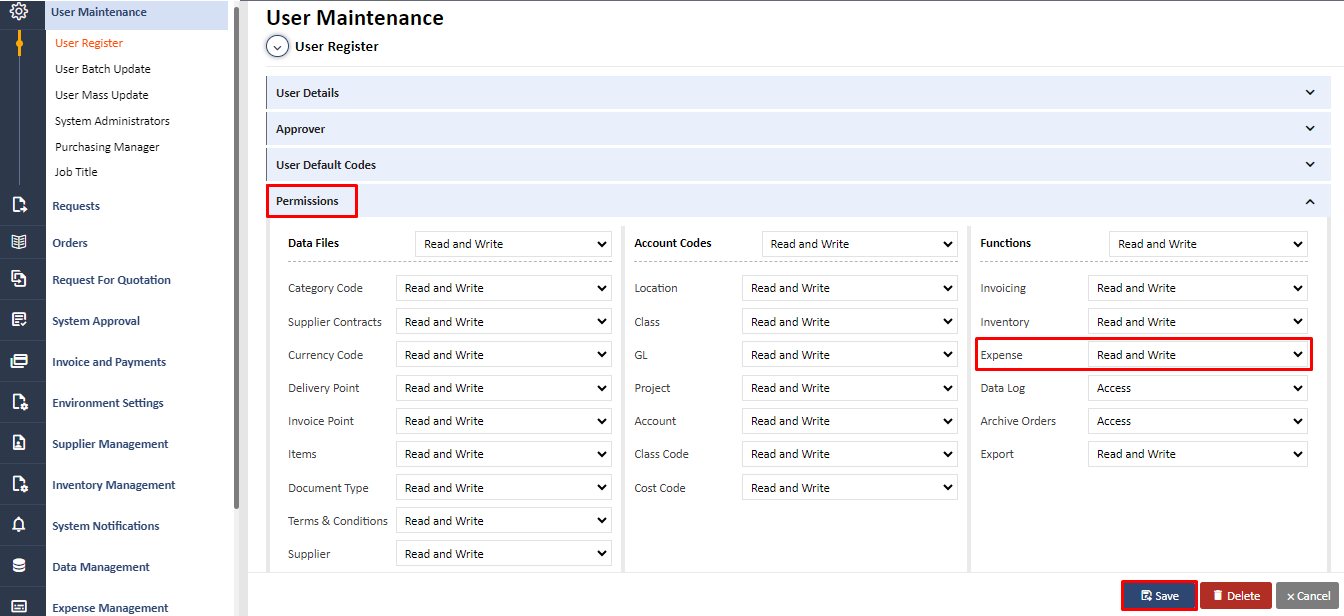
2. Select the user you want to assign the Expense permission. Then, click on the user’s “Permissions” tab. Provide “Read and Write” access to the user for Expense as highlighted in the screen below.
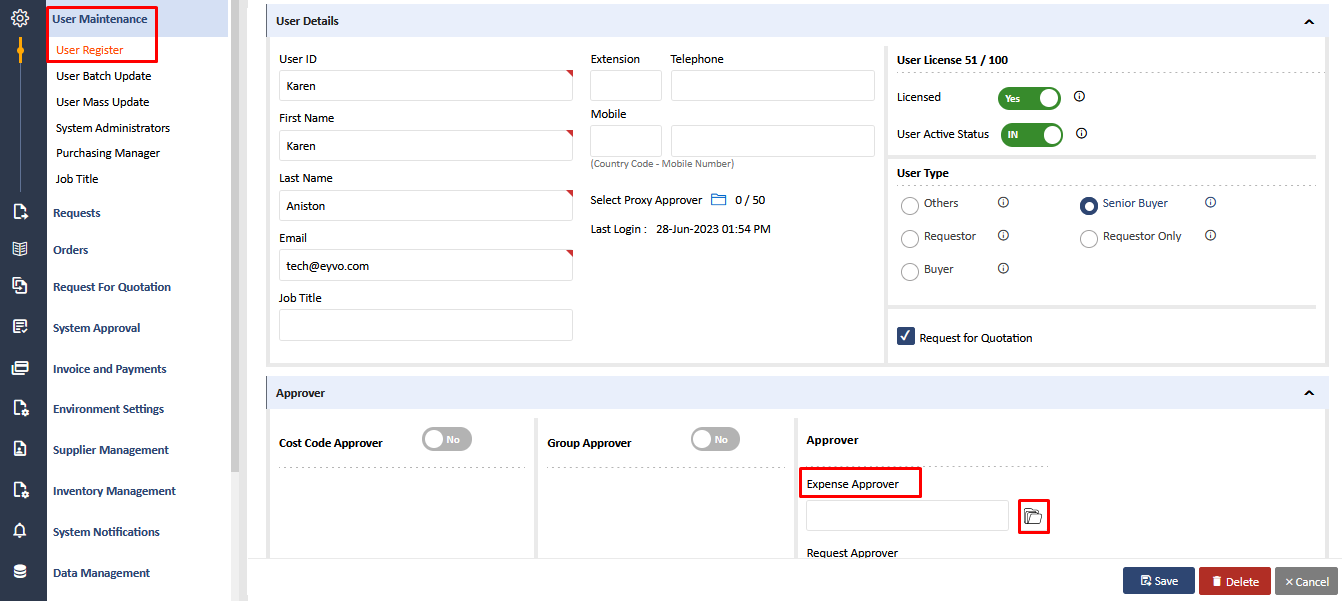
3. If you want to assign an Expense Approver to a user for approving their expense, click on the “Approver” tab and select the Expense Approver by clicking on the folder icon as shown in Screen-3.
It will display a list of users from which you can select an “Expense Approver” by clicking on the user name. You can also search the particular person by typing their name on the search bar and clicking on the “Search” button as shown in Screen-3.1.
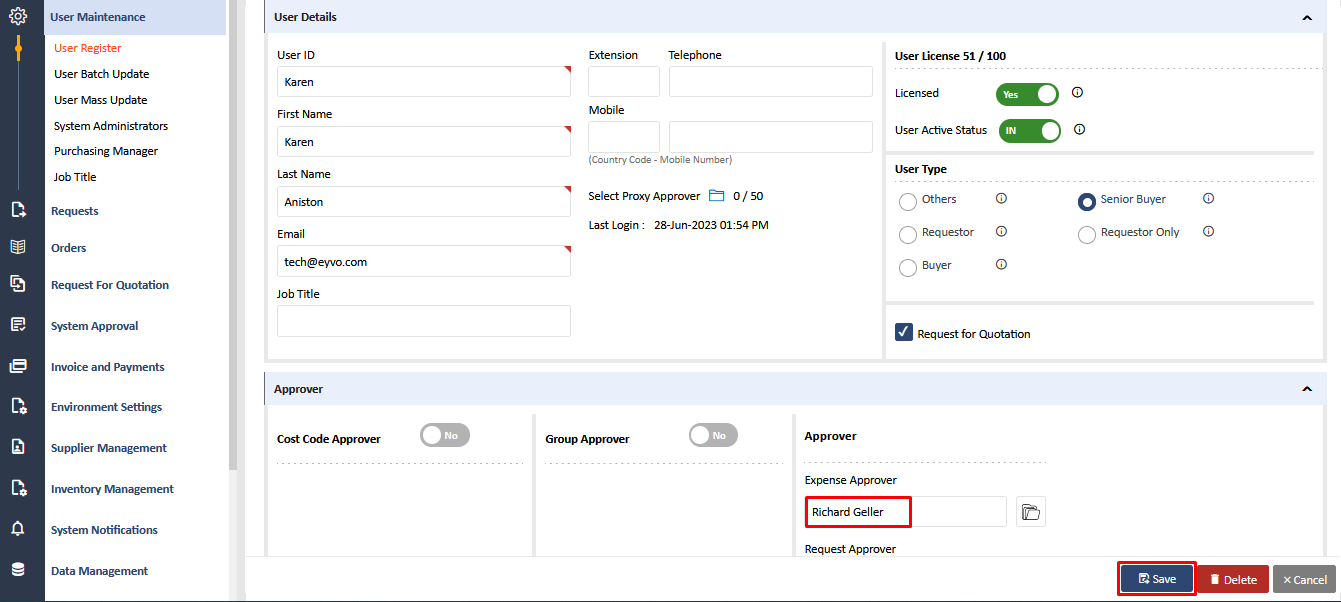
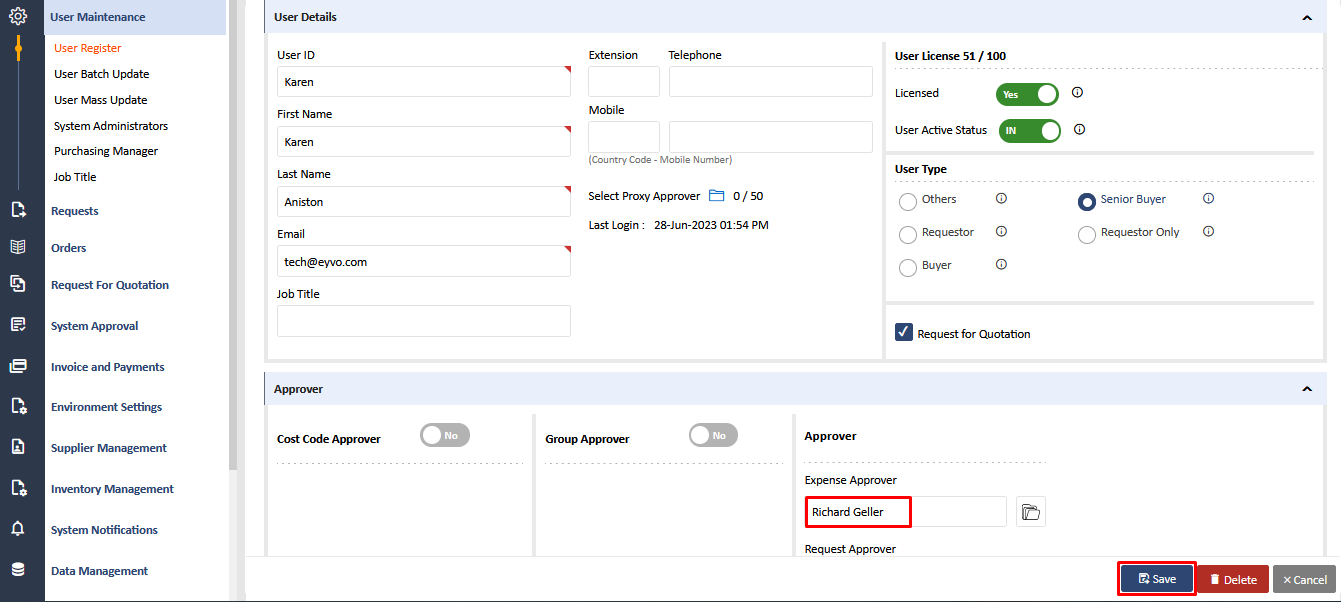
For e.g., the manager of a user could be their “Expense Approver”. In this scenario, any expense created by Karen Aniston will be sent to Richard Geller for approval.
Choose the user you wish to select, and once you have made your selection, that user will appear in the Expense Approver tab. Finally, click on the "Save" button to ensure that the changes are saved.
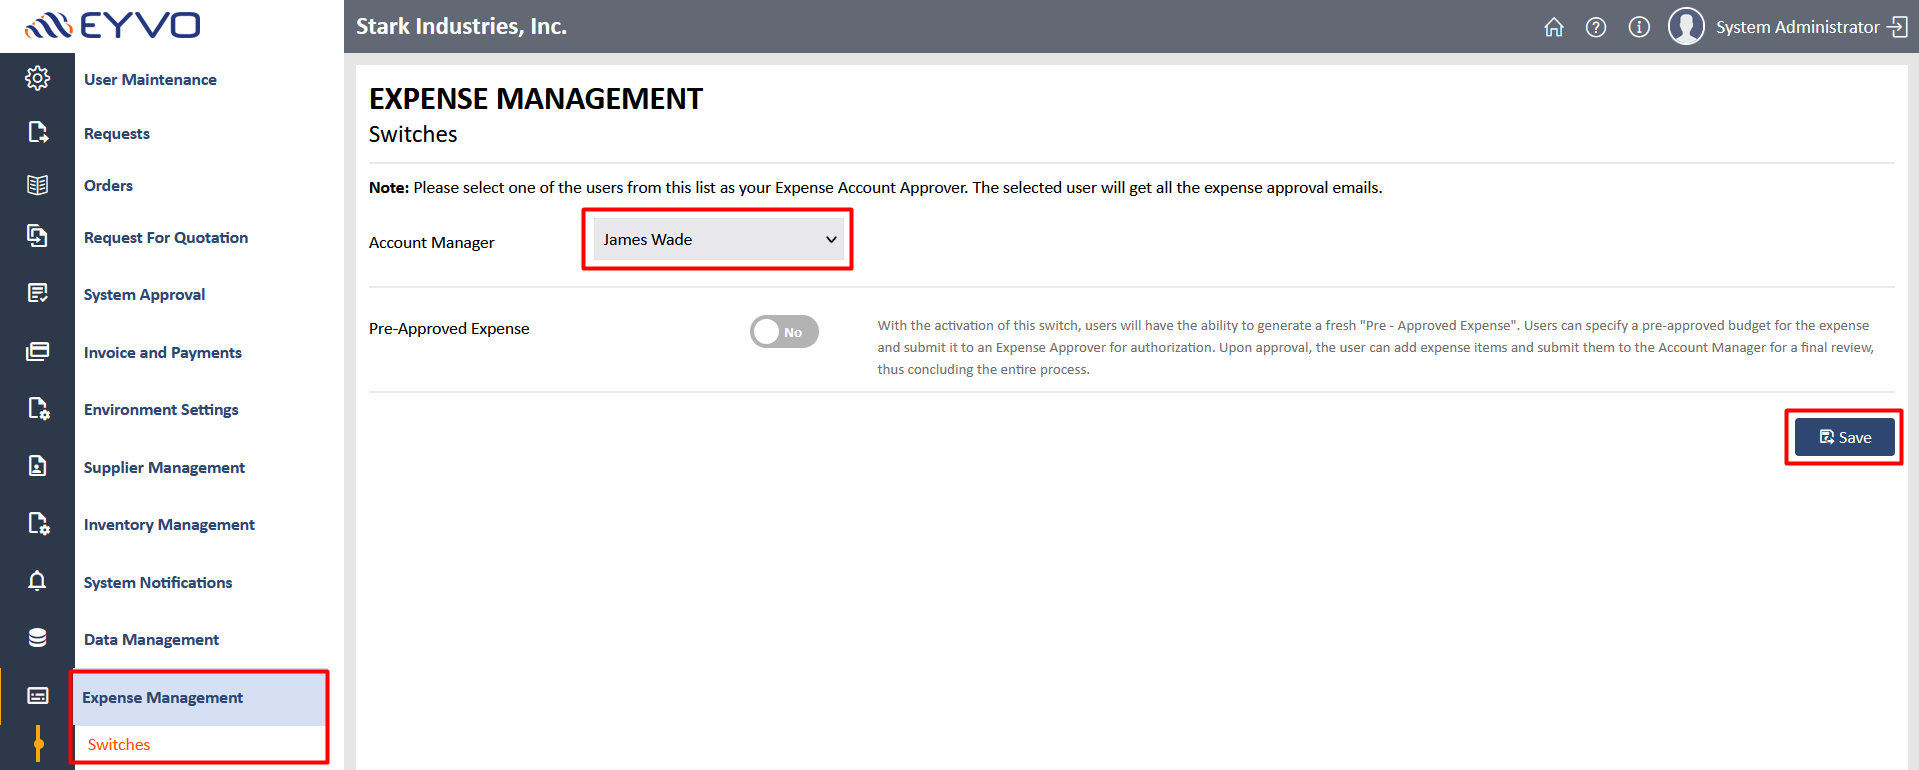
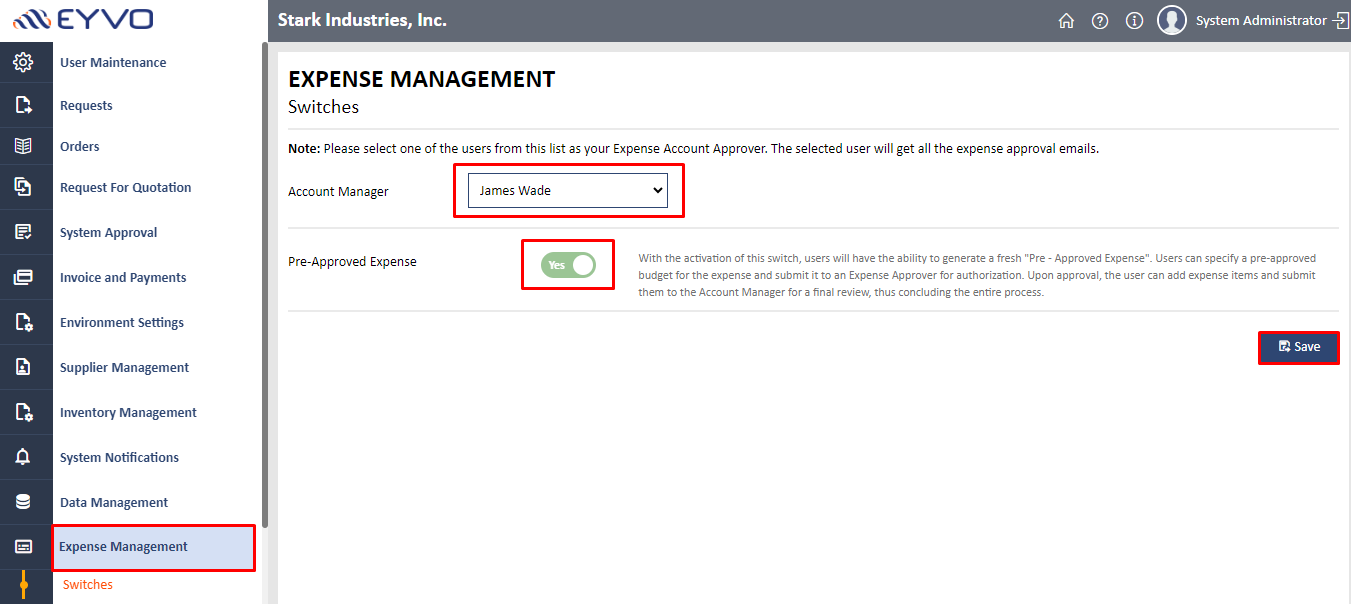
4. To proceed, the System Administrator must assign an "Account Manager" for expenses. To do this, navigate to the Expense Management section-> Switches option.
An Account Manager typically belongs to the accounts team and is responsible for approving payment disbursements. They will enter payment details for expenses in the system.
To assign an Account Manager, click on the drop-down menu next to the "Account Manager" label. A list of names will appear, from which one should be selected.
As an example, let's assume James Wade has been designated as the Account Manager. Once the Account Manager is assigned, the system will automatically send all expenses for account approval, regardless of the user who submitted the expense.
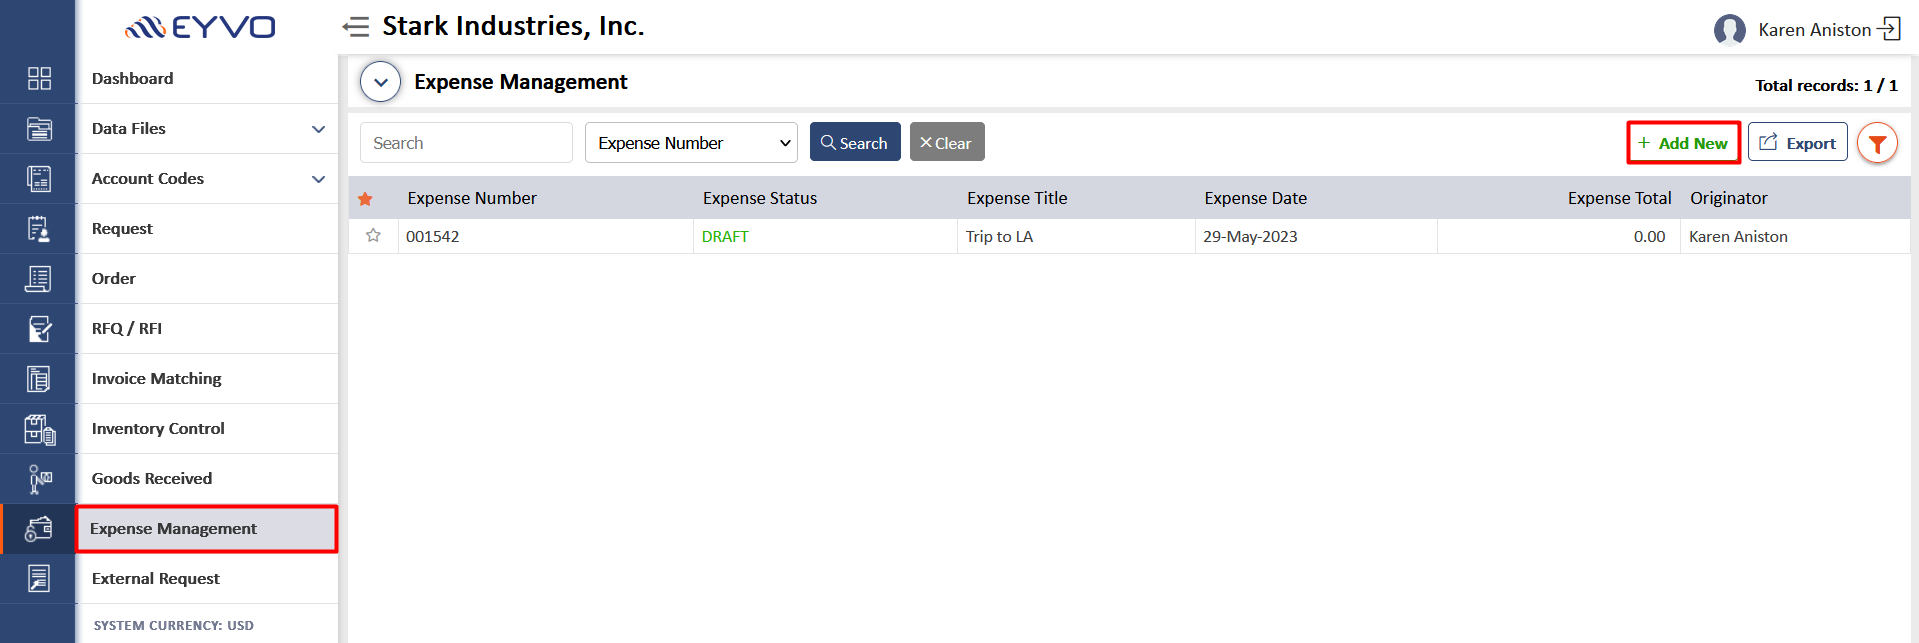
5. Now the expense originator (Karen in this scenario) can initiate the process of creating a new expense by logging into the main application. The expense originator will then select the “Expense Management” module and click on “Add New”.
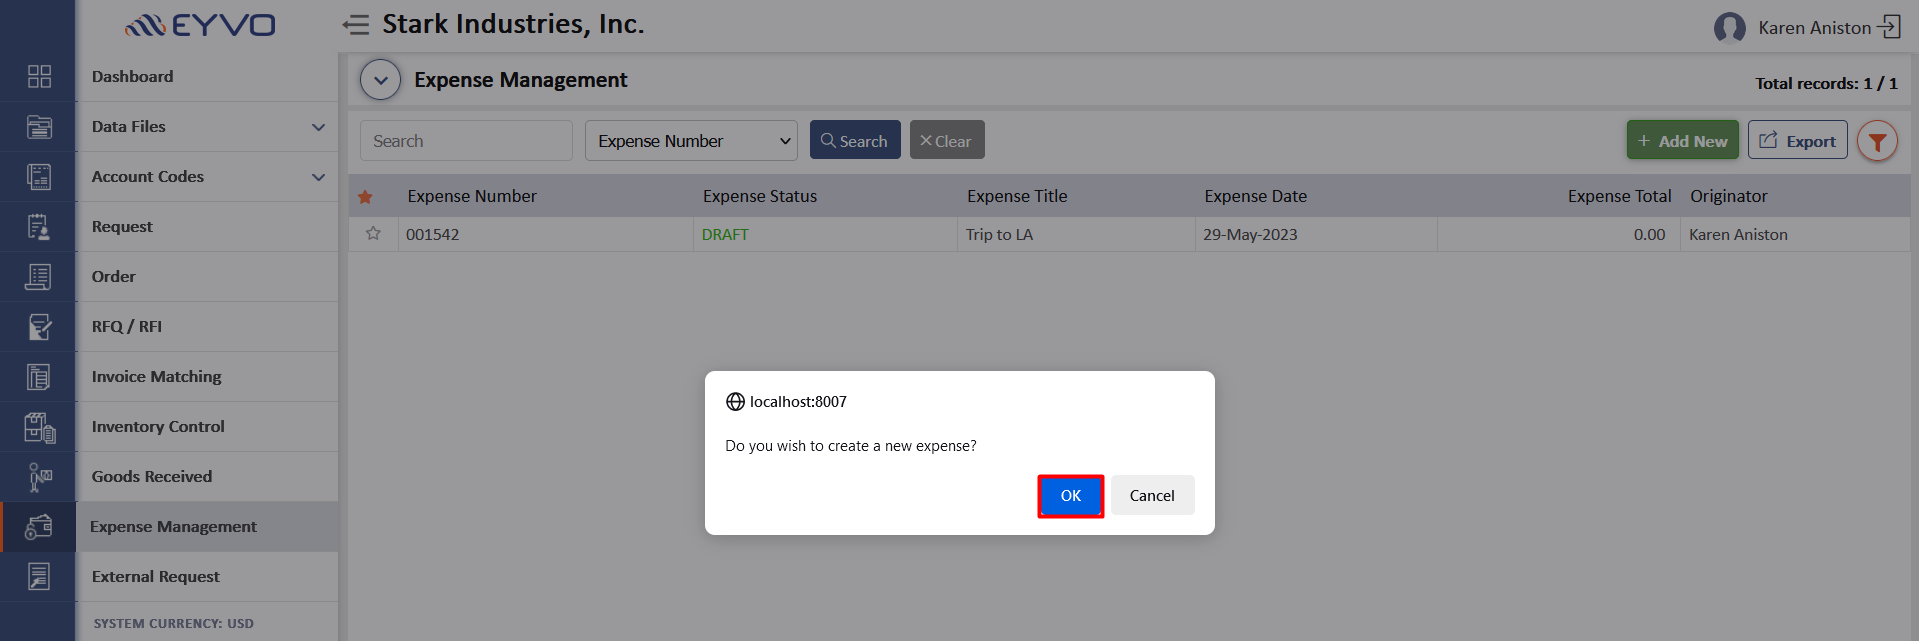
6. On clicking "Add New", a pop-up will appear, requesting confirmation to create a new expense. To proceed, click on "OK".
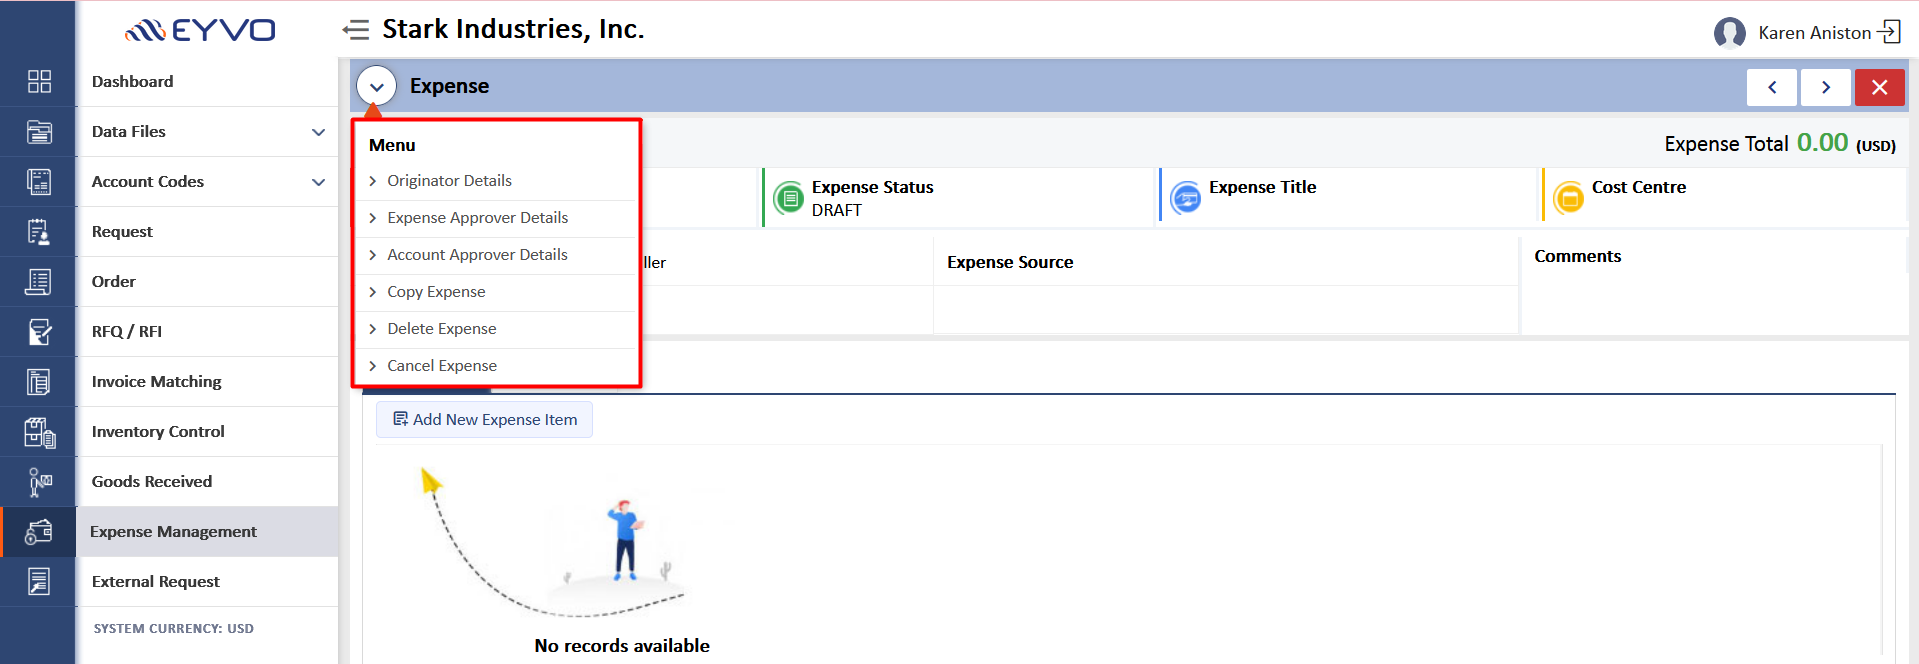
7. On clicking the highlighted icon, it will open the "Menu" showing details about the Originator, Expense Approver, and Account Approver. Additionally, users have the option to copy, delete, or cancel expenses.
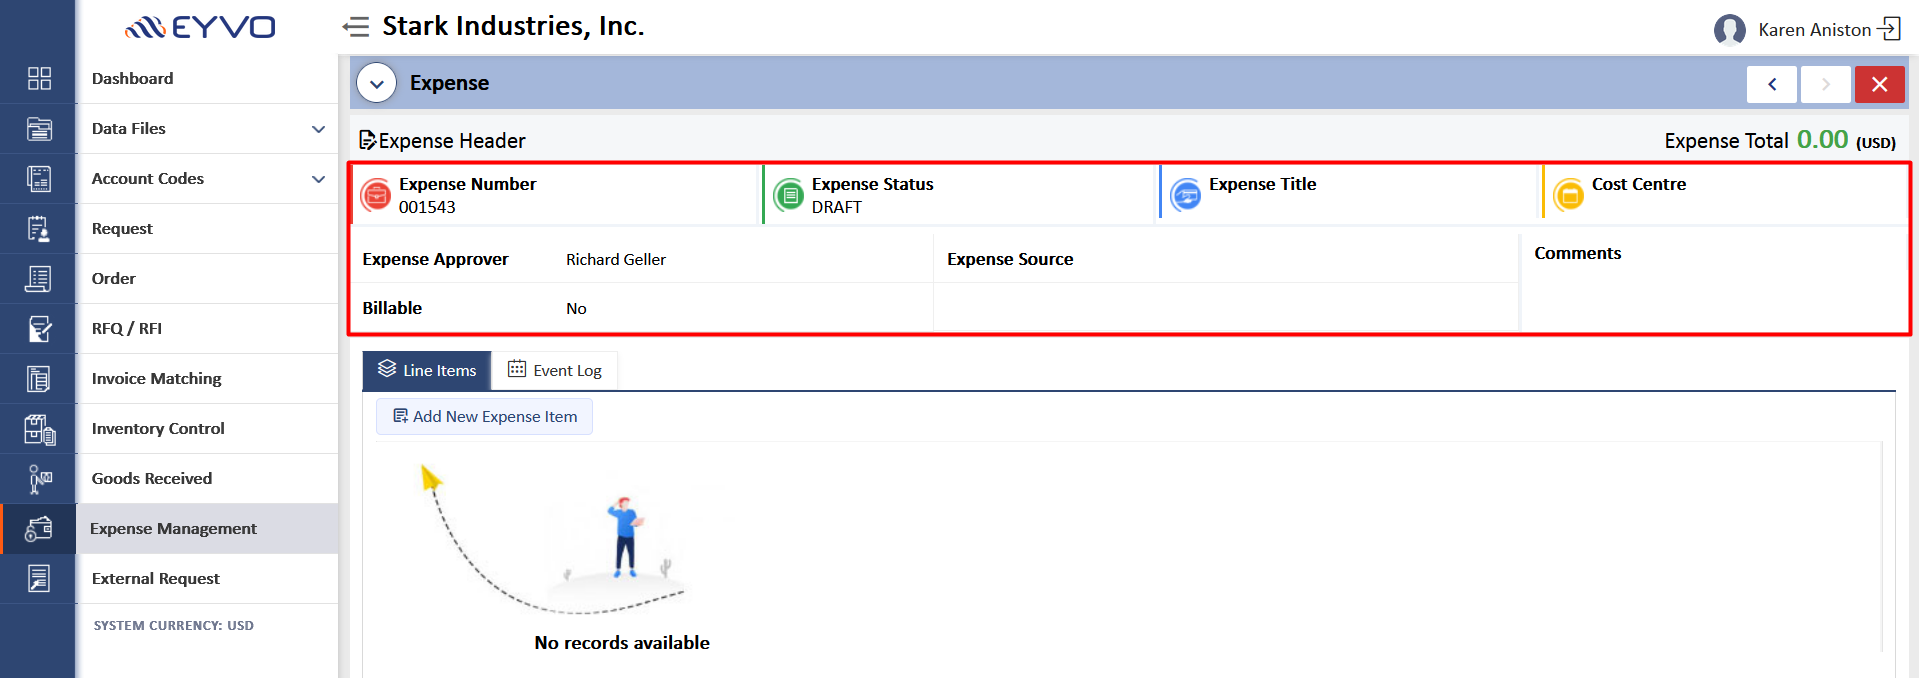
8. The expense originator will be able to view a new expense number, with the expense status shown as "Draft," along with the name of the expense approver. To fill in the relevant details for the expense click on the expense header, as shown in the Screen: 8.
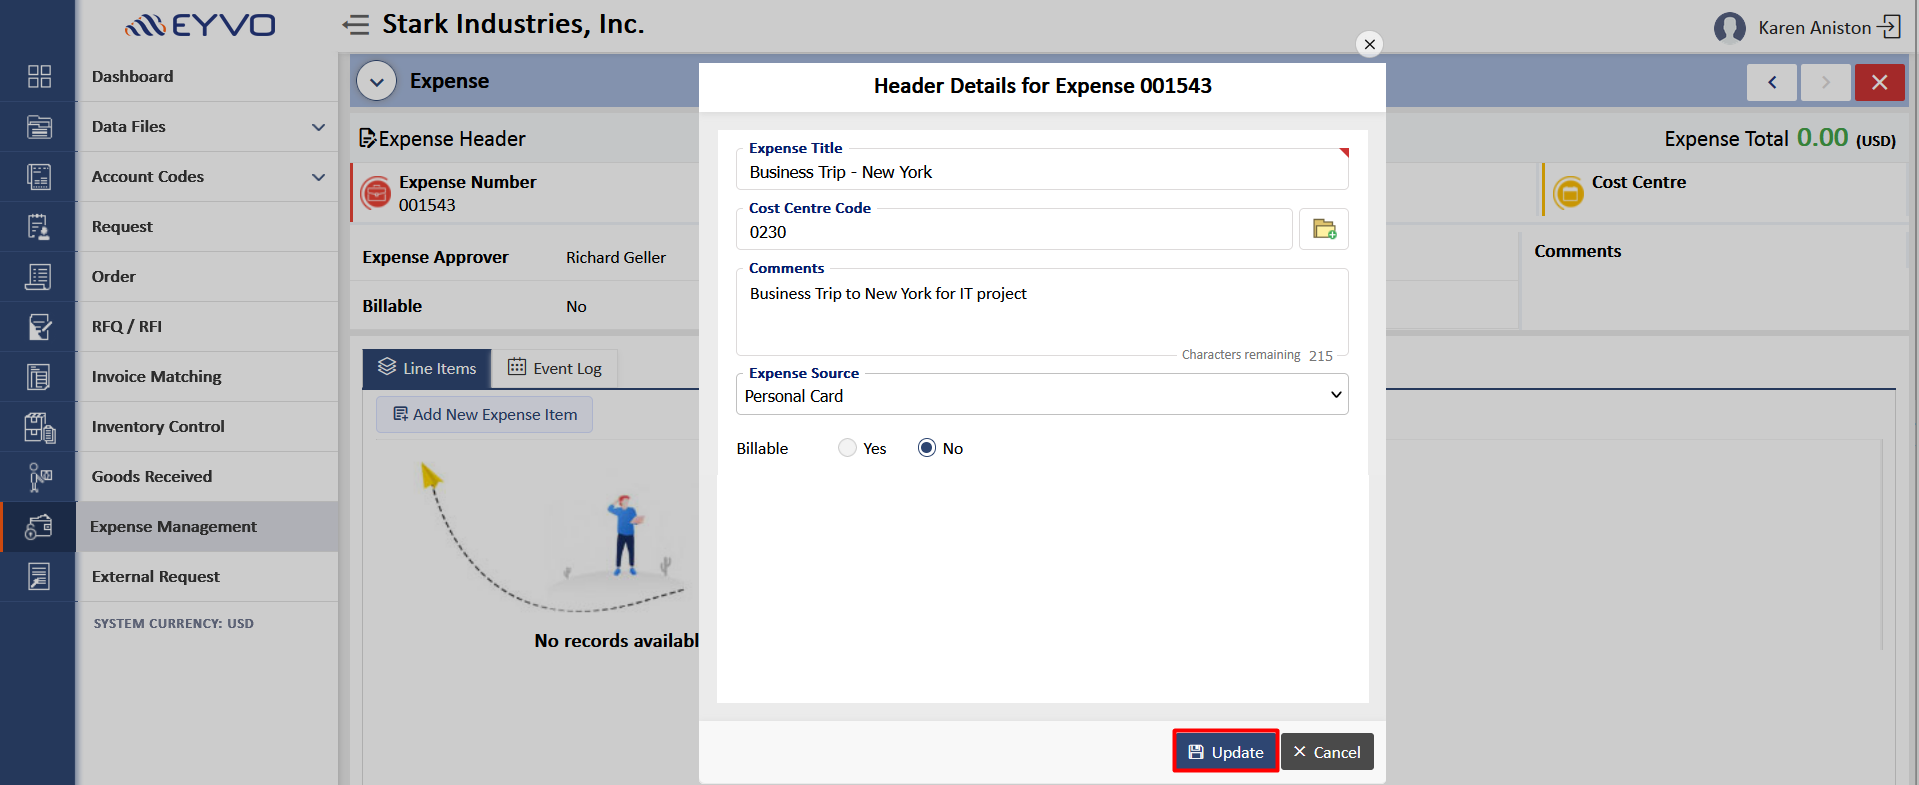
9. The user is required to enter the Expense Title in the header for the respective expense. Additionally, they can also provide other relevant information such as Cost Centre, Comments, Expense Source, and whether the expense is Billable. This information will assist the accounts department in processing the reimbursement appropriately. For instance, if the Expense Source is a personal card or cash, the reimbursement will be made promptly. However, if the Expense Source is a debit or credit card, the reimbursement process may take a few days. Once all the necessary details are filled, the user can proceed by clicking on the "Update" button.
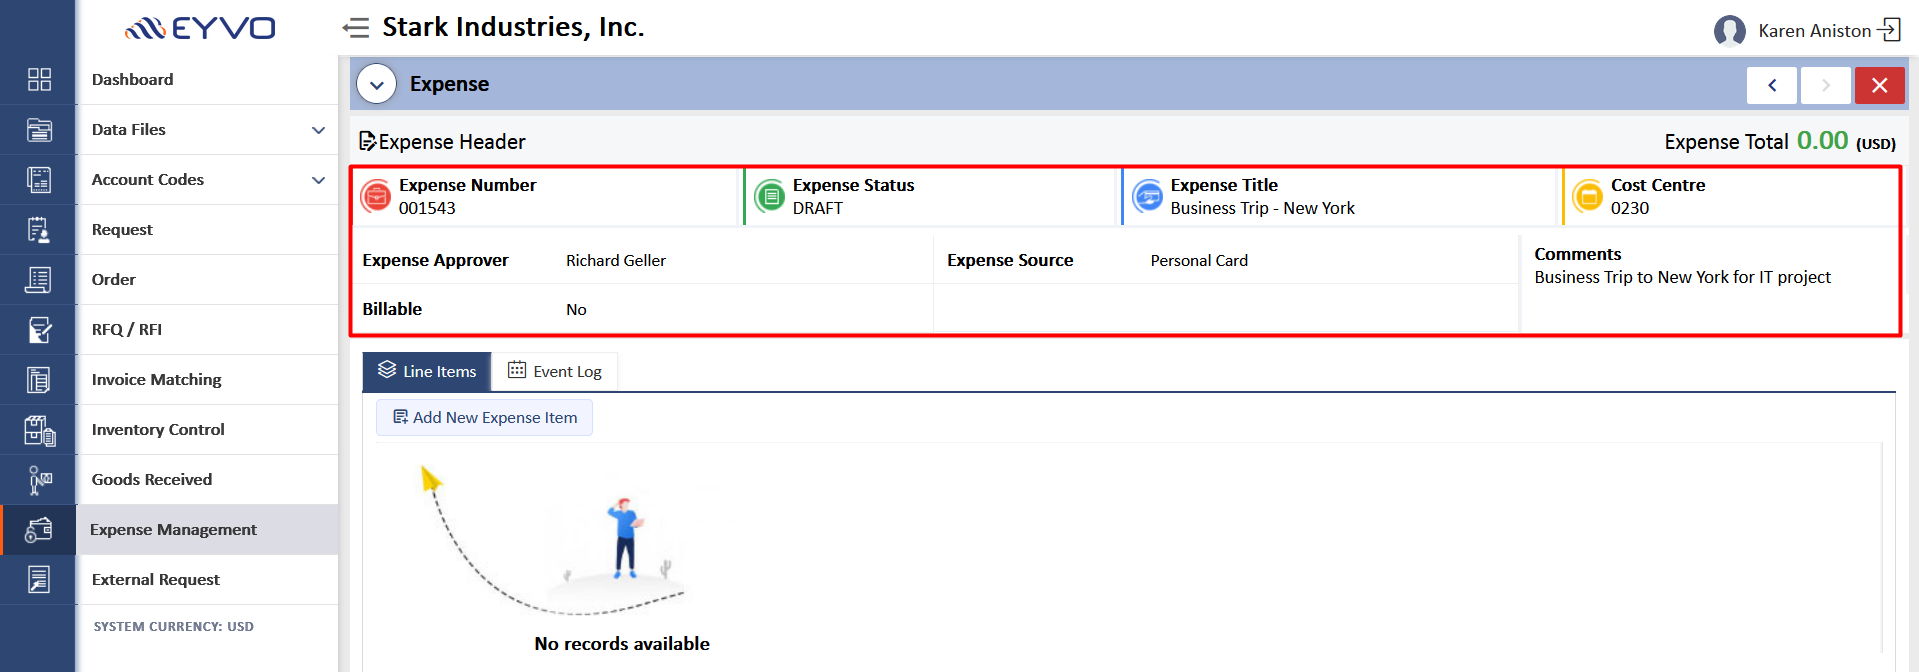
10. The updated details will be visible on the header section of the Expense page.
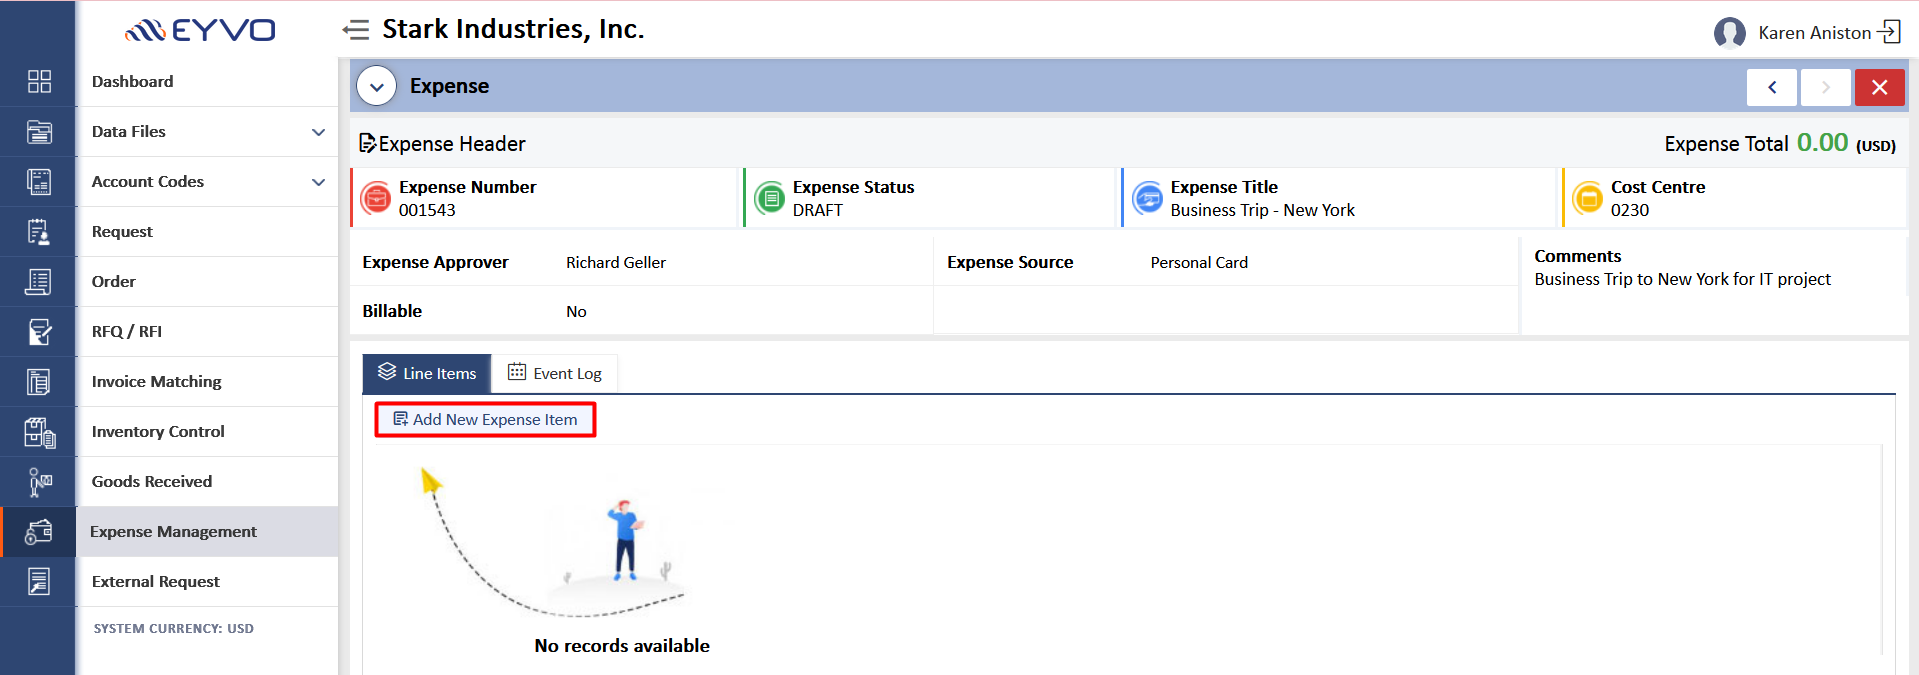
11. To add a new expense, the user will need to select “Add New Expense Item” as highlighted in the screen below:
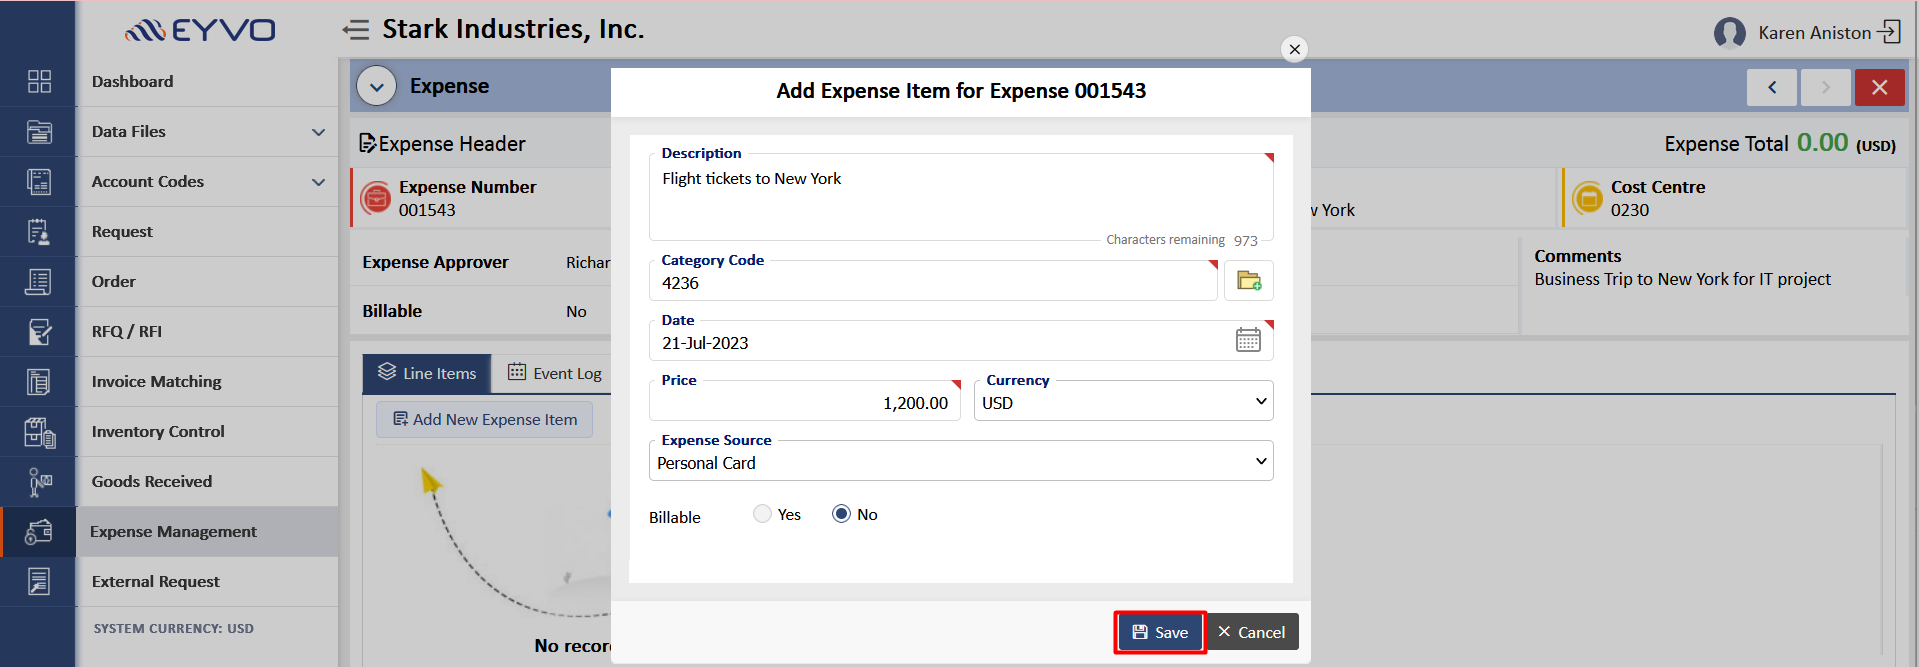
12. The user will need to enter all the mandatory information, including the Description, Category code, Price and Date of the expense. They also have the option to include additional information such as Currency (if different from the default), Expense Source, and specify if the expense is Billable. After providing all the necessary information, the user can proceed by clicking on the "Save" button.
13. After clicking the "Save" button, a pop-up message will prompt the user to decide whether they want to attach an image of the receipt for the item. To proceed, the user can select the "OK" button. Conversely, if they prefer not to add an image of the receipt, they can simply click "Cancel."
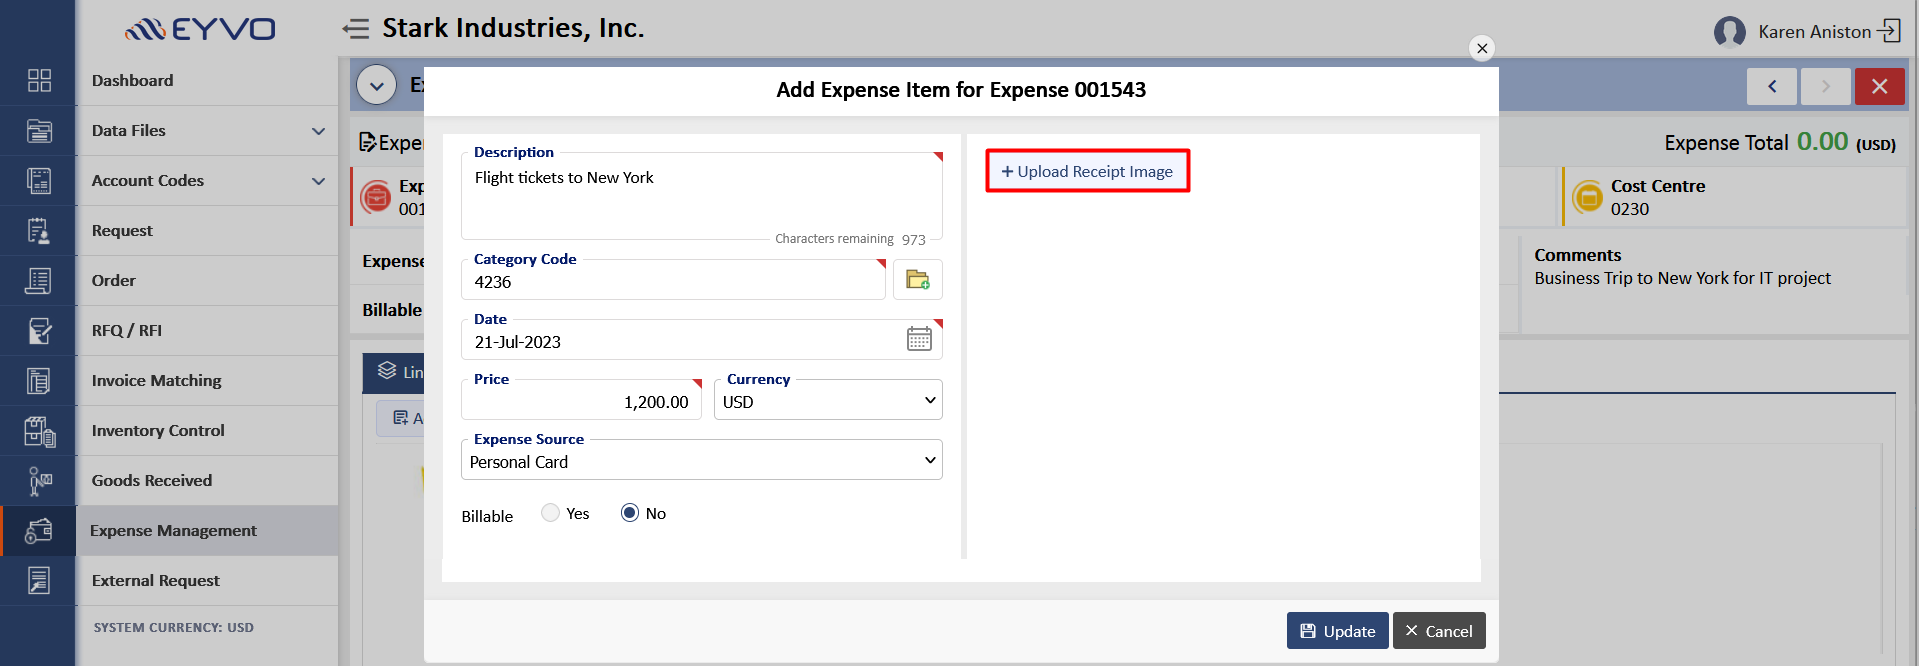
14. The user will be able to see the option of “Upload Receipt Image” which will help them to attach an image file.
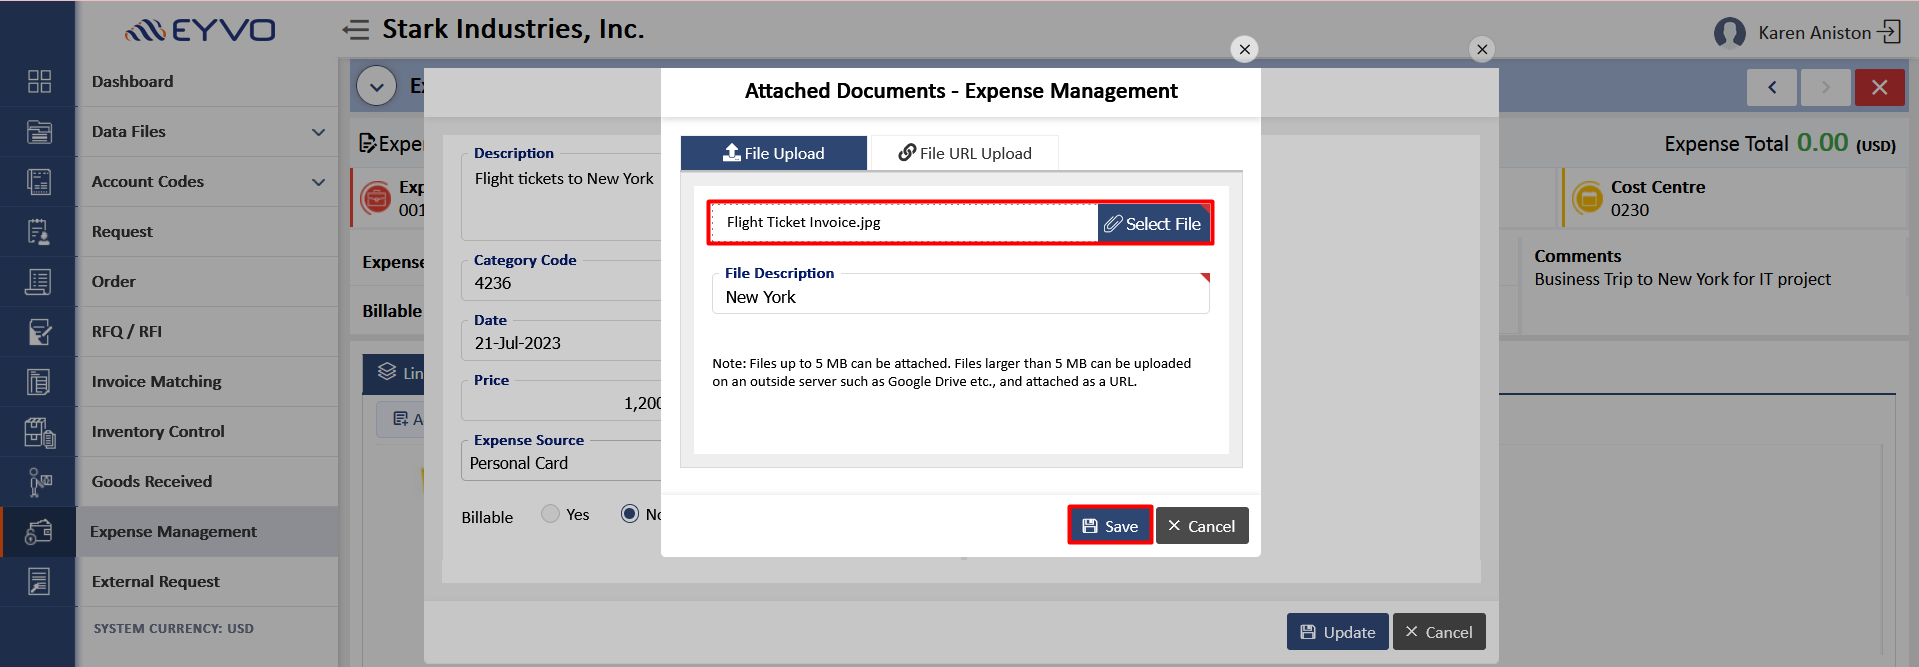
15. A pop-up will appear in front of the user for attaching the document. The user can upload the file from their system by clicking on Select File which will allow them to browse the file from their computer or simply drag & drop the file in the designated area. Another option is to enter the URL of the file from any cloud database. Enter the File Description and click on the “Save” button.
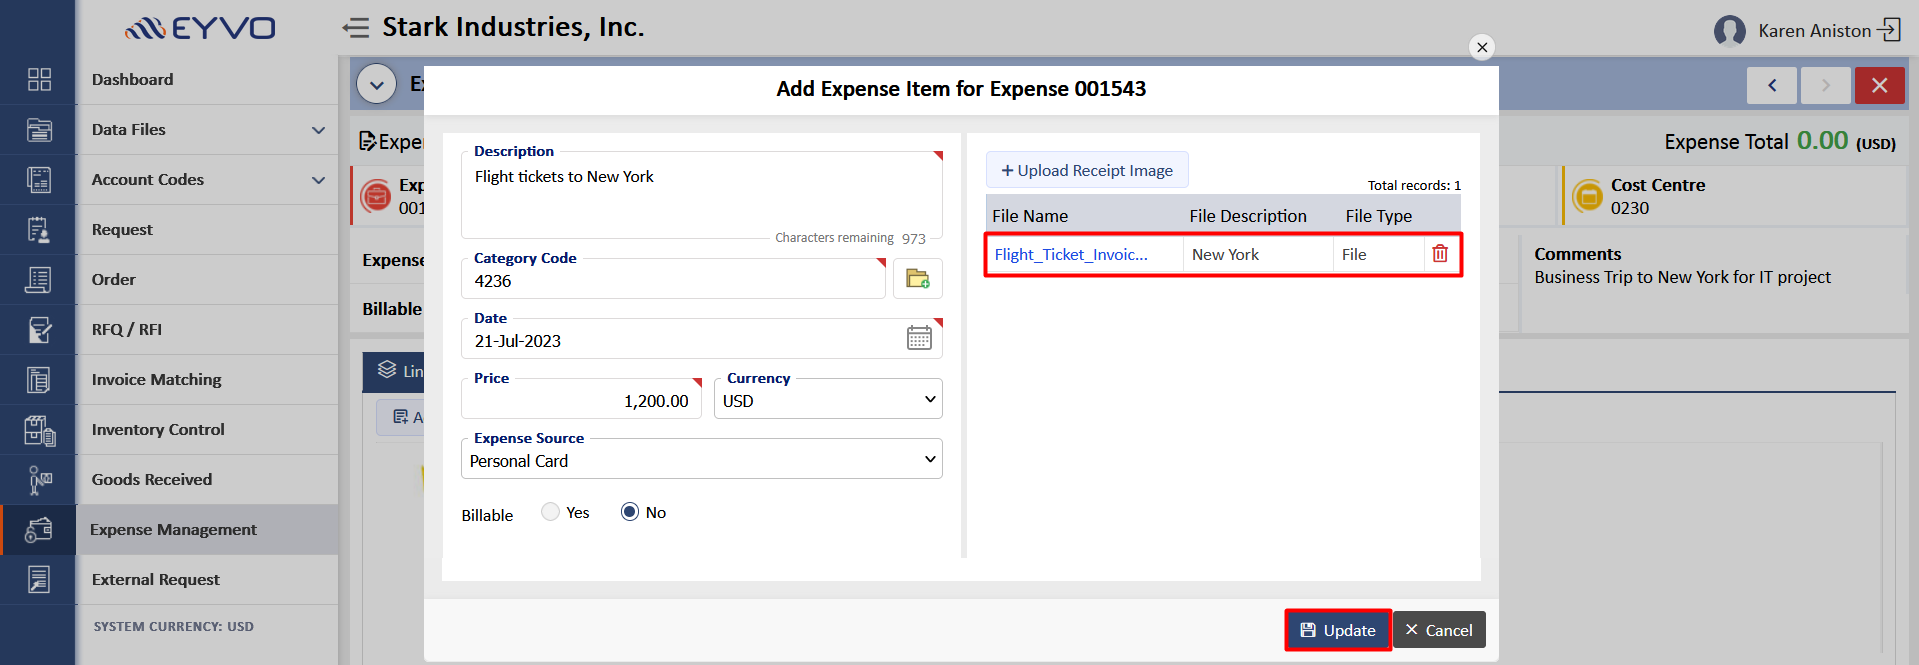
16. Once the image has been attached, the file details will be visible on the screen to the user. The user will need to click on the “Update” button.
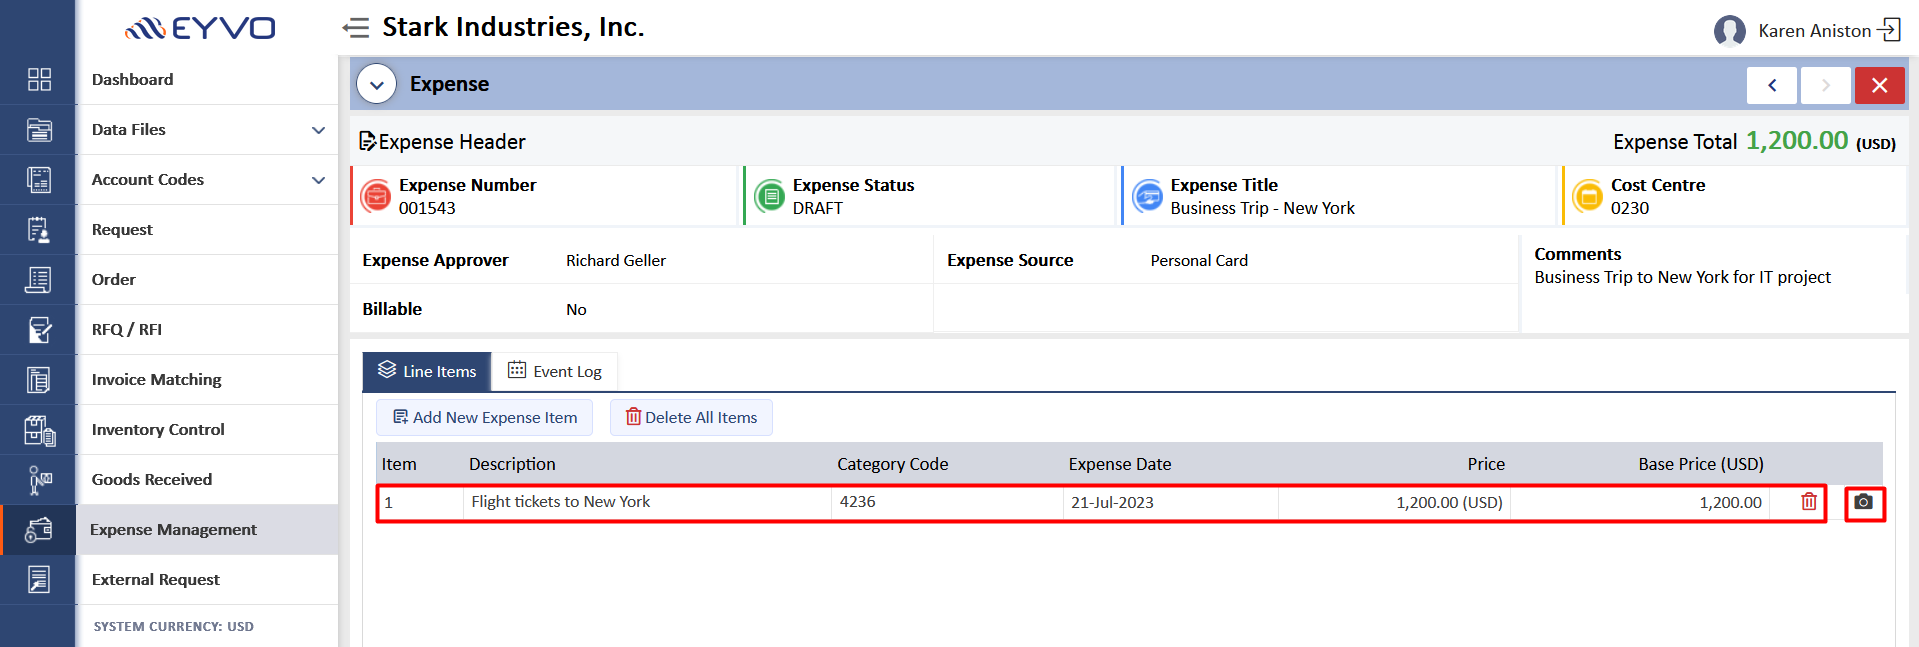
17. After the user has added the expense item, it will be visible on the screen such as below. The highlighted camera icon indicates that an image has been attached to this expense item.
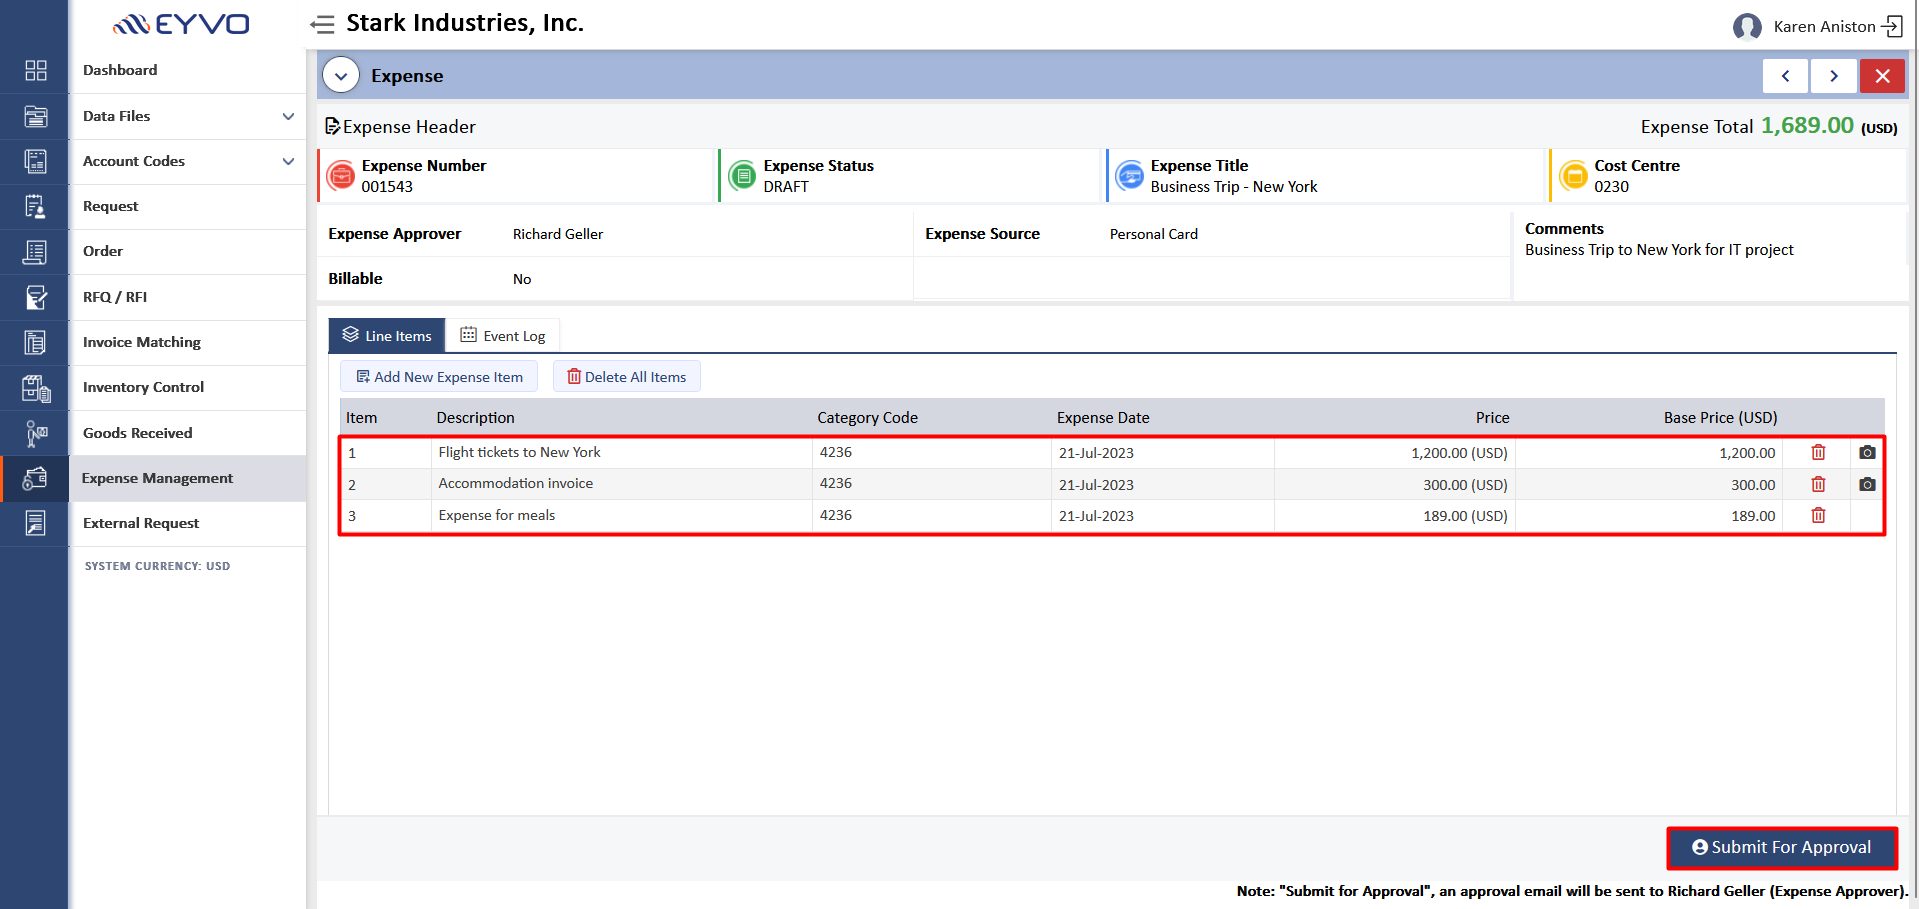
18. The user can add another item to the list in the same manner by selecting the Add New Expense Item. After the user has added all the desired expenses, they will need to submit it to the “Expense Approver” by clicking on the ”Submit For Approval” button.
19. A pop-up will appear asking whether the user wants to submit this expense for approval, they will click on the “OK” button to proceed further.
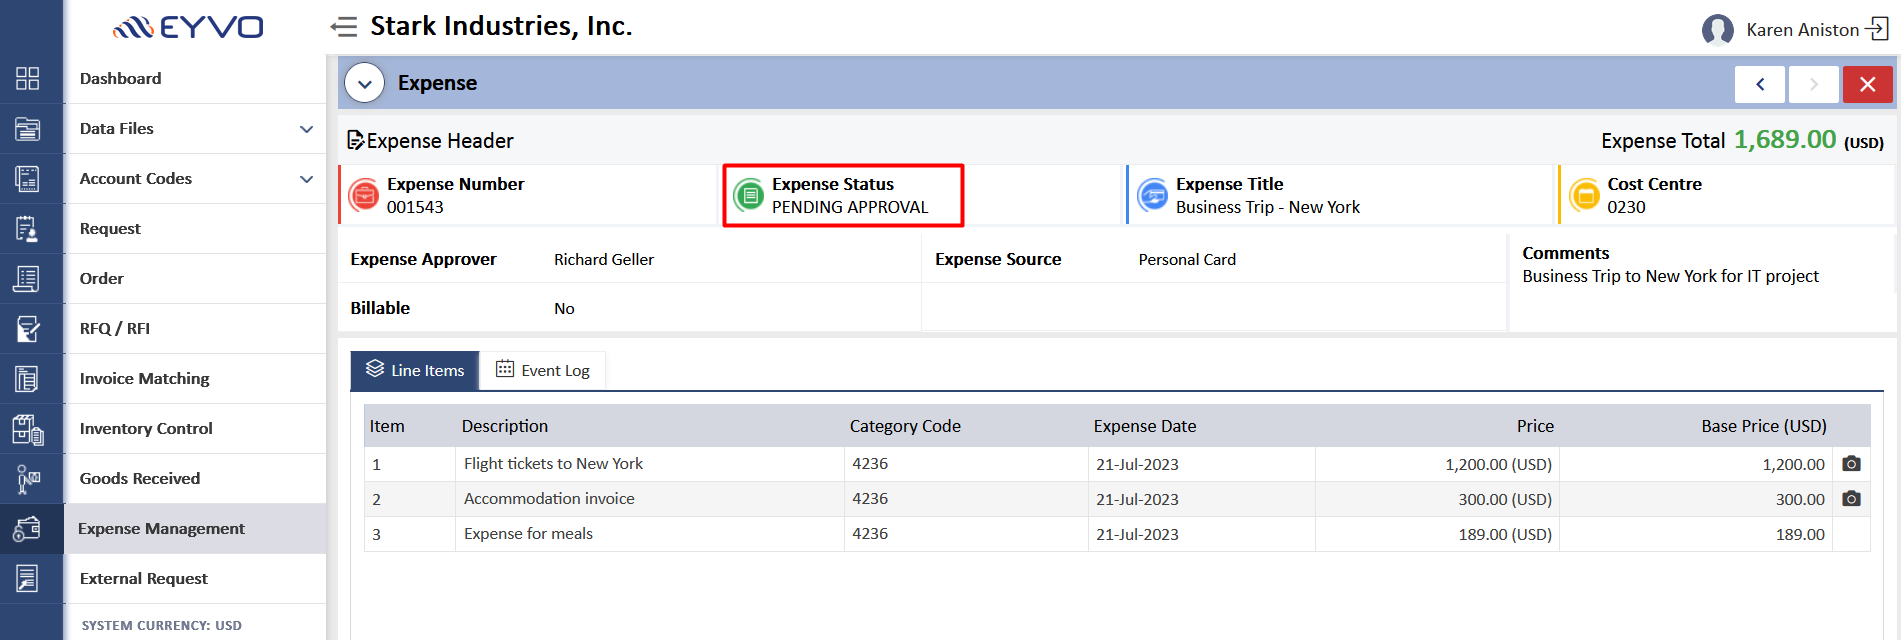
20. Once the expense has been submitted to the expense approver, the status of the expense will be updated to "Pending Approval," as shown in Screen: 20.
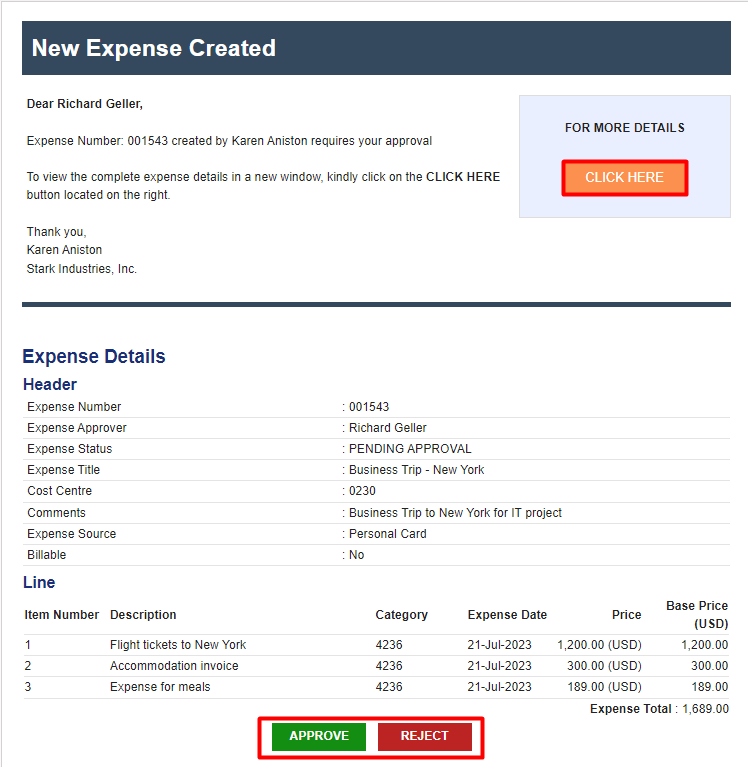
21. The Expense Approver will receive an email notification of the expense that requires their approval. The Expense Approver can simply click on the “Approve”/ “Reject” buttons at the bottom of the email to approve or reject the expense directly, as shown in Screen: 21.
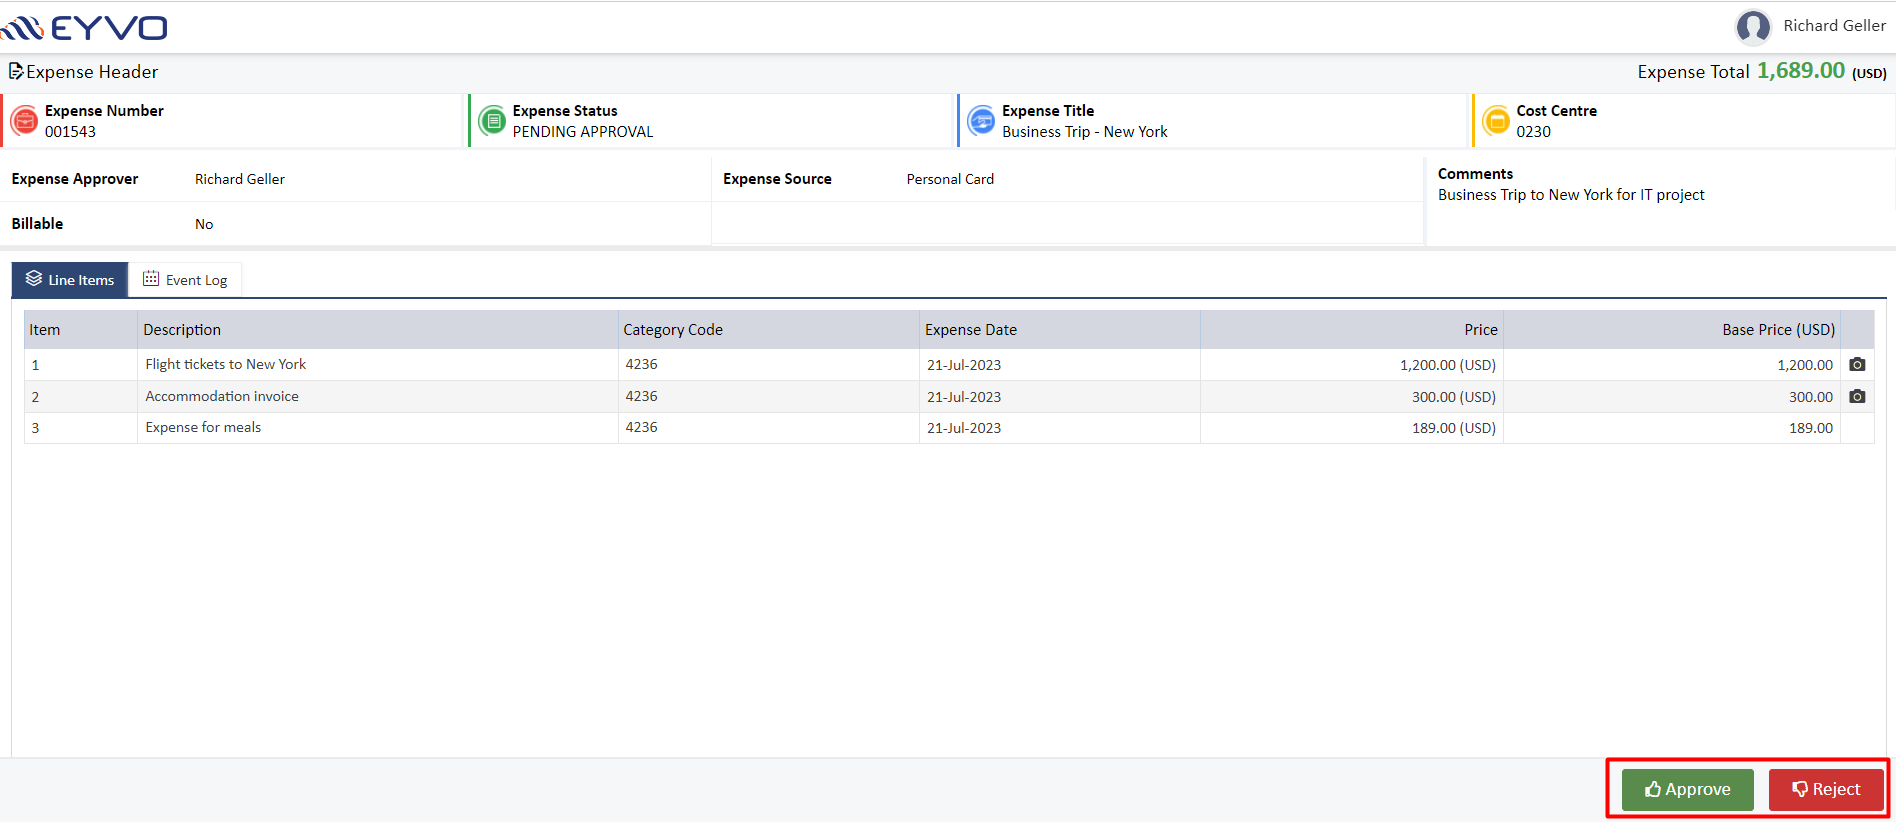
22. If the Expense Approver selects the “Click Here” option, they will be redirected as shown in Screen: 22 where they could see the expense details for which approval is required. They can then “Approve”/ “Reject” the approval using the highlighted buttons provided at the bottom of the page.
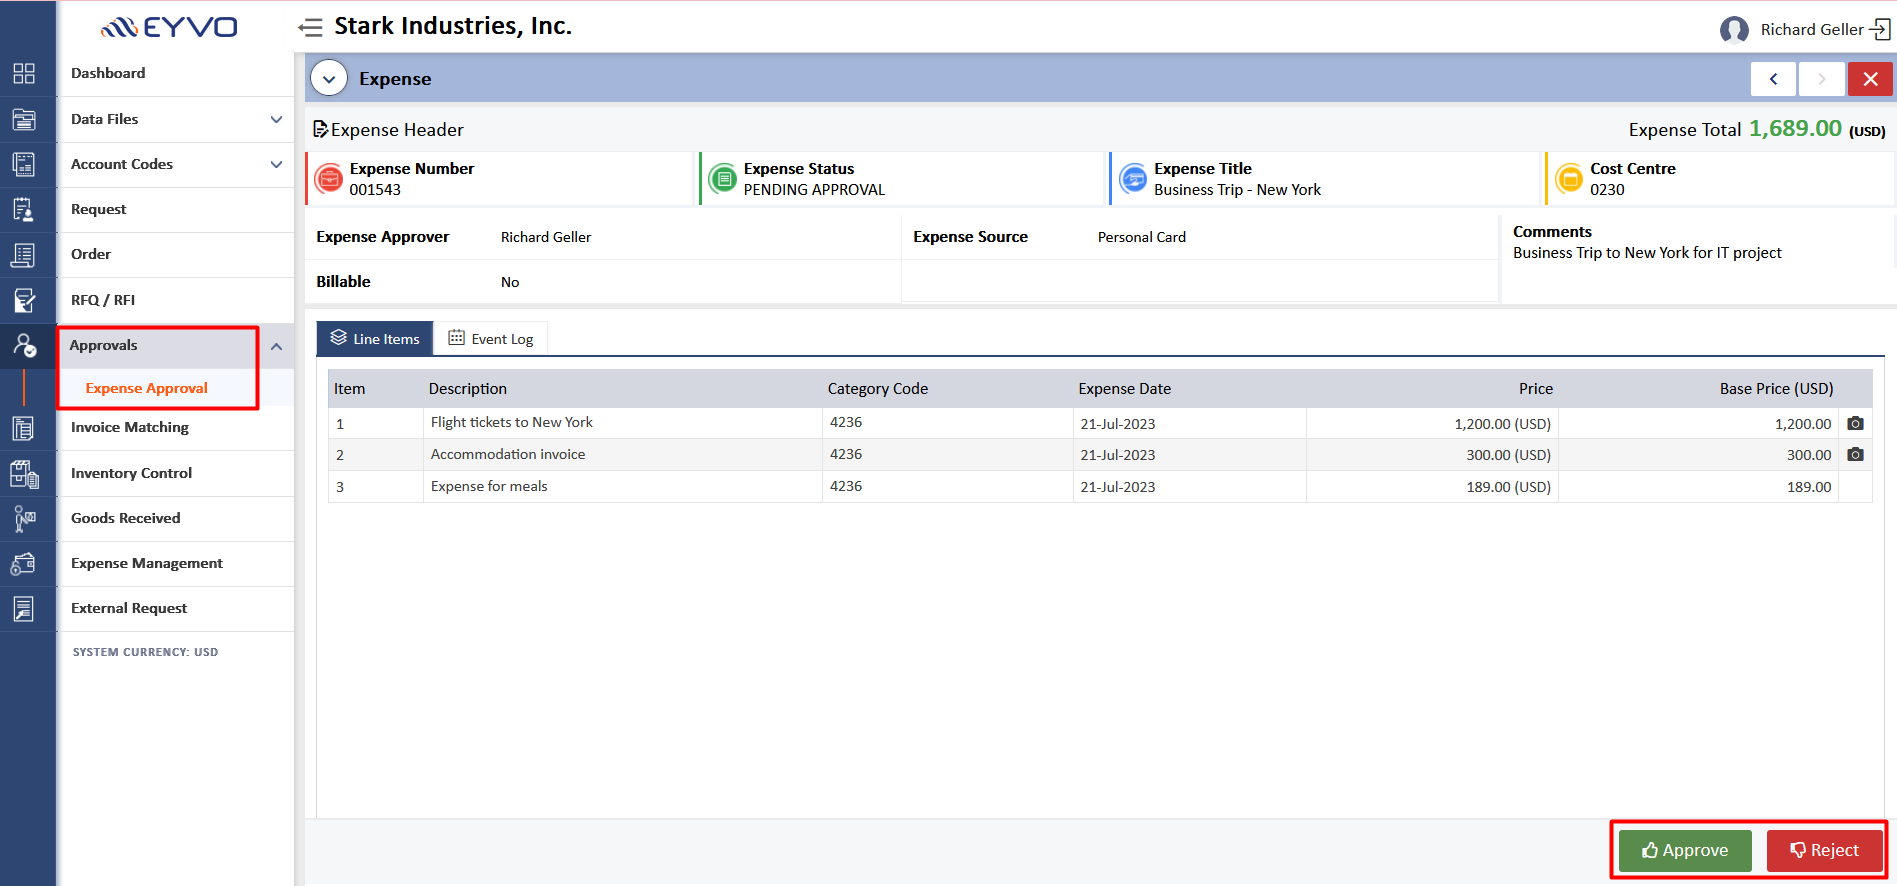
23. In another option, the expense approver has the ability to approve or reject the expense by logging into the main application. They can do this by navigating to the "Approvals" tab, locating the specific expense number, and then simply clicking on the appropriate buttons labeled "Approve" or "Reject", as shown in Screen: 23.
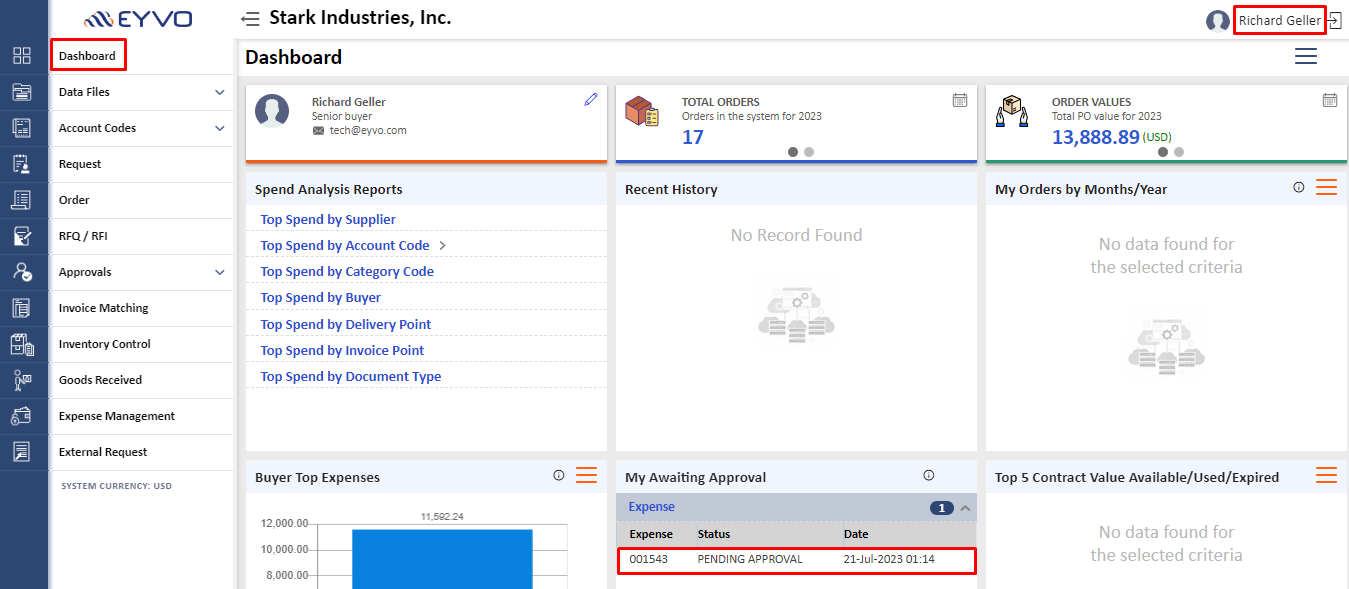
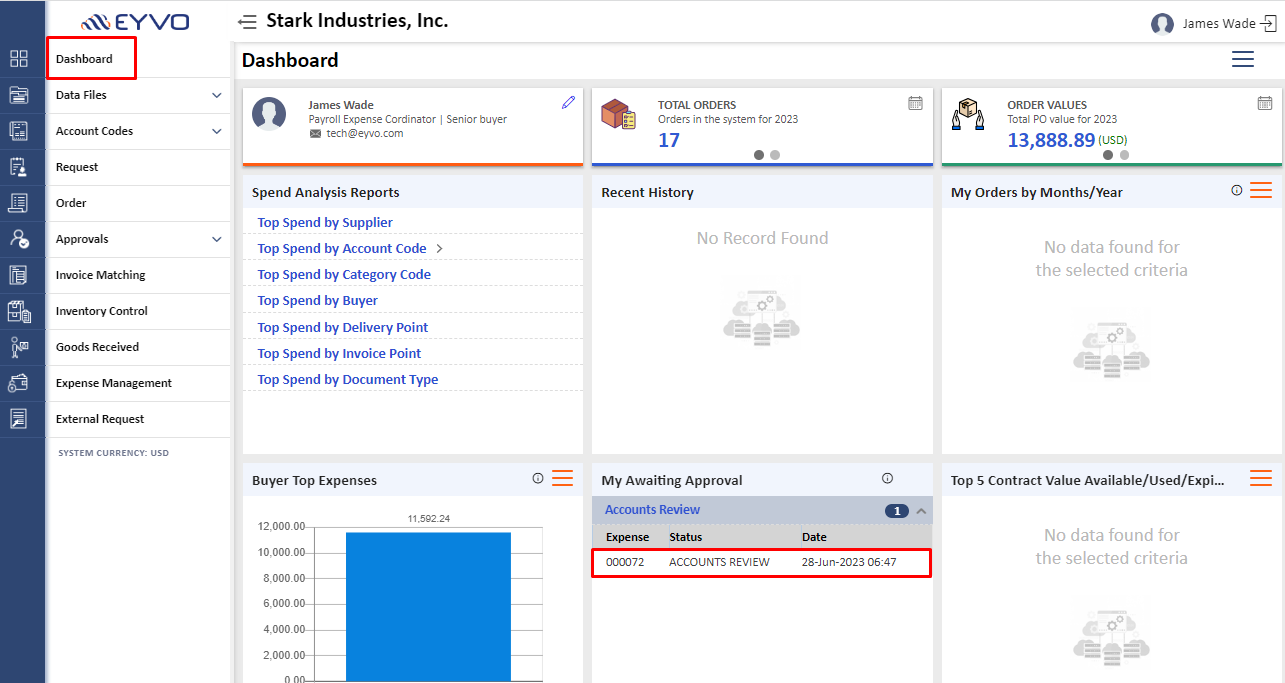
24. Additionally, the expense approver has the option to access the "My Awaiting Approval" section within the "Dashboard". By clicking on the expense number in the Dashboard, the system will automatically redirect the approver to the "Approvals" tab, where they can proceed to click on the appropriate buttons labeled "Approve" or "Reject", as shown in Screen: 24.
25. Once the expense approver has clicked on "Approve" from the email, a pop-up in front of the approver to confirm if they want to approve the expense. They can proceed further by clicking on the “OK” button.
26. On confirming the approval, a screen similar to below will appear in front of the approver stating that the expense has been approved successfully. It also gives the approver an option to to login into the main application by clicking on the “Click Here” hyperlink.
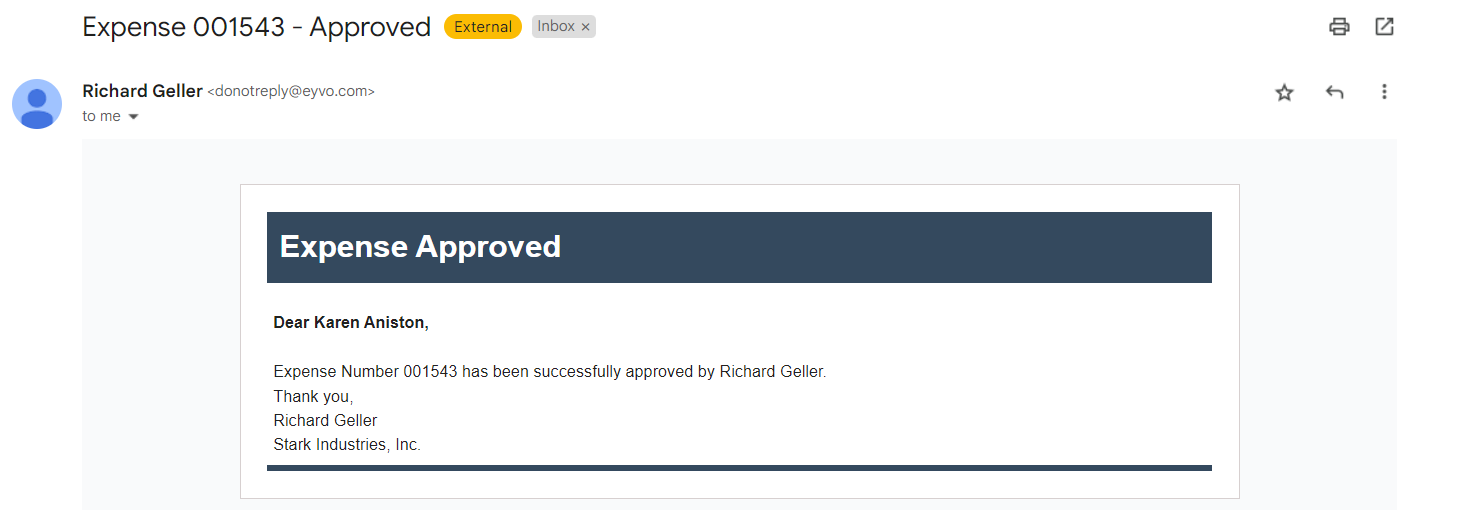
27. Once the Expense Approver approves the expense an email will be triggered to the expense originator, in this case Karen Aniston, stating that the expense has been approved by Richard Geller (Expense Approver).
28. Now, let’s say that the Expense Approver decides to reject the approval due to some reason, they will click on the “Reject” button. This will pop-up a dialogue box, asking for the reason for rejection. The Expense Approver will provide valid reason and click on the “Reject” button as highlighted on the screen below.
29. The Expense Approver will see another pop-up on the screen, confirming whether they want to reject the expense. They can confirm by selecting the “OK” option as highlighted on the Screen: 29.
30. On clicking the “OK” option, the Expense Approver will be redirected to a page which says that “Expense Rejected Successfully” along with the expense number mentioned on the Screen: 30.
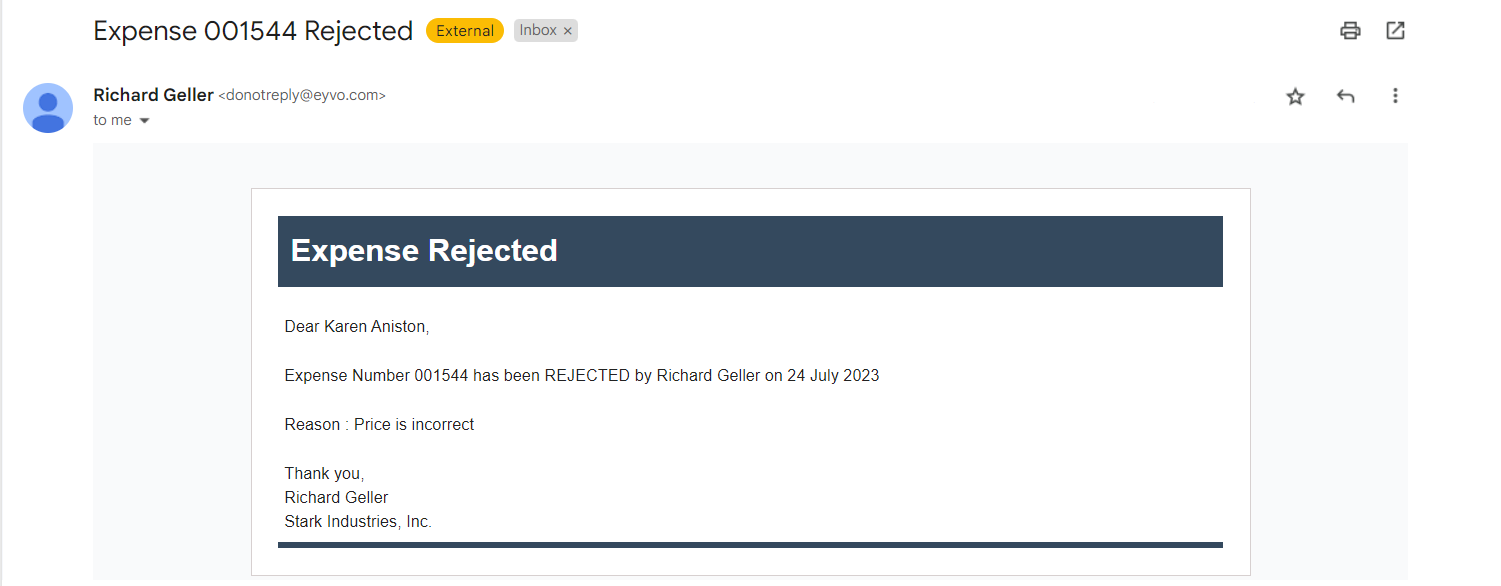
31. The originator will receive a notification email that the Expense Approver has rejected the expense along with the reason for rejection.
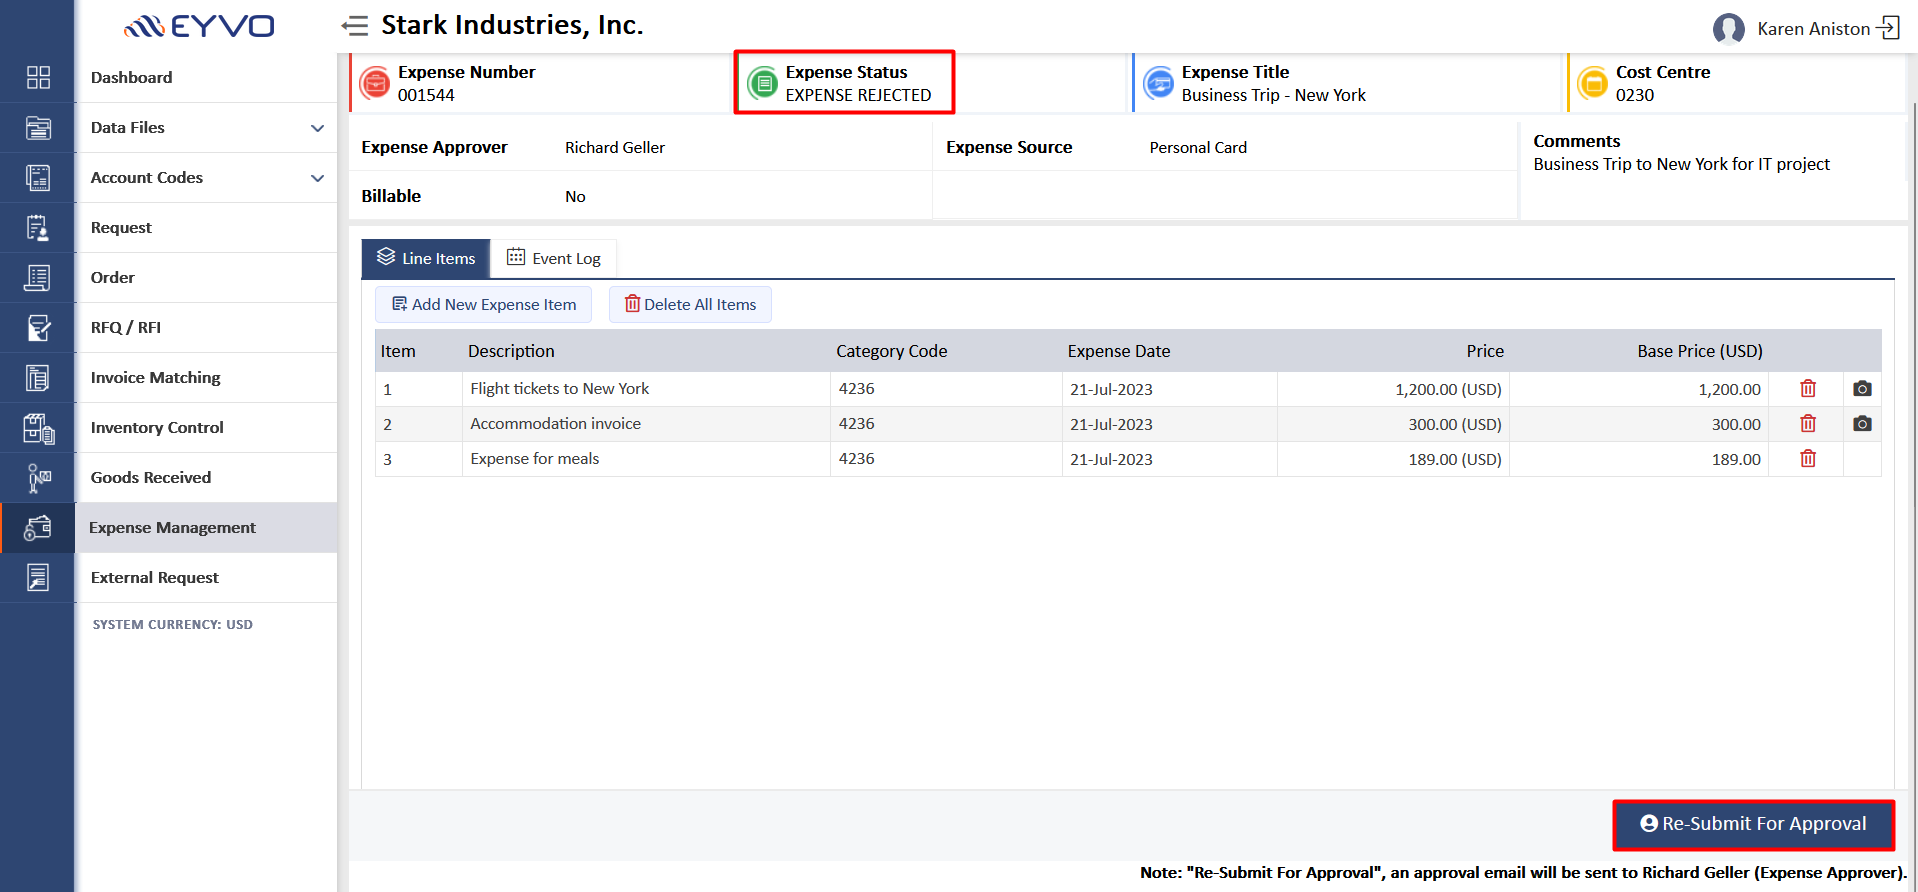
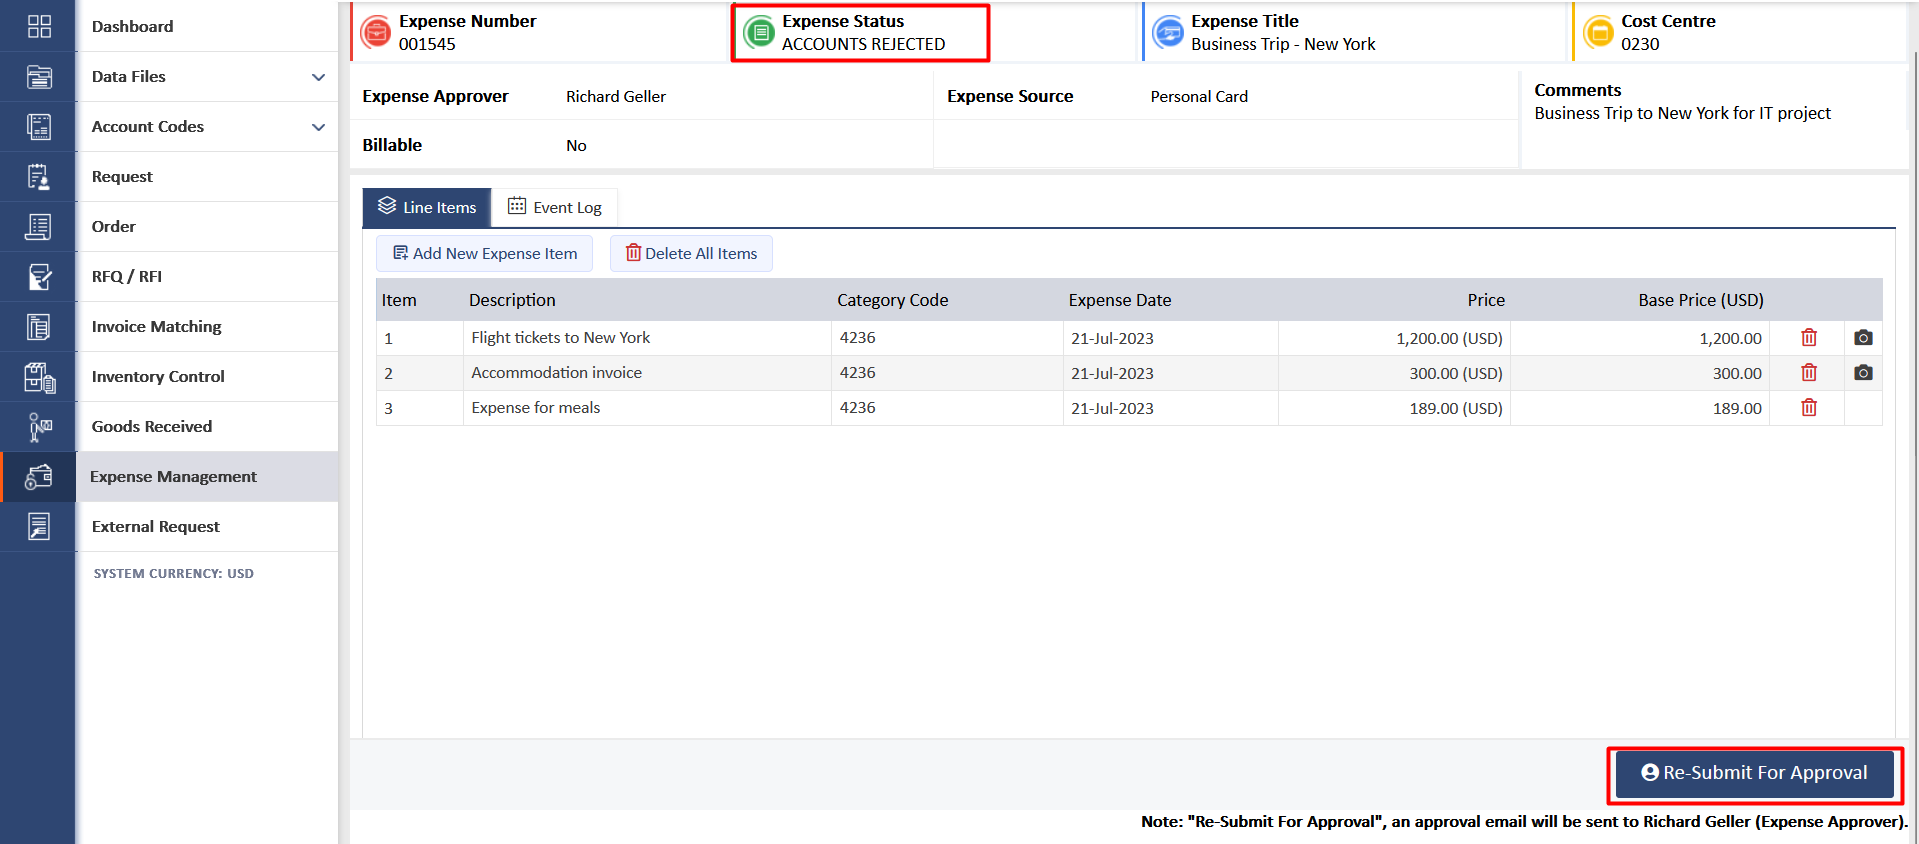
32. Below screen displays the status of the expense as “Expense Rejected”, on the Main Application’s page. Also, the expense can be modified and resubmitted to expense approver by clicking on the "Re-Submit For Approval".
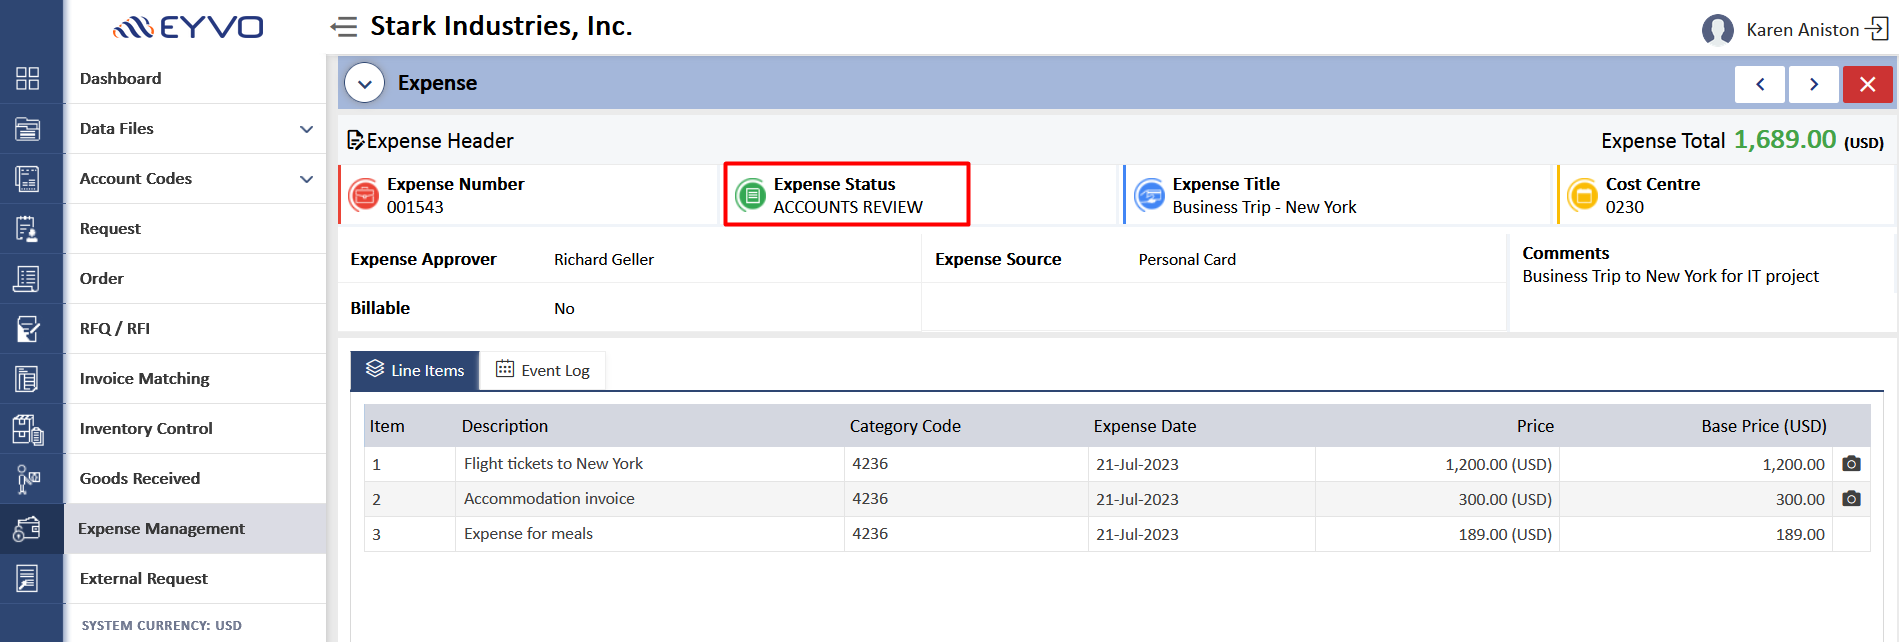
33. Once the expense approver has approved the expense, the status on the expense page will change to “Accounts Review” as the next step will proceed to the Accounts Manager.
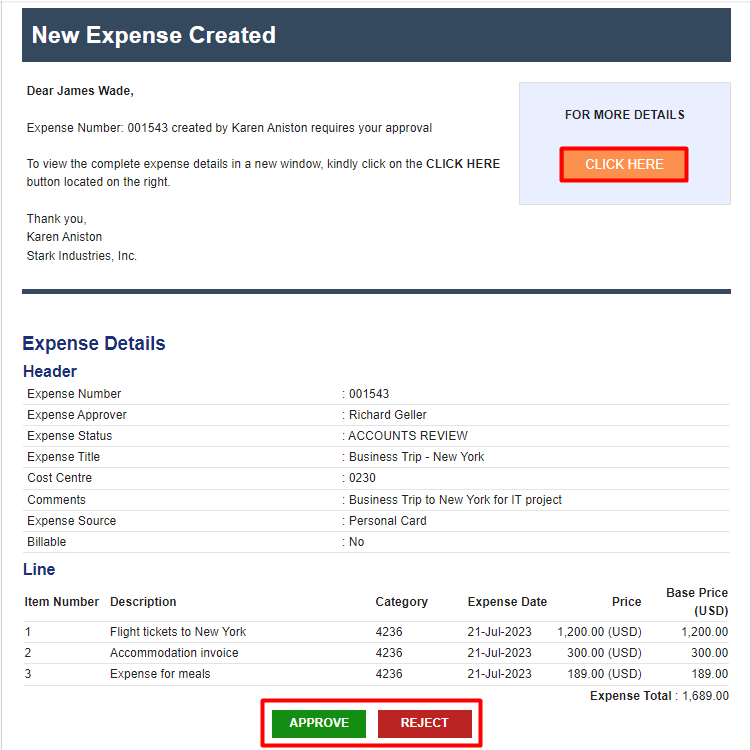
34. The Accounts Manager will receive an email such as below, as the next step of the approval process. In this scenario, James Wade is the Accounts Manager and they will approve or reject the expense by clicking the “Approve” or “Reject” buttons provided at the bottom of the email or select the “Click Here” option as highlighted in screen below.
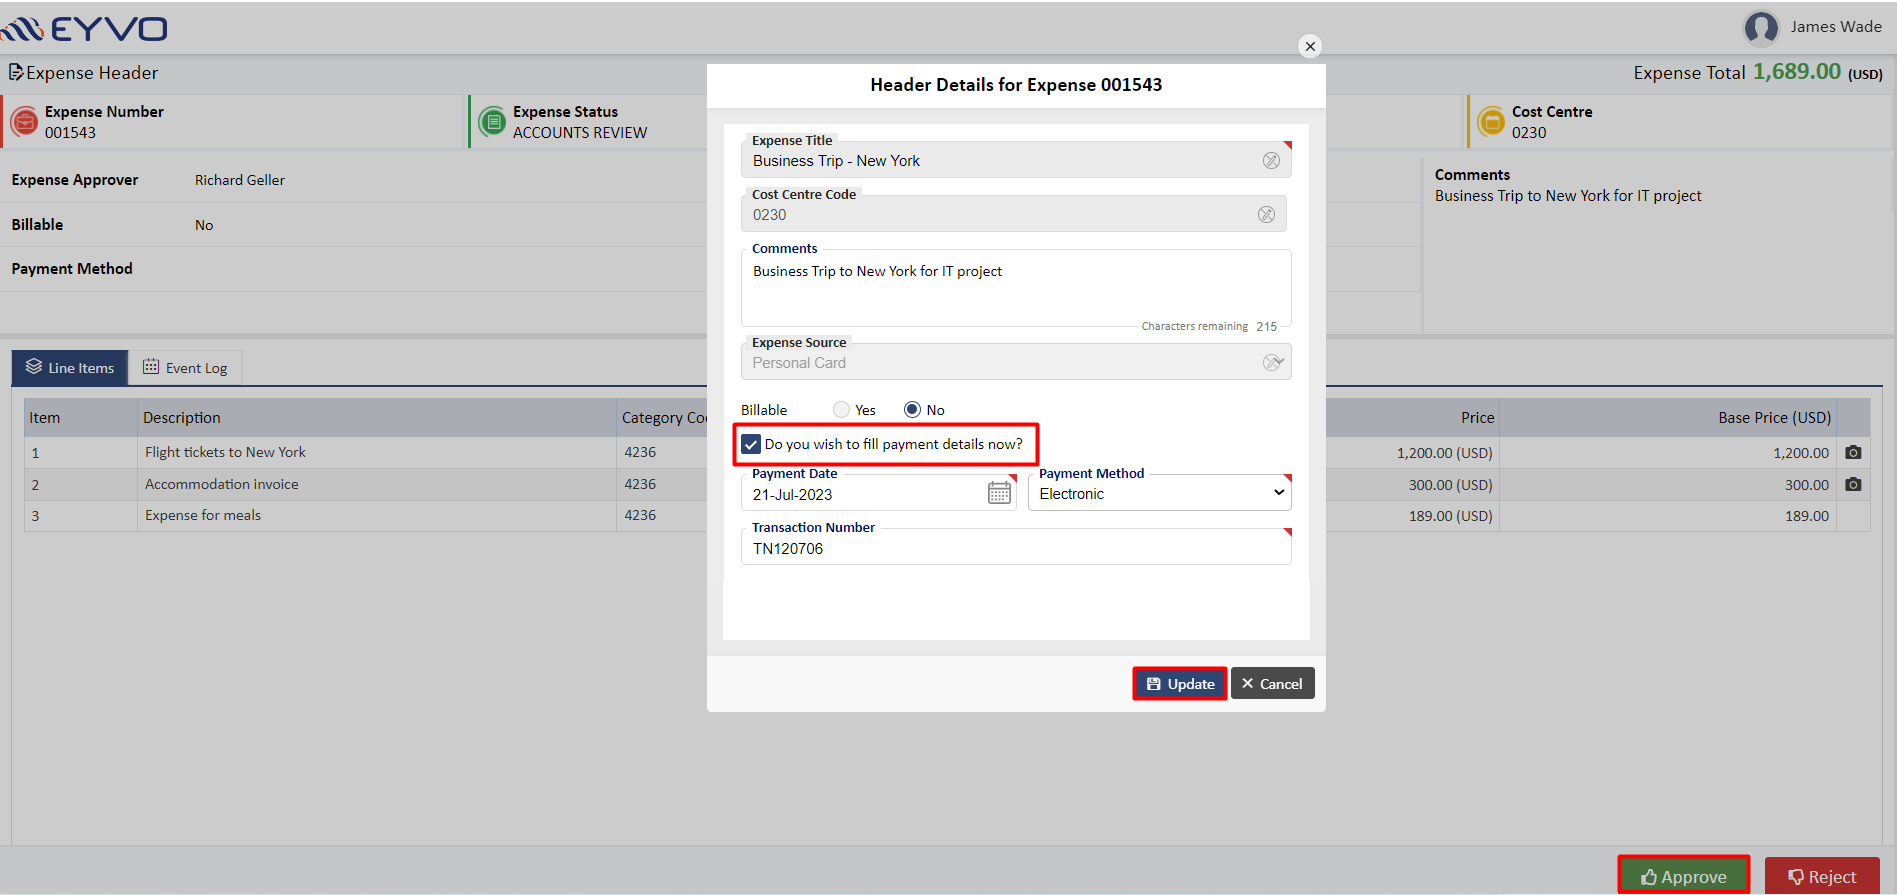
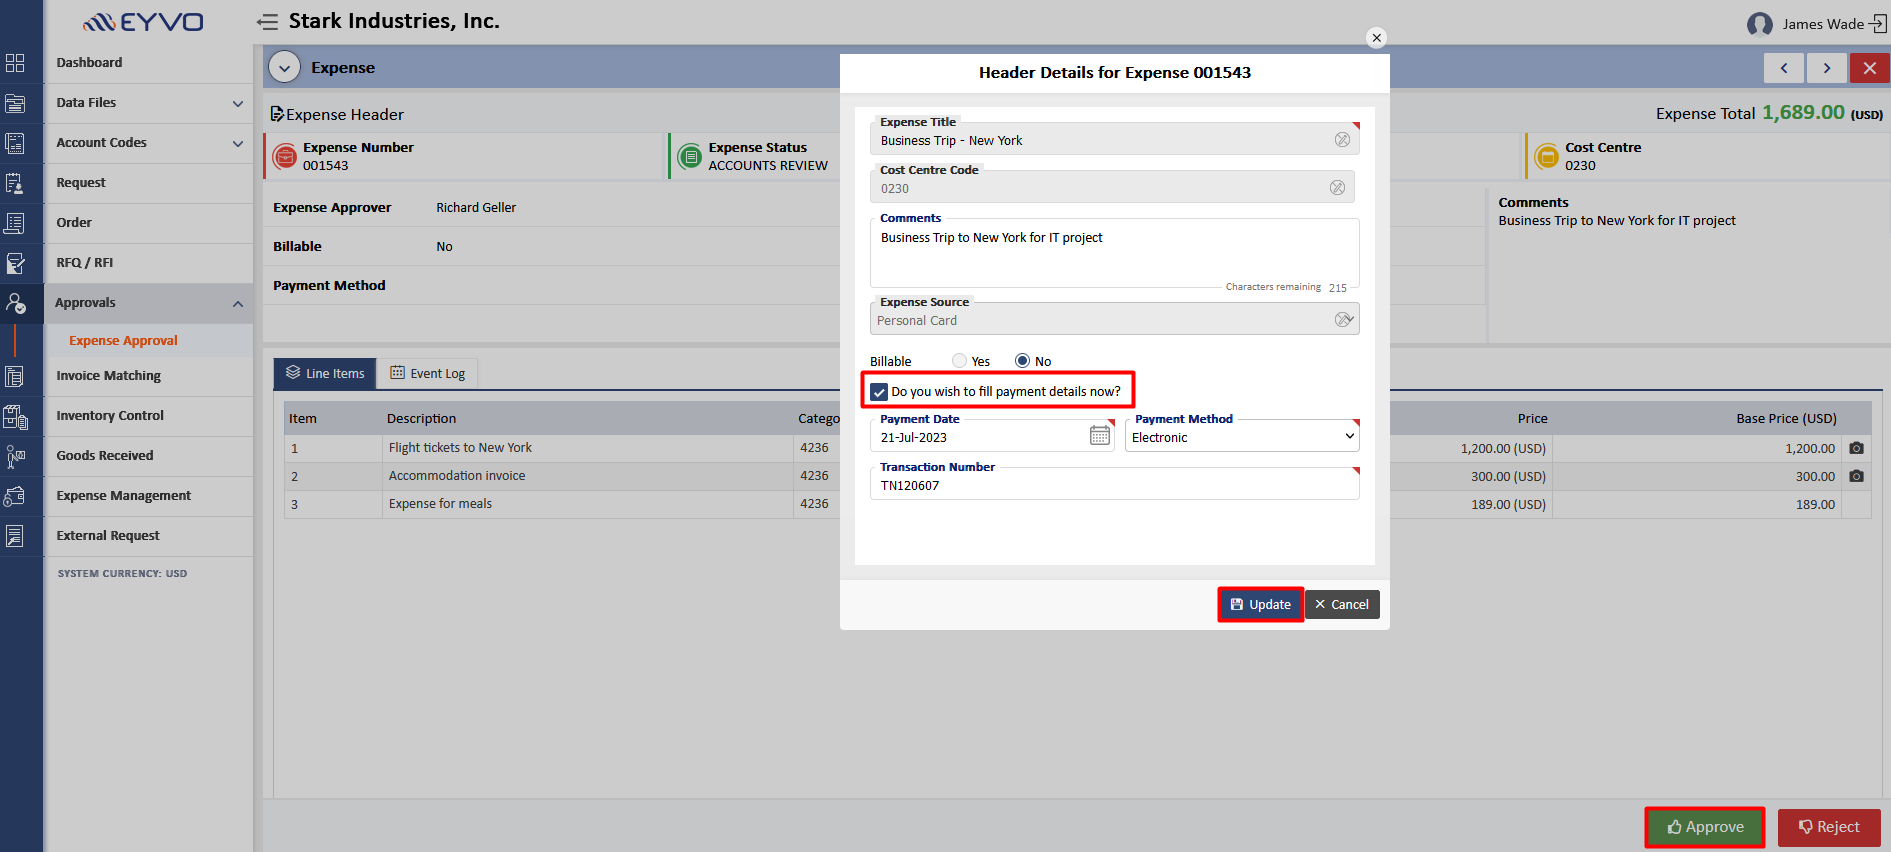
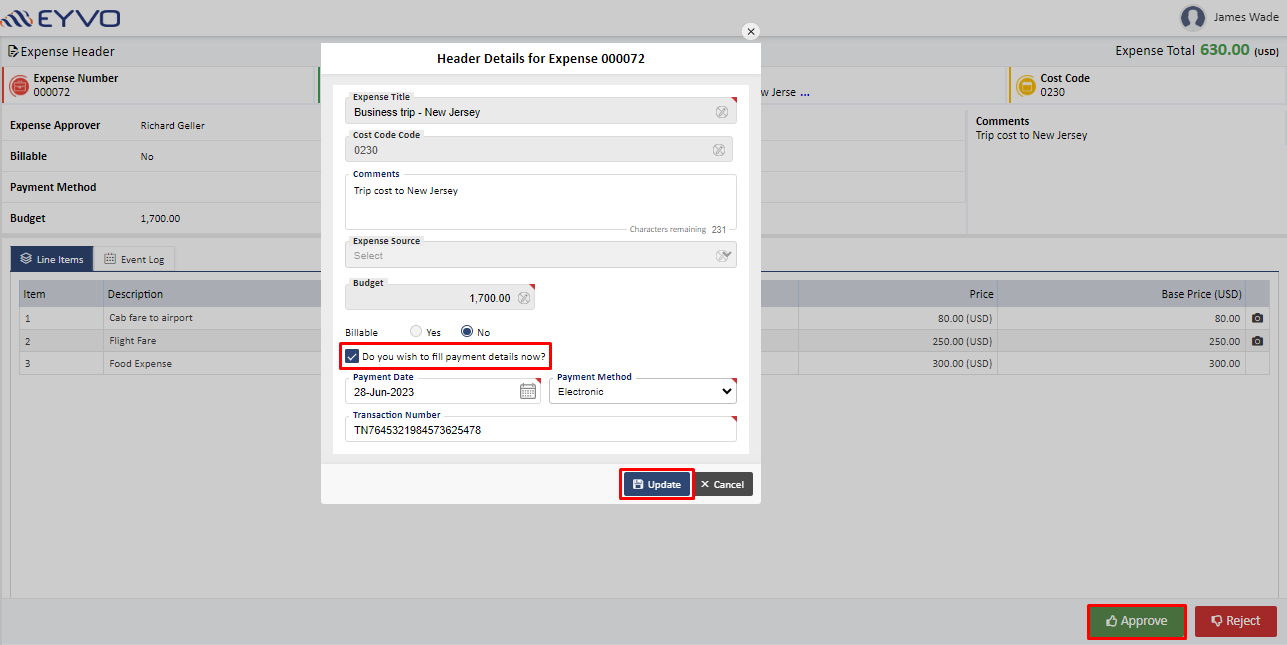
35. When the "Click Here" button is clicked, the screen displayed below will be visible to the Accounts Manager. On this screen, they have the option to select the checkbox labeled "Do you wish to fill the payment details now?" on clicking expense header. If they choose to do so, they can enter the payment details and then proceed to click the "Update" button. Finally, they can click the "Approve" button to complete the process.
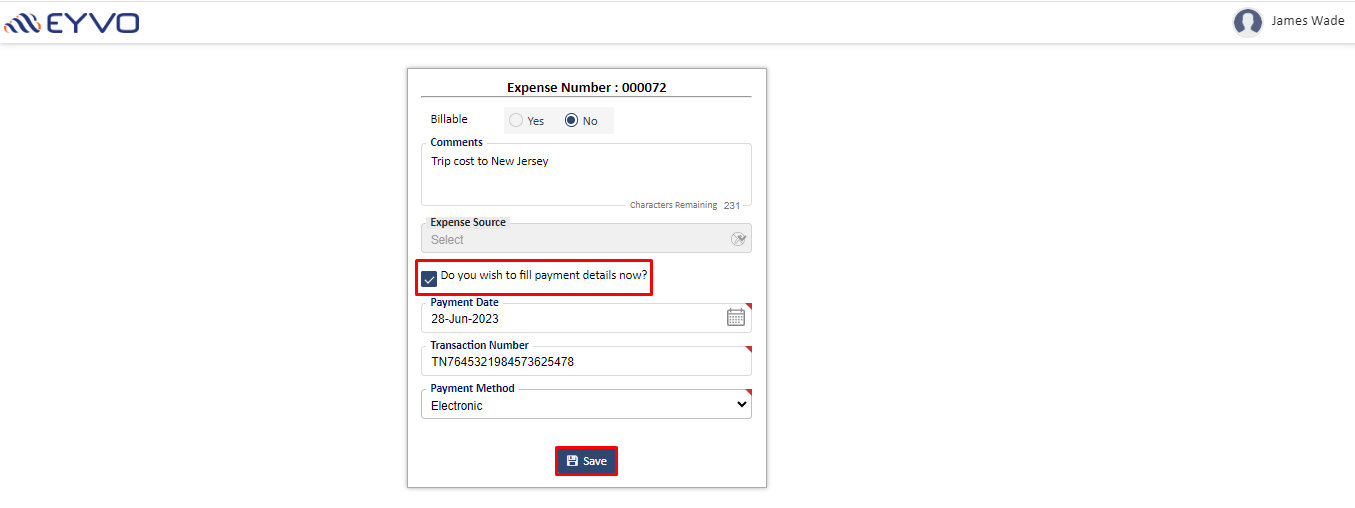
36. Upon clicking the "Approve" button located at the bottom of the email, the Accounts Manager will be directed to a screen where they can enter the payment details. After entering the necessary information, they can proceed by clicking the "Save" button to finalize the process.
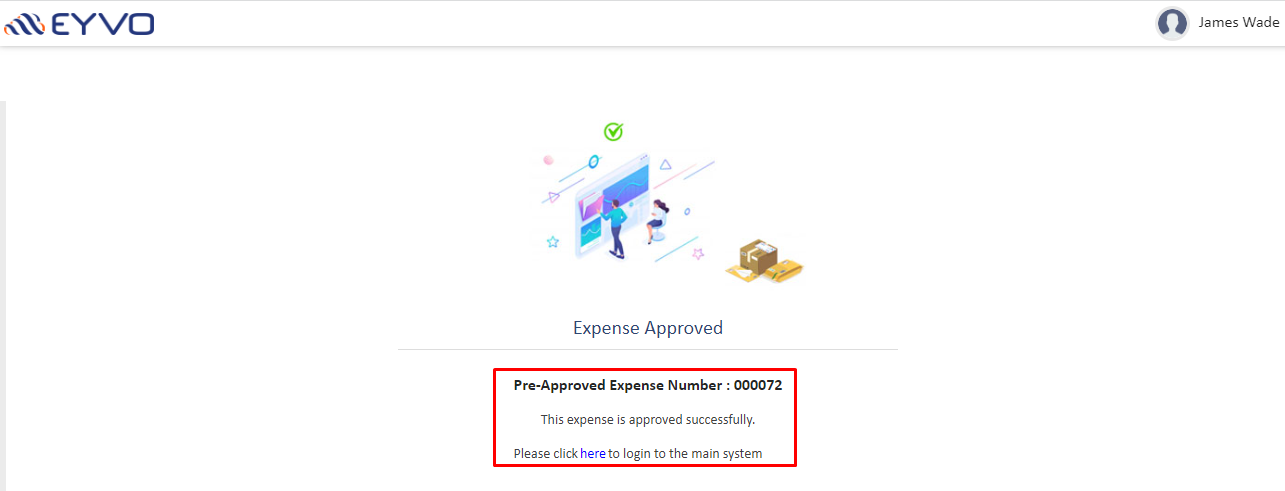
37. On approving the expense, the below screen will appear in front of the Account Manager stating that the expense has been approved successfully.
38. In another option, the account approver has the ability to approve or reject the expense by logging into the main application. They can do this by navigating to the "Approvals" tab, locating the specific expense number, and then simply clicking on the appropriate buttons labeled "Approve" or "Reject", as shown in Screen: 38.
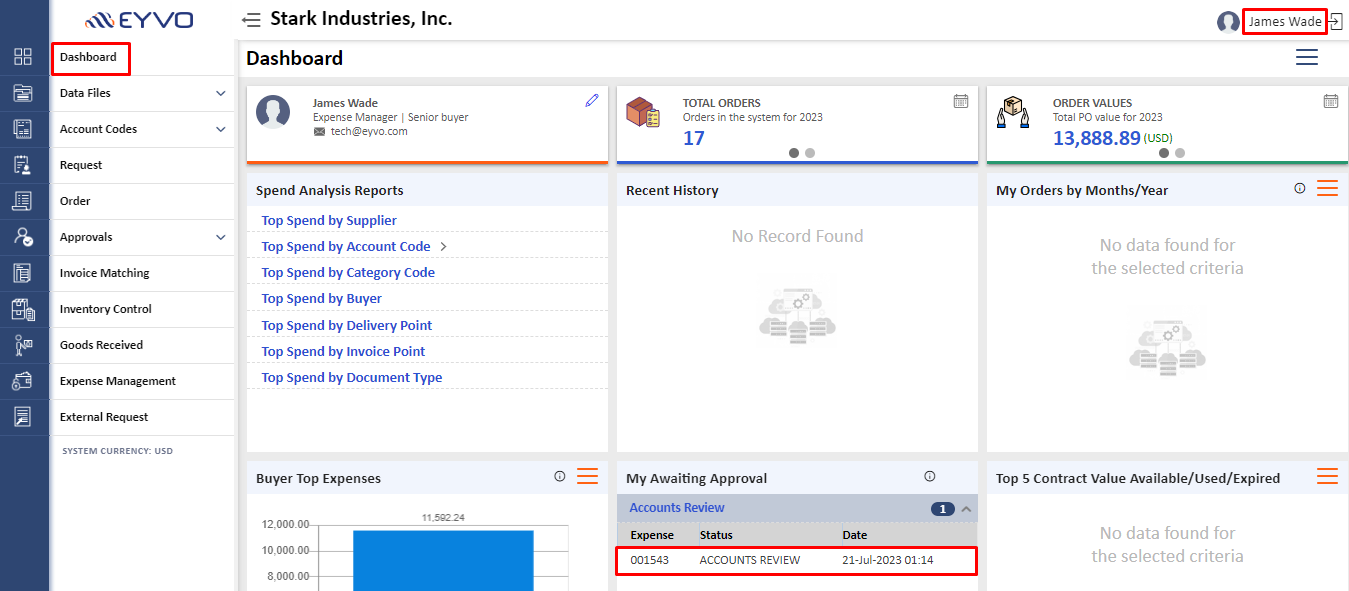
39. Additionally, the account approver has the option to access the "My Awaiting Approval" section within the "Dashboard". By clicking on the expense number in the Dashboard, the system will automatically redirect the approver to the "Approvals" tab, where they can proceed to click on the appropriate buttons labeled "Approve" or "Reject", as shown in Screen: 39.
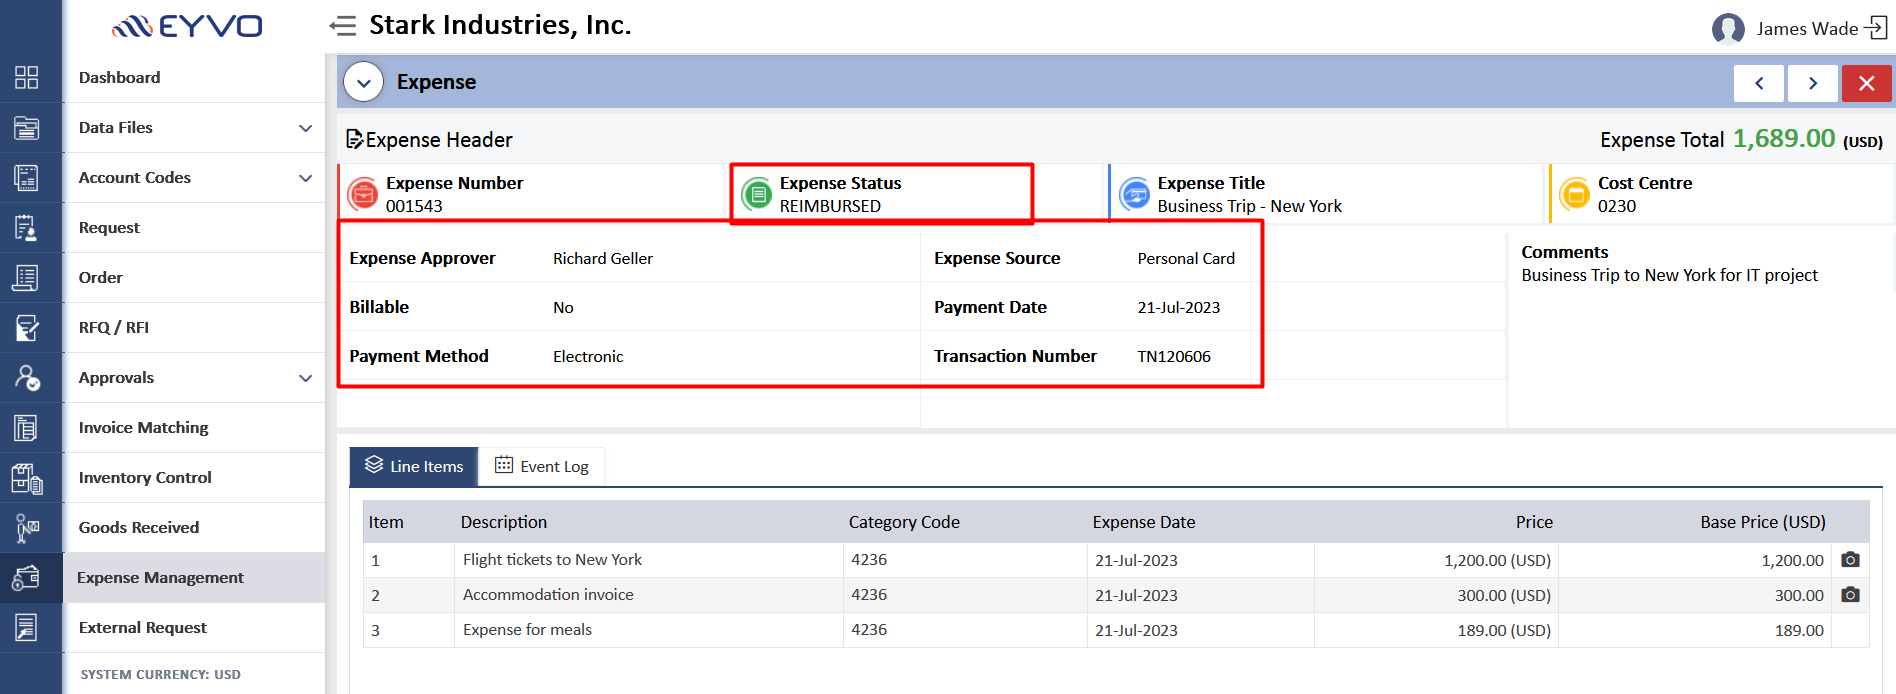
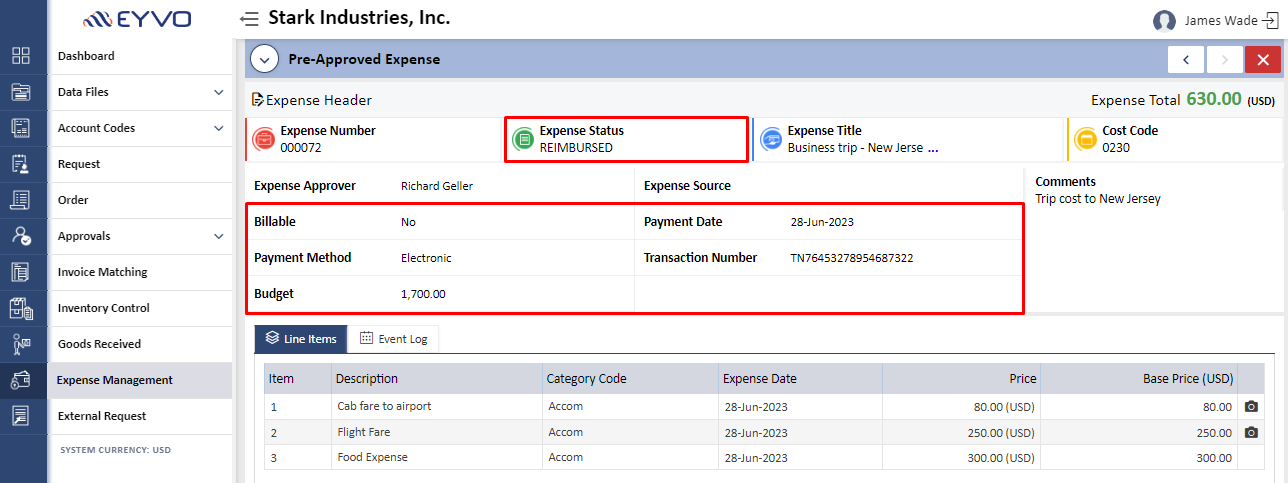
40. Once the expense is approved, the originator will see the Expense Status changed to “Reimbursed”, on the “Expense” page as shown in Screen: 40.
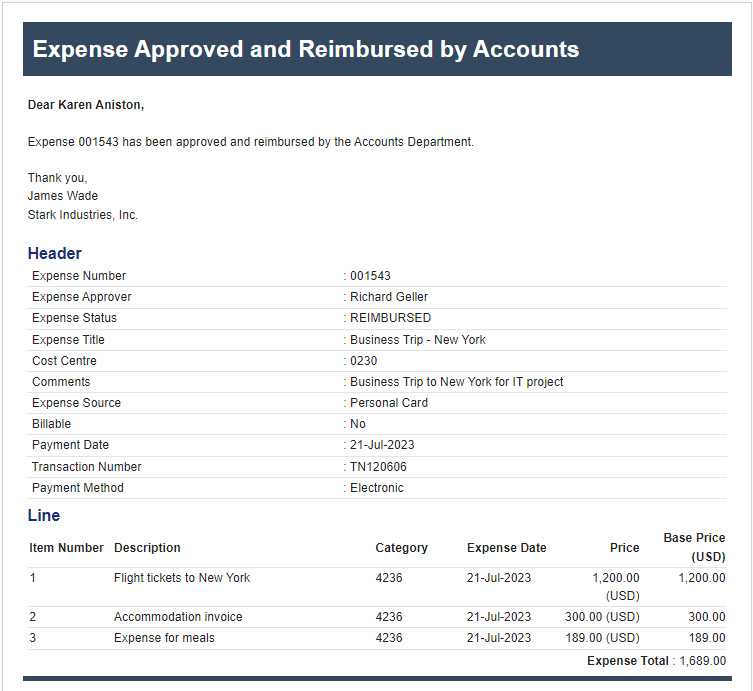
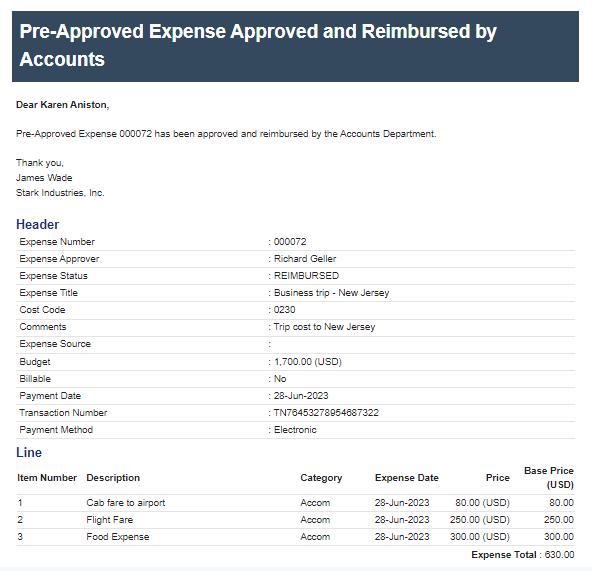
41. In addition, the expense originator will also receive an email notification, stating that their expense has been approved by the “Account Manager” as shown in Screen: 41.
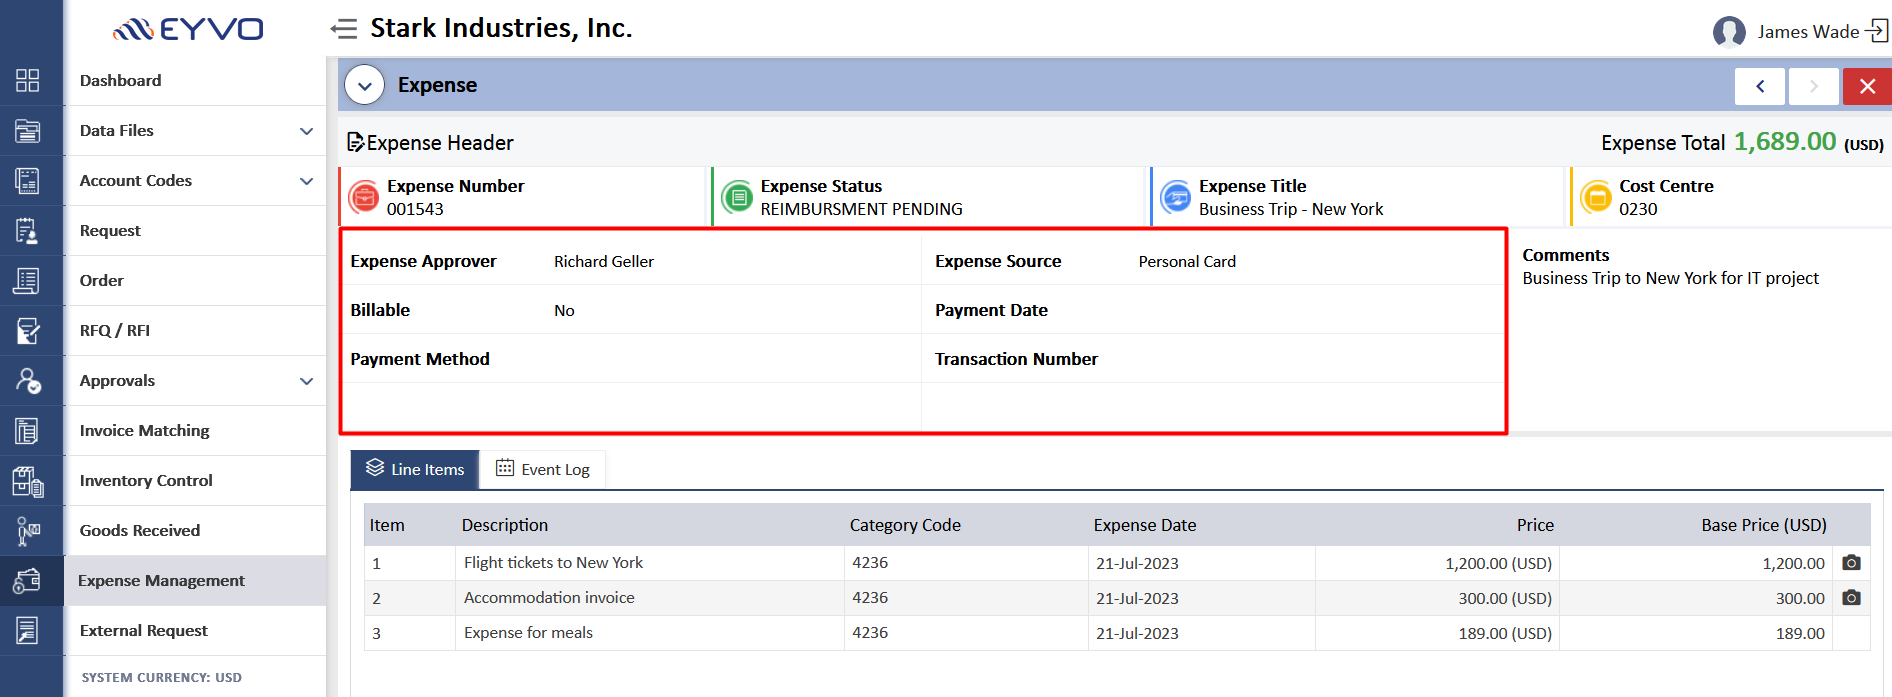
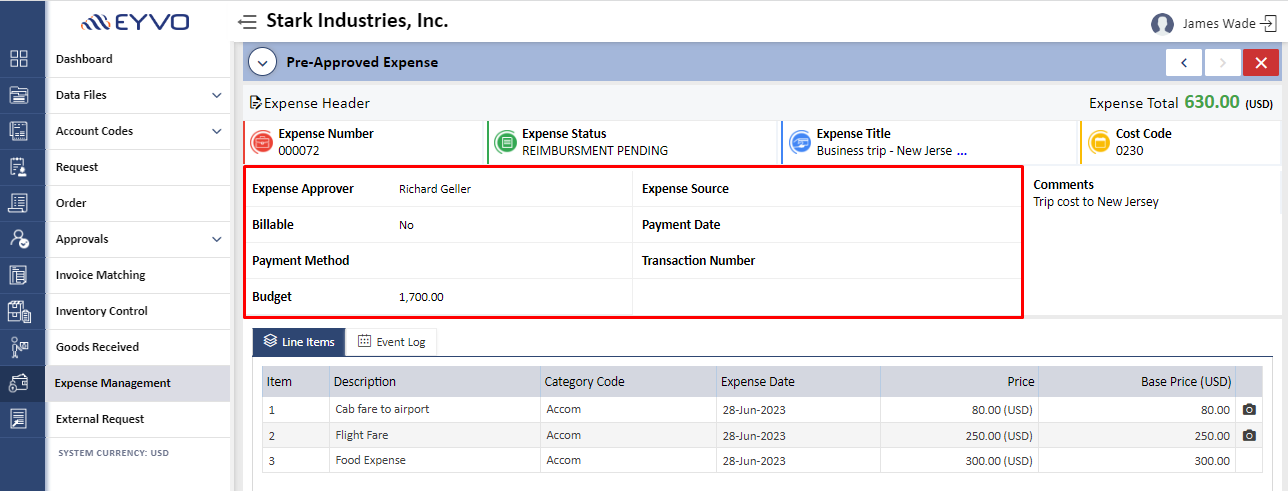
42. If the Account Manager approves the expense by clicking the "Approve" button without entering the payment details, the Expense Status will be updated to "Reimbursement Pending." To enter the payment information, the Accounts Manager should log in to the main application and access the expense header as displayed on Screen: 42.
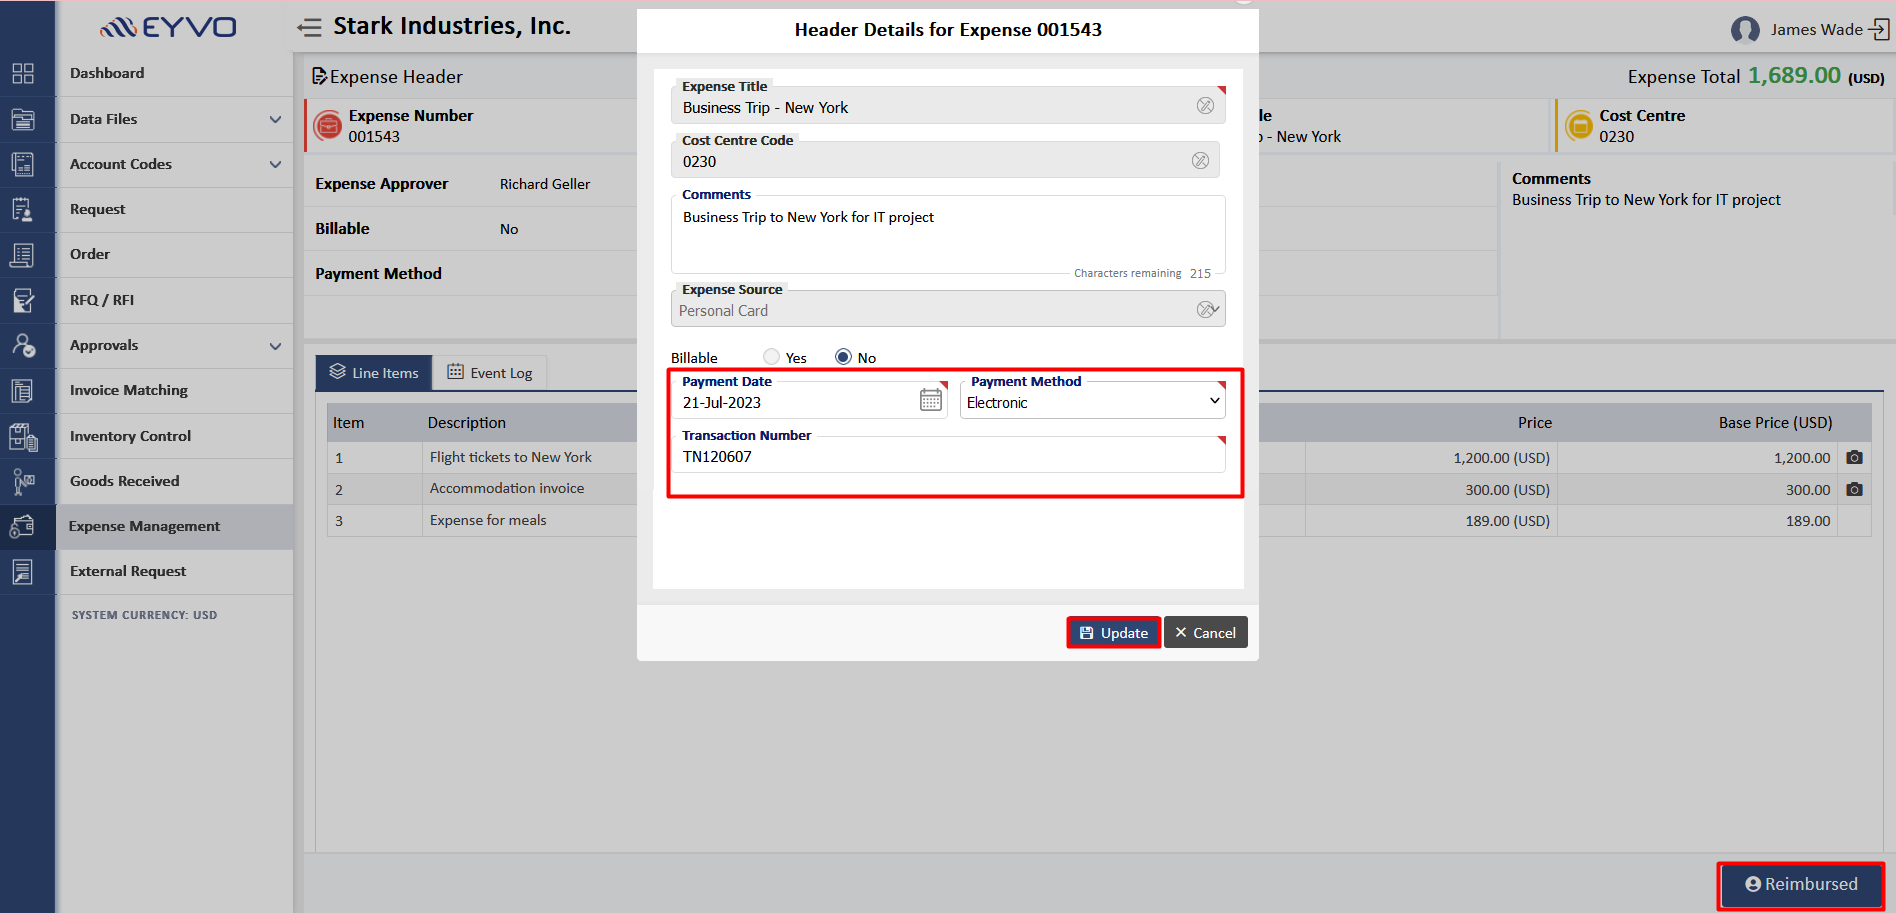
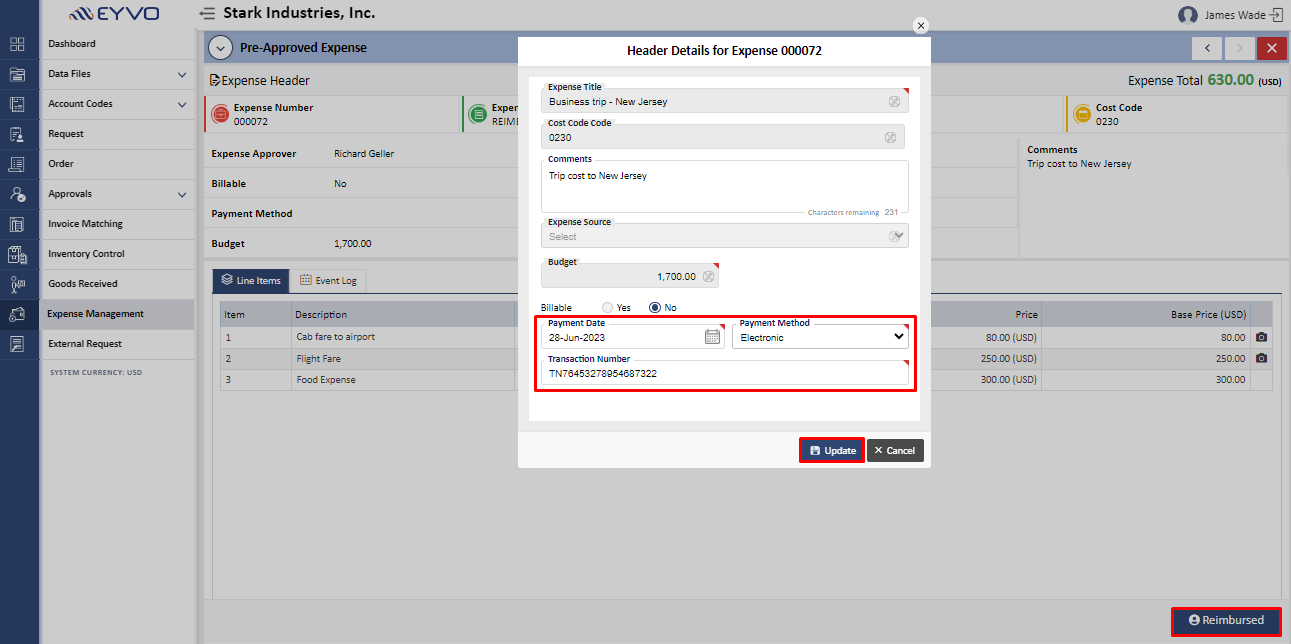
43. Within this screen, the Accounts Manager is required to input reimbursement details such as the Payment Date, Payment Method, and Transaction Number. After entering the necessary information, they can proceed by clicking the "Update" button. The entered payment details will now be visible in the header section for the Accounts Manager. Once the details are successfully updated, they can finalize the process by clicking on the "Reimbursed" button located at the bottom, as illustrated in Screen: 43.
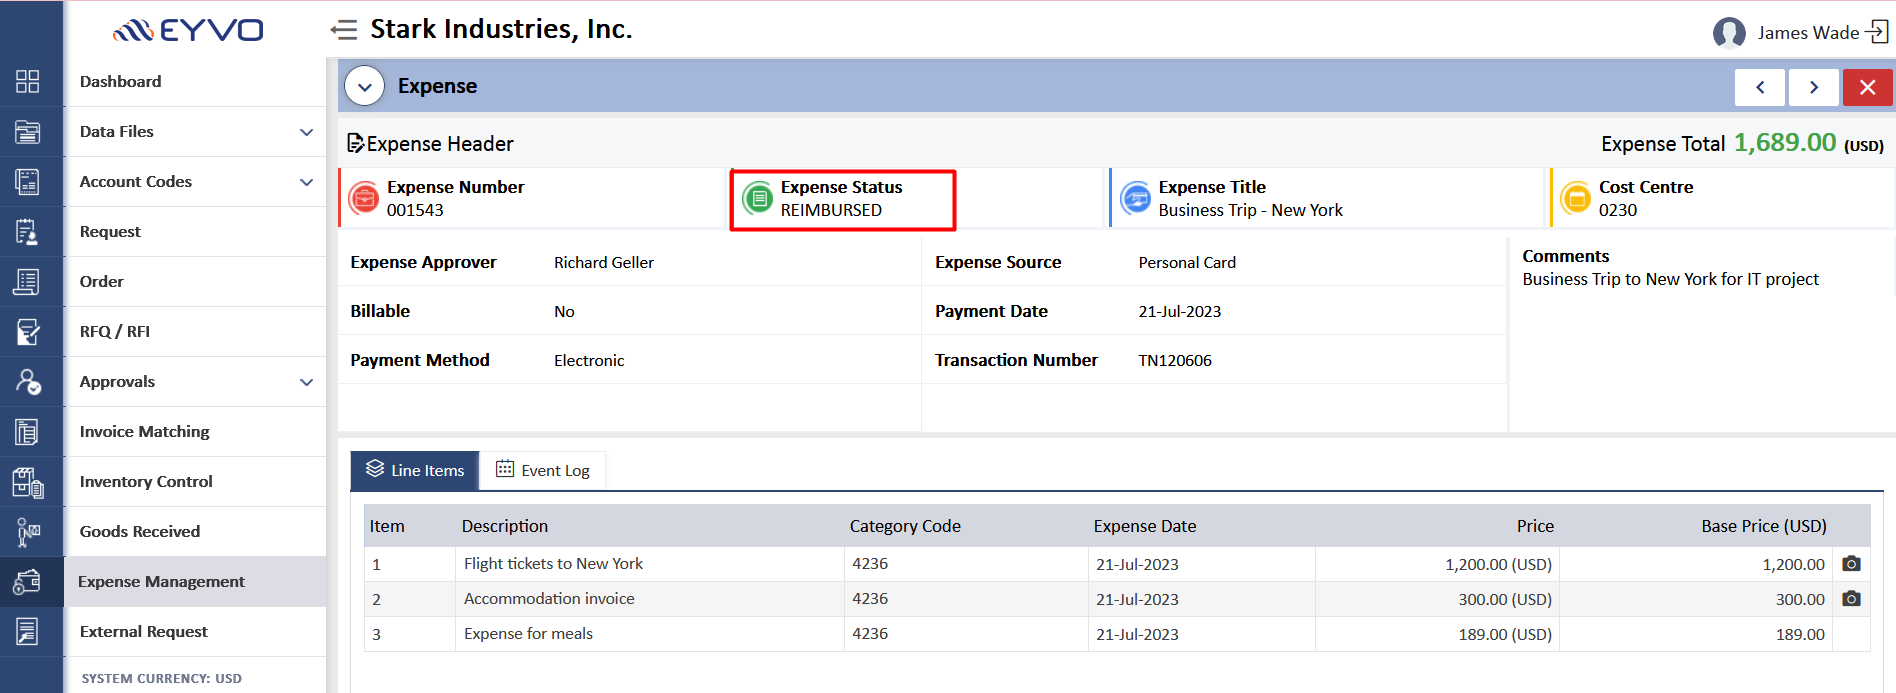
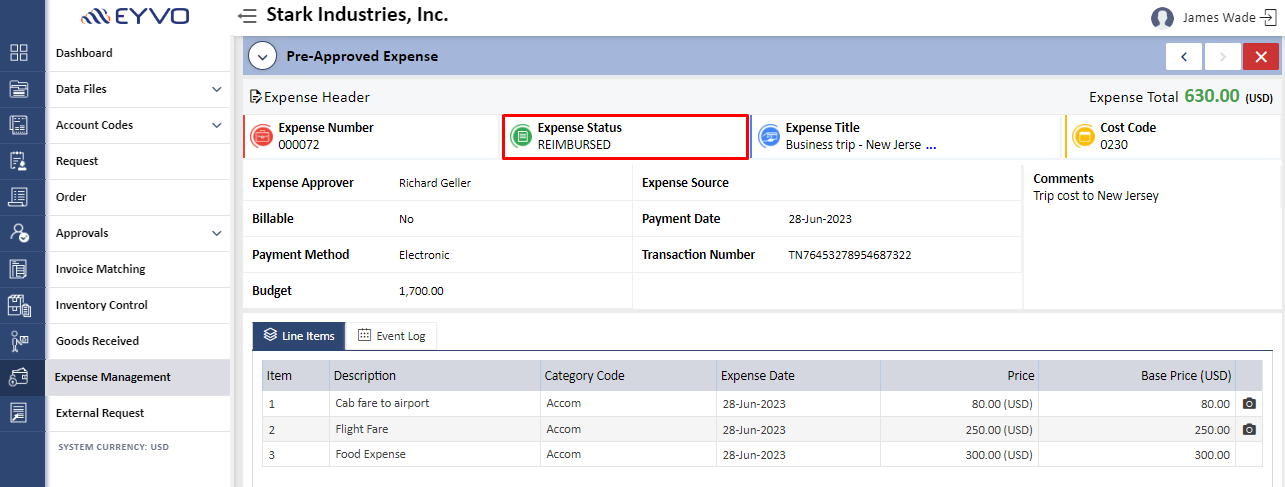
44. Now the Expense Status will changed to “Reimbursed” as shown in Screen: 44. Also, the expense originator will also receive an email notification, stating that their expense has been approved by the Account Manager.
45. In a scenario where the Account Approver chooses to reject the approval for a particular expense due to specific reasons, they will need to click on the "Reject" button. Following the rejection, the expense status will be updated to "Accounts Rejected". If the originator decides to proceed by clicking on "Re-submit for Approval", the expense will be resubmitted to the Expense Approver for their approval, as depicted below.
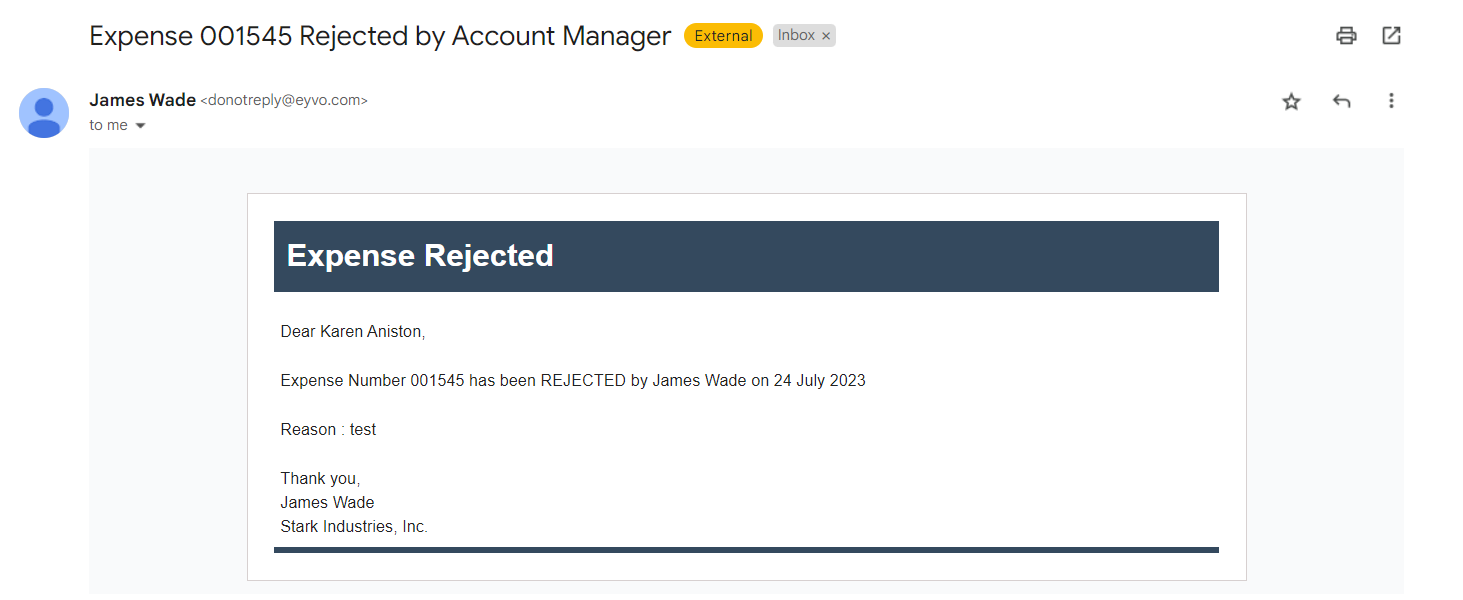
46. The originator will receive a notification email that the Account Approver has rejected the expense along with the reason for rejection.
Pre-Approved Expense
The Pre-Approved Expense module allows the originator to define a pre-approved budget for spending on business related activities. This is commenced by getting budget approval from the Expense Approver and then submitting the expense invoices to the Account manager to complete the process.
1. First step in this will be providing “Expense” permission to users by the System Administrator. For this you will need to login into the system administration section, click on User Maintenance-> User Register and this will display the list of users in the system or else add new user by clicking on “Add New” button as shown in the screen below.
For the purpose of demonstration, we will utilize the user 'Karen Aniston' as the expense originator. Consequently, we will grant the user Read-Write permissions to perform necessary actions within the system.
2. Select the user you want to assign the Expense permission. Then, click on the user’s “Permissions” tab. Provide “Read and Write” access to the user for Expense as highlighted in the screen below.
3. If you want to assign an Expense Approver to a user for approving their expense, click on the “Approver” tab and select the Expense Approver by clicking on the folder icon as shown in Screen-3.
It will display a list of users from which you can select an “Expense Approver” by clicking on the user name. You can also search the particular person by typing their name on the search bar and clicking on the “Search” button as shown in Screen-3.1.
For e.g., the manager of a user could be their “Expense Approver”. In this scenario, any expense created by Karen Aniston will be sent to Richard Geller for approval.
Choose the user you wish to select, and once you have made your selection, that user will appear in the Expense Approver tab. Finally, click on the "Save" button to ensure that the changes are saved.
4. To proceed, the System Administrator must assign an "Account Manager" for expenses and activate the "Pre-Approved Expense" feature. To do this, navigate to the Expense Management section-> Switches option.
An Account Manager typically belongs to the accounts team and is responsible for approving payment disbursements. They will enter payment details for expenses in the system.
To assign an Account Manager, click on the drop-down menu next to the "Account Manager" label. A list of names will appear, from which one should be selected.
As an example, let's assume James Wade has been designated as the Account Manager. Once the Account Manager is assigned, the system will automatically send all expenses for account approval, regardless of the user who submitted the expense.
Additionally, the System Administrator needs to enable the "Pre-Approved Expense" function by toggling the corresponding switch to "Yes" and click on the "Save" button to save the changes as indicated in the screen below.
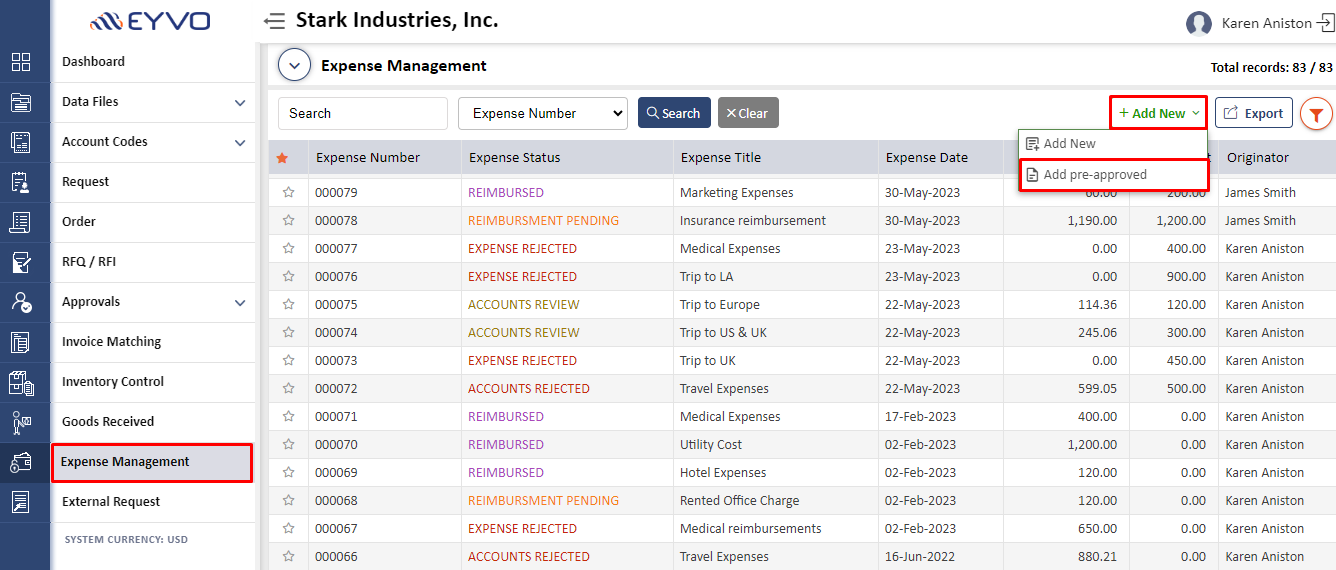
5. Now the expense originator (Karen in this scenario) can initiate the process of creating a pre-approved expense by logging into the main application. The expense originator will then select the “Expense Management” module, click on “Add New” and then select the “Pre-Approved Expense” option.
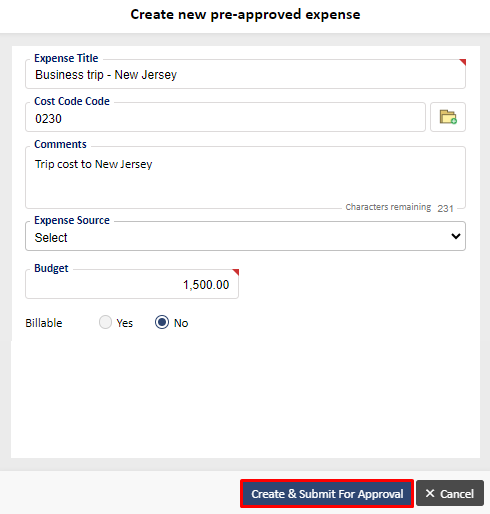
6. Once the expense originator selects the “Pre-Approved Expense” option, the below screen will pop-up in front of them. The expense originator will then have to enter the required information such as Expense Title, Budget of the expense, etc. After entering all the details, the expense originator will need to click on the “Create & Submit For Approval” button.
7. As a result, a confirmation pop-up will appear in front of the expense originator, prompting them to confirm their decision to proceed with the approval submission. The expense originator must click on the "OK" option to submit the expense for approval to the Expense Approver.
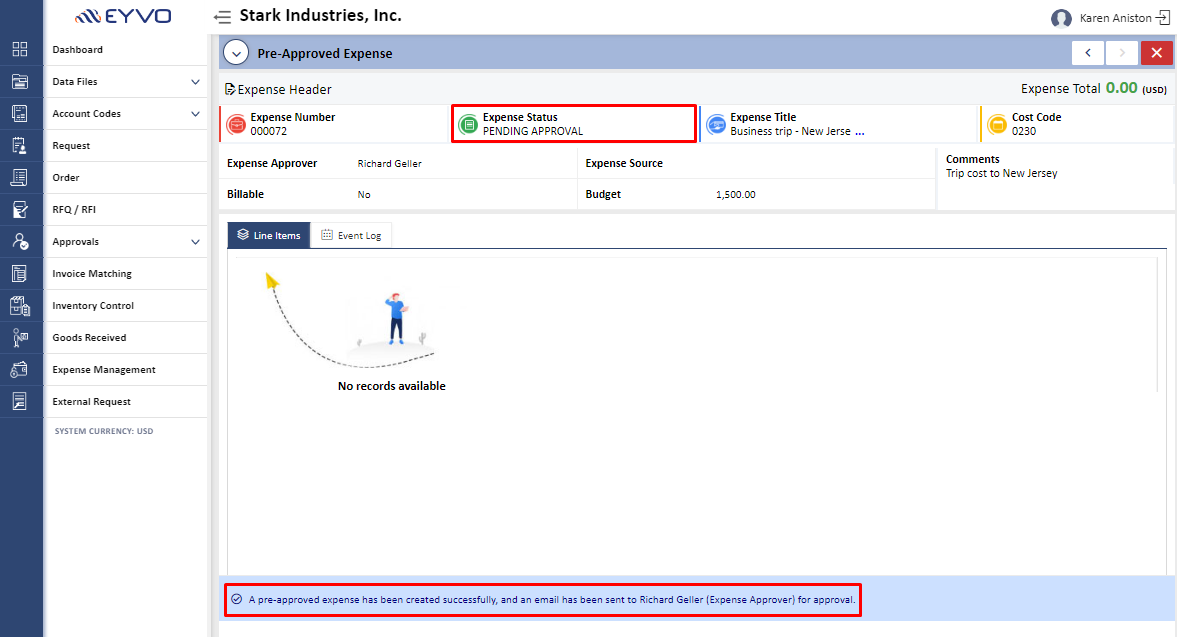
8. Upon submission, the expense originator will be directed to the Pre-Approved Expense page, where they can view the expense status displayed as "Pending Approval." This page also provides various header details, including the expense approver's name, expense source, budget, and more. As the Expense Approver has not yet provided their approval, the status remains as "Pending Approval."
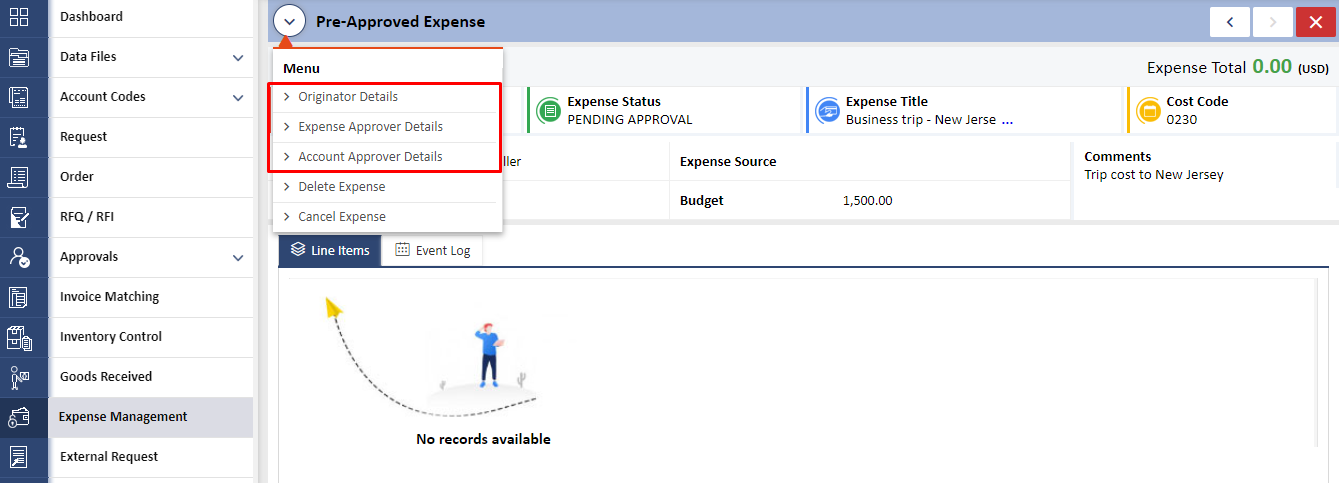
9. On clicking the highlighted icon, it will open the "Menu" showing details about the Originator, Expense Approver, and Account Approver. Additionally, users have the option to delete or cancel expenses.
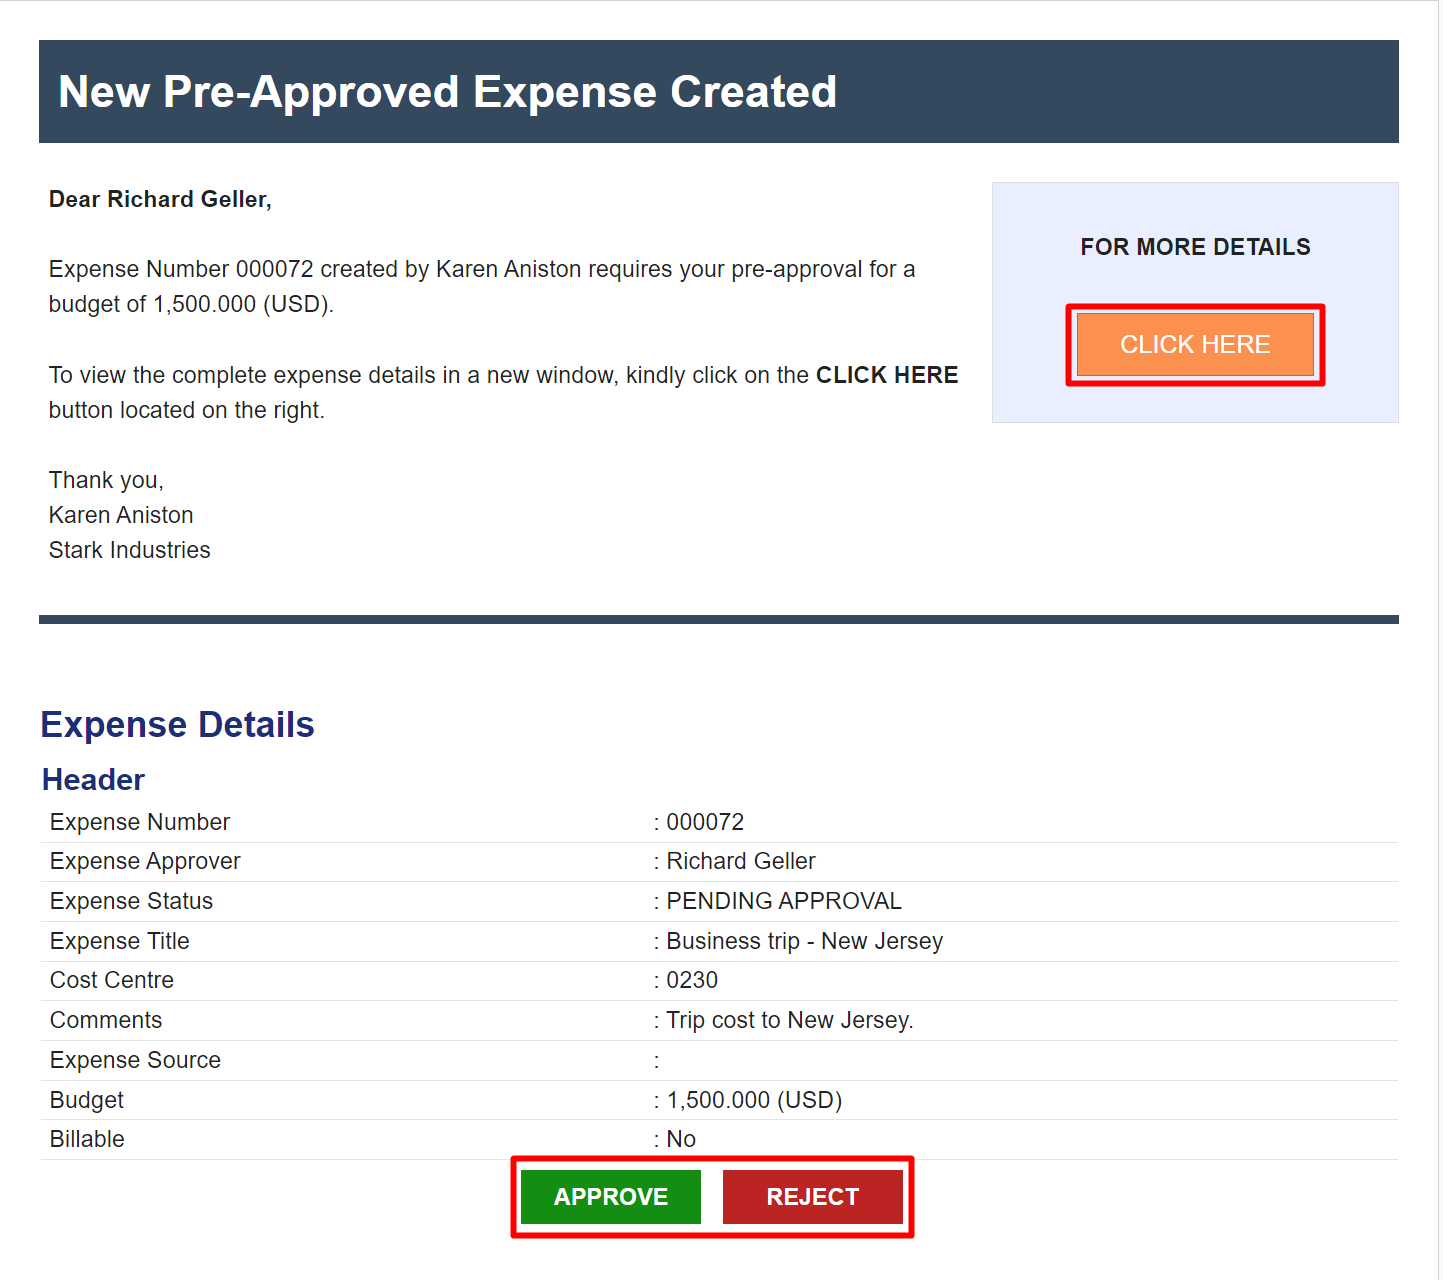
10. In the next step, the Expense Approver will receive an email notification of the expense that requires their approval. The Expense Approver can simply click on the “Approve”/ “Reject” buttons at the bottom of the email to approve or reject the expense directly, as shown in Screen: 10.
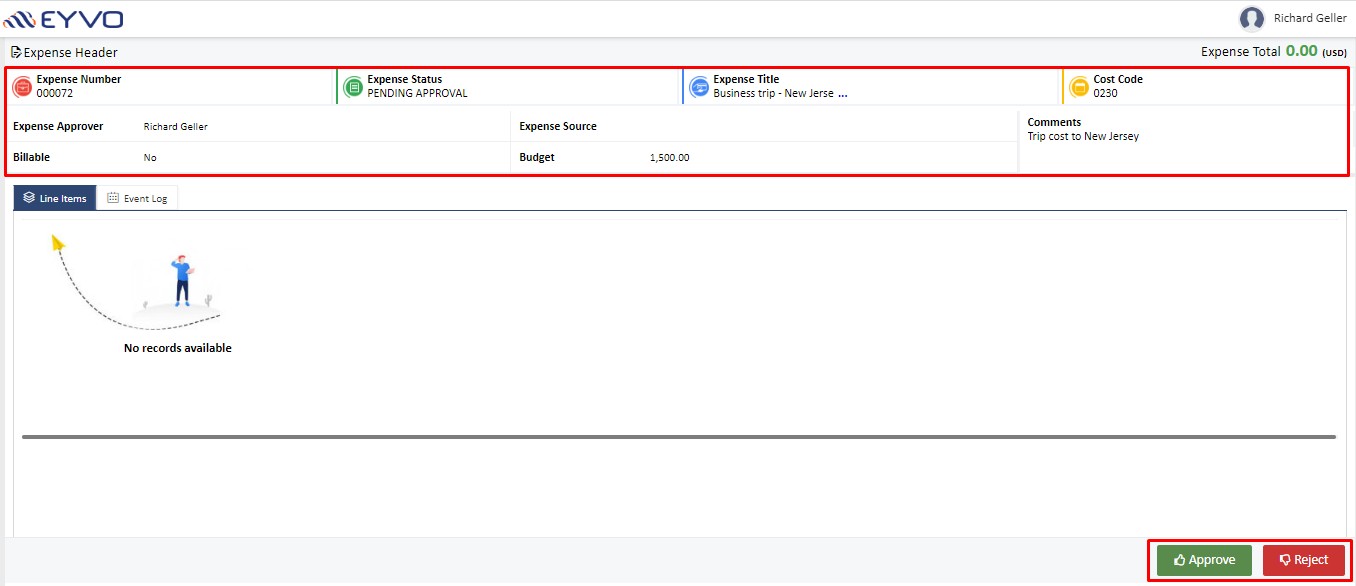
If the Expense Approver selects the “Click Here” option, they will be redirected as shown in Screen: 10.1 where they could see the expense details for which approval is required. They can then “Approve”/ “Reject” the approval using the highlighted buttons provided at the bottom of the page.
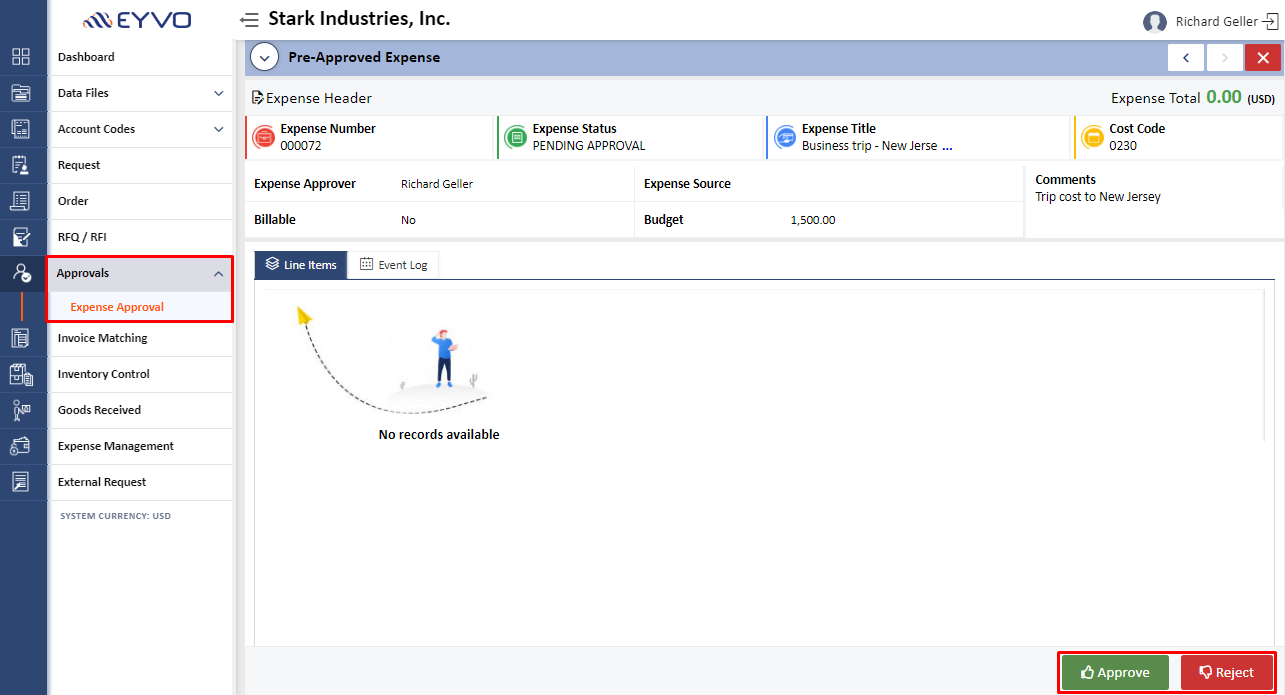
In another option, the expense approver has the ability to approve or reject the expense by logging into the main application. They can do this by navigating to the "Approvals" tab, locating the specific expense number, and then simply clicking on the appropriate buttons labeled "Approve" or "Reject", as shown in Screen: 10.2.
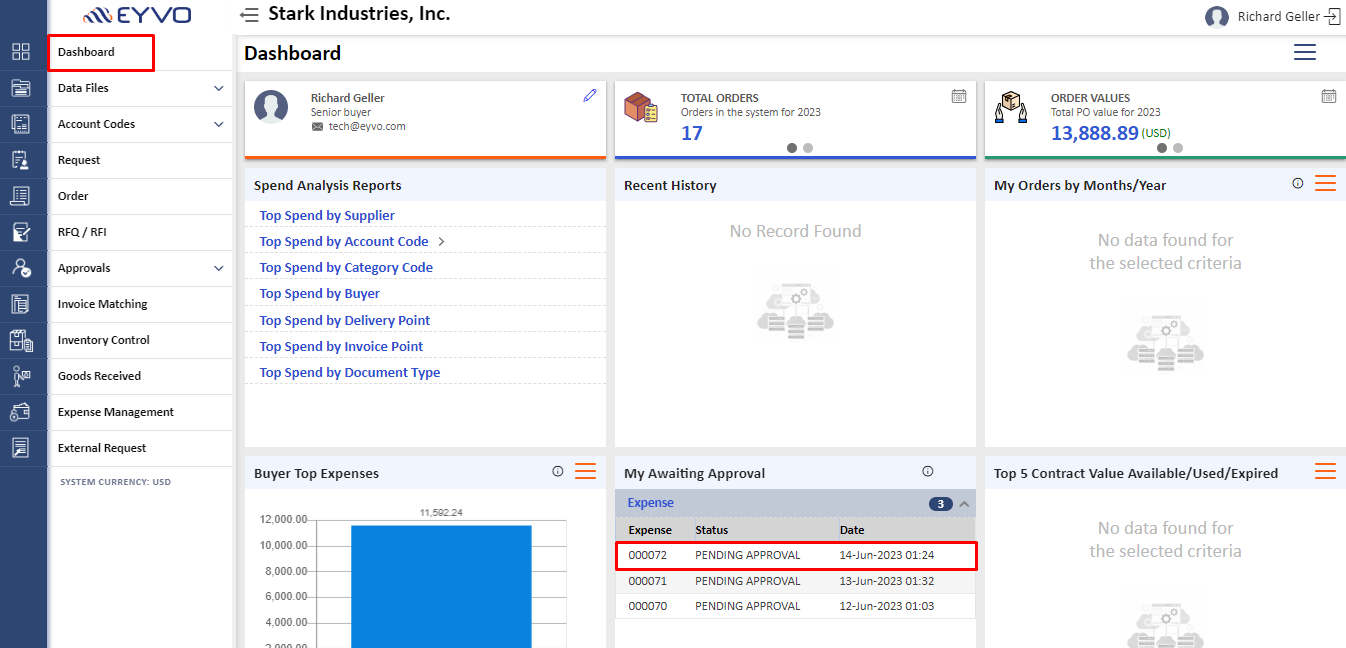
Additionally, the expense approver has the option to access the "My Awaiting Approval" section within the "Dashboard". By clicking on the expense number in the Dashboard, the system will automatically redirect the approver to the "Approvals" tab, where they can proceed to click on the appropriate buttons labeled "Approve" or "Reject", as shown in Screen: 10.3.
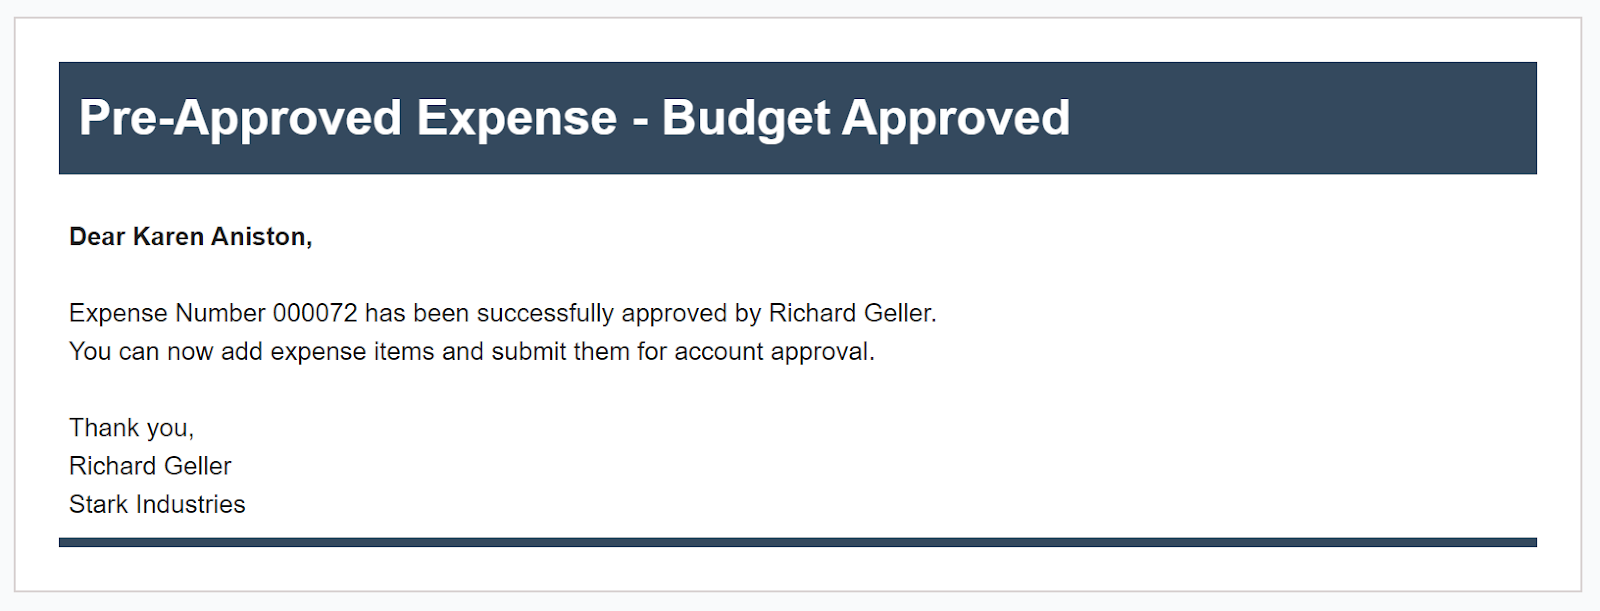
11. If the Expense Approver clicks on the "Approve" button in the email, they will be taken to a page, as shown in Screen: 11. An Email will be triggered to the originator stating that the Expense has been approved by the Expense approver as shown in Screen: 11.1.
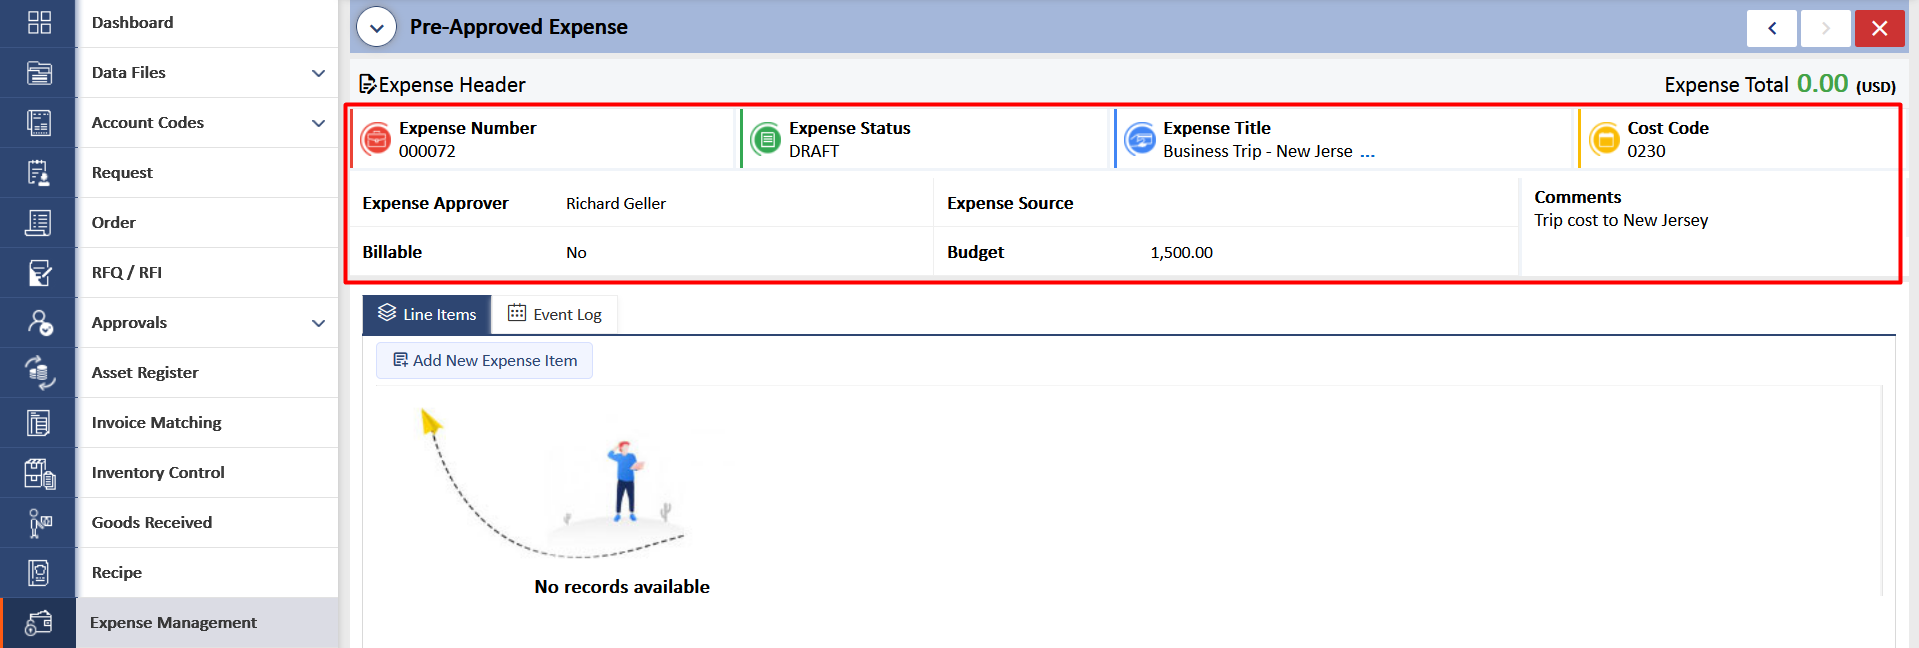
12 . On the “Pre-Approved Expense” of the Main Application, the Expense Status will be changed to “Draft”. Now if the originator wishes to increase the budget, they can accomplish this by selecting the Expense Header details of the Pre-Approved Expense as shown in Screen: 12.
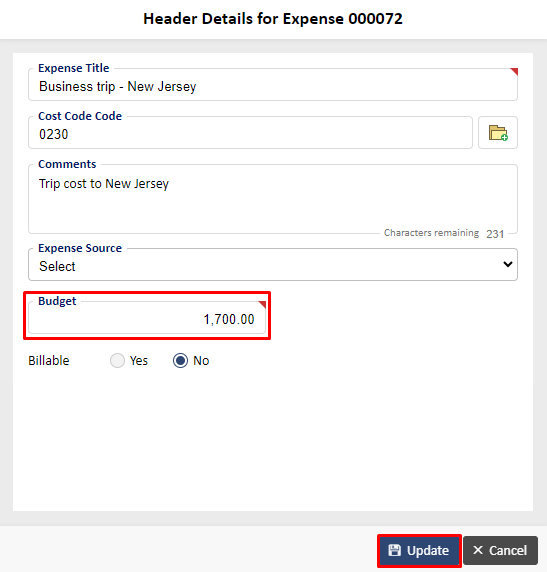
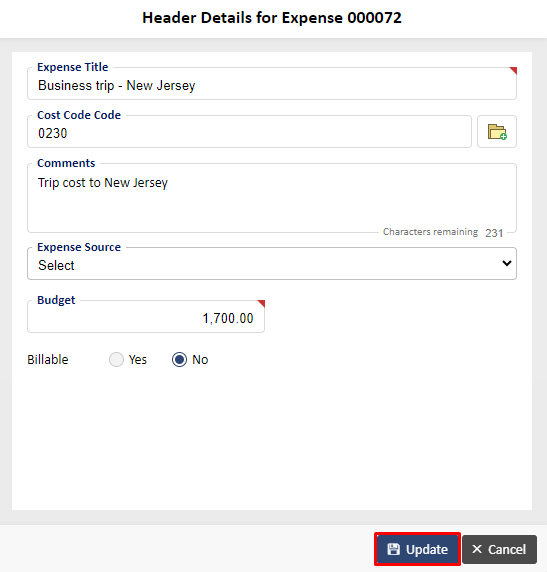
After entering the new budget, they should proceed by clicking on the "Update" button, as shown in Screen: 12.1.
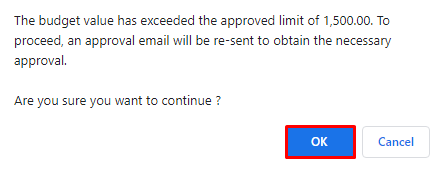
A pop-up will emerge indicating that the newly added budget will again require Expense Approver approval. To proceed, simply click on the "OK" button, as shown in Screen: 12.2.
After clicking on "OK," the originator should proceed by clicking on the "Update" button to proceed further as shown in Screen: 12.3. Once the Update button is clicked, an email notification will be sent to the Expense Approver, prompting them for expense approval.
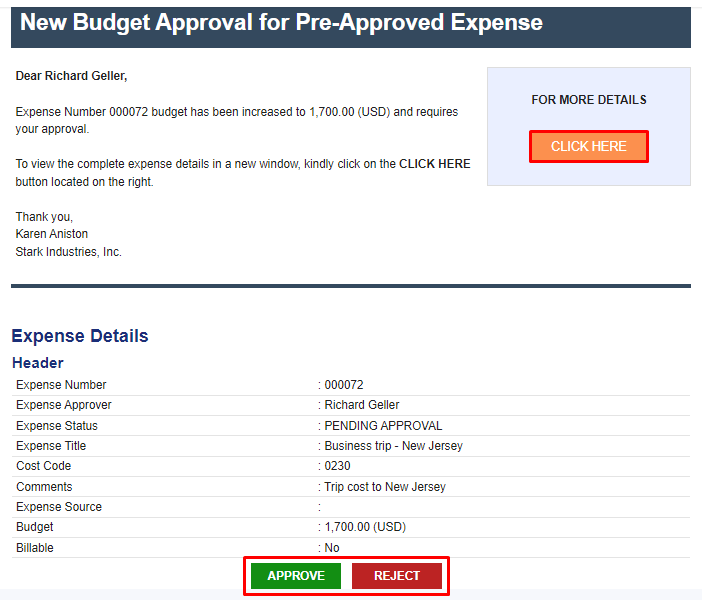
The following email will be sent to the expense approver, as displayed in Screen: 12.4
13. Now, let’s say that the Expense Approver decides to reject the approval due to some reason, they will click on the “Reject” button. This will pop-up a dialogue box, asking for the reason for rejection. The Expense Approver will provide valid reason and click on the “Reject” button as highlighted on the screen below.
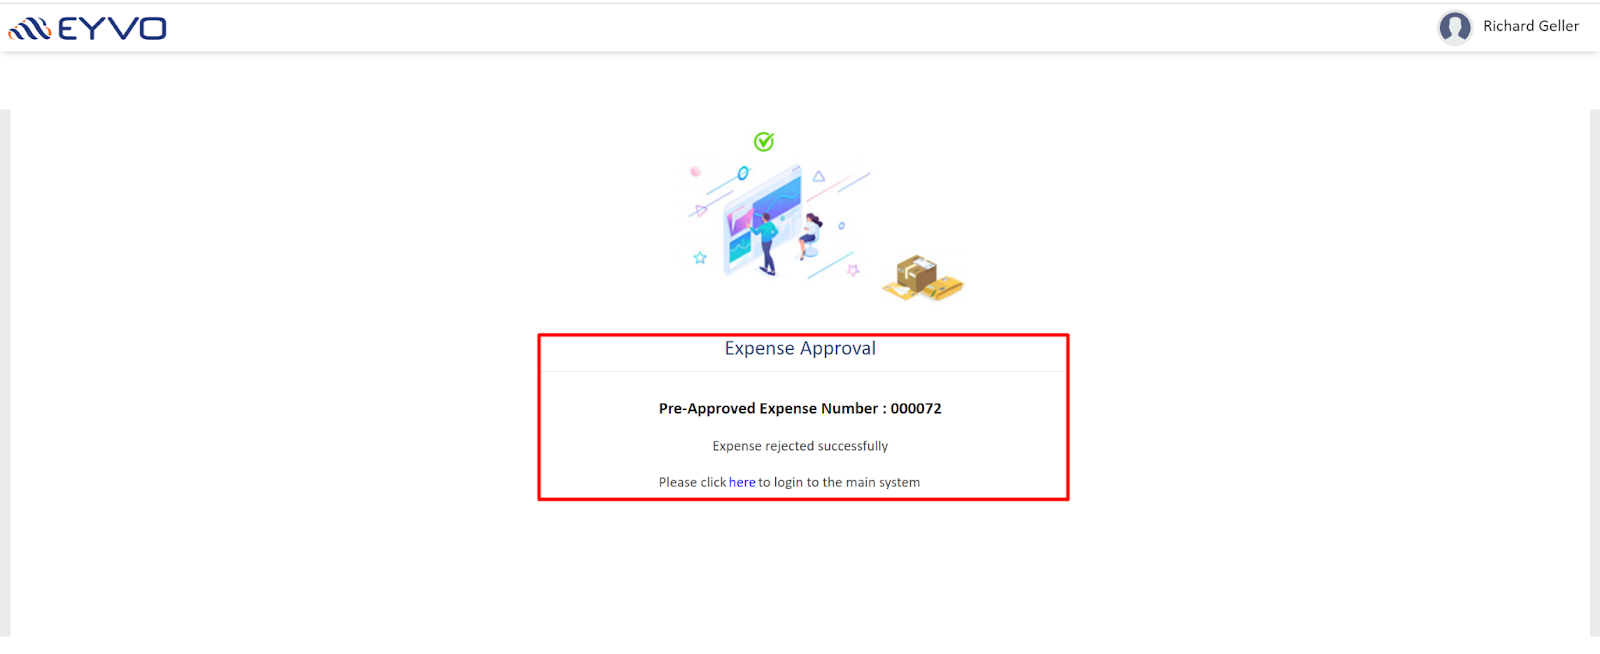
14. The Expense Approver will see another pop-up on the screen, confirming whether they want to reject the expense. They can confirm by selecting the “OK” option as highlighted on the Screen: 14. On clicking the “OK” option, the Expense Approver will be redirected to a page which says that “Expense Rejected Successfully” along with the expense number mentioned on the Screen: 14.1.
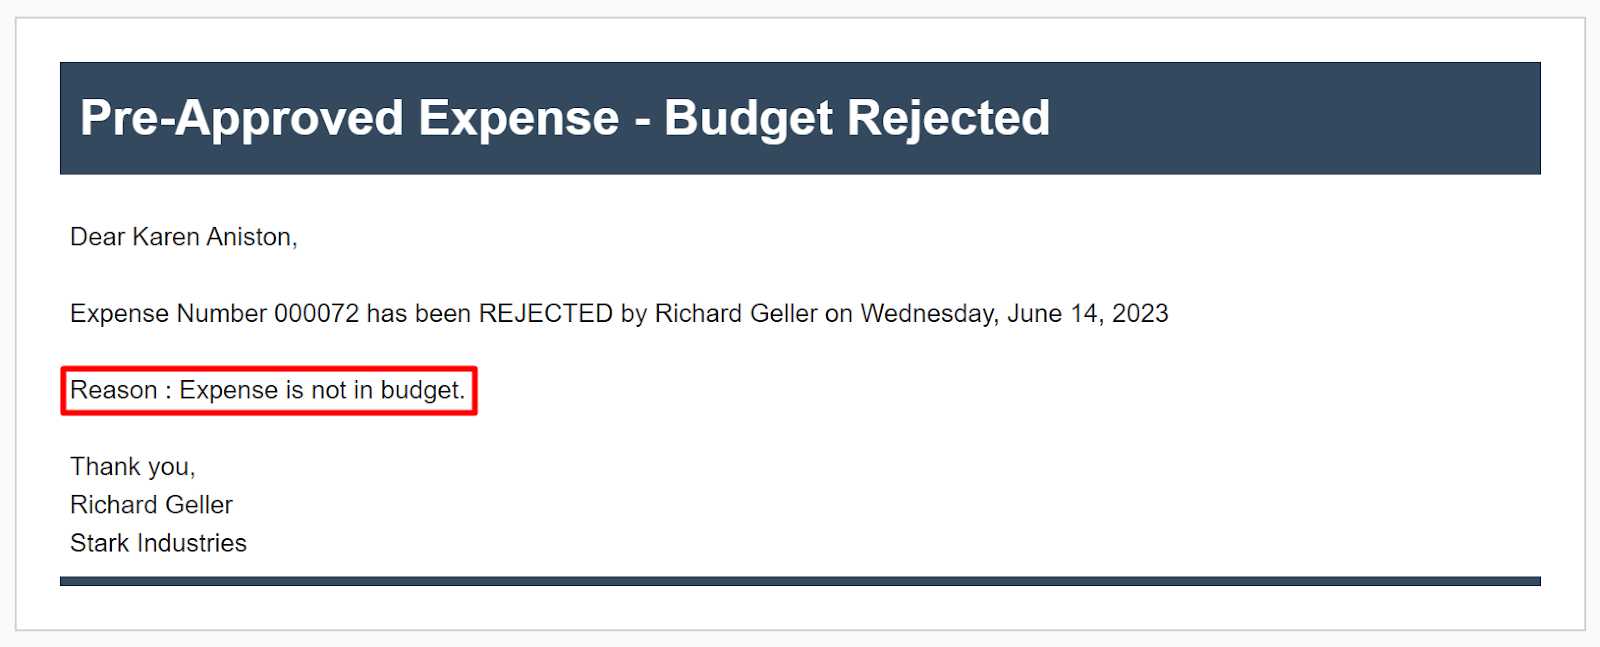
15. The originator will receive a notification email that the Expense Approver has rejected their budget along with the reason for rejection.
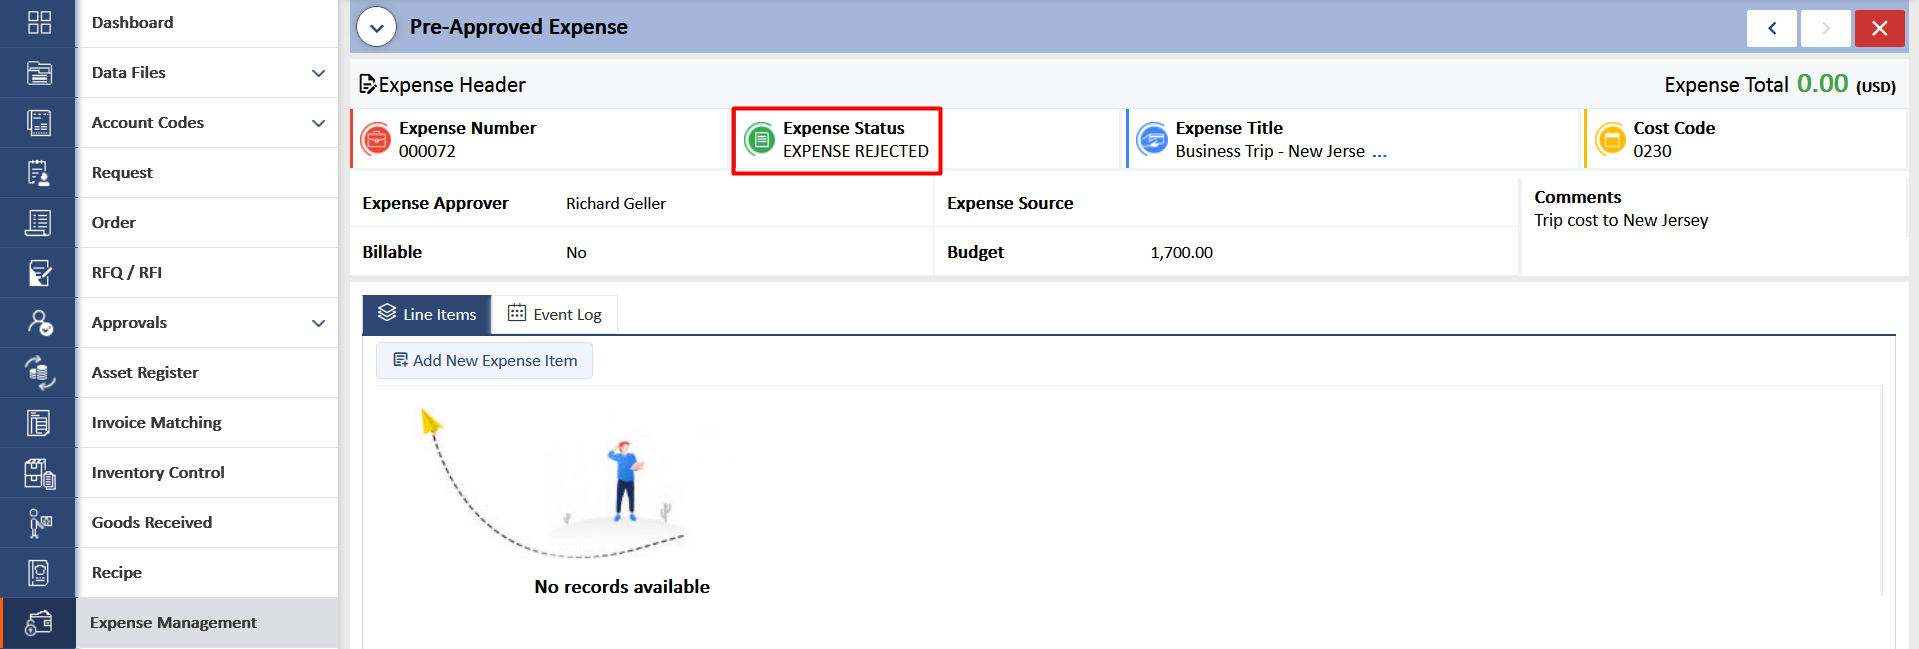
Below screen displays the status of the expense as “Expense Rejected”, on the Main Application’s “Pre-Approved Expense” page.
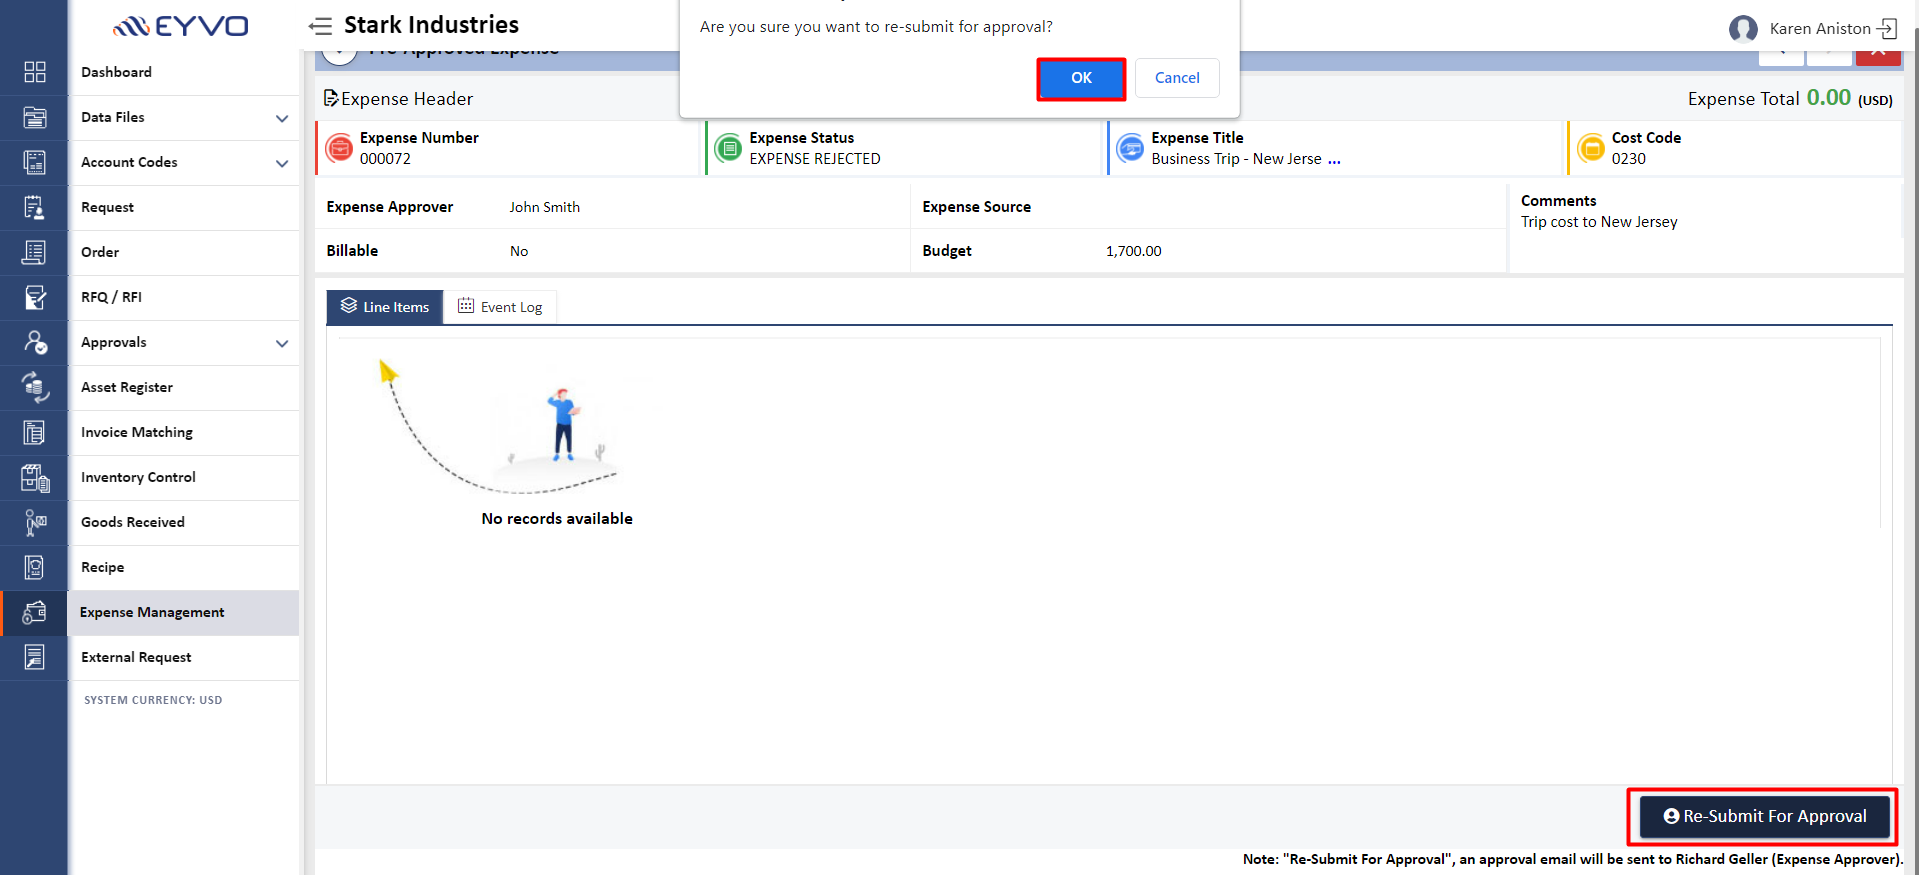
16. The originator can choose to resubmit the expense for approval by simply clicking on the "Re-submit For Approval" button, a pop-up will appear, requesting confirmation from the originator. Upon clicking on "OK" button, the pre-approved expense will be re-submitted to the Expense Approver for their approval.
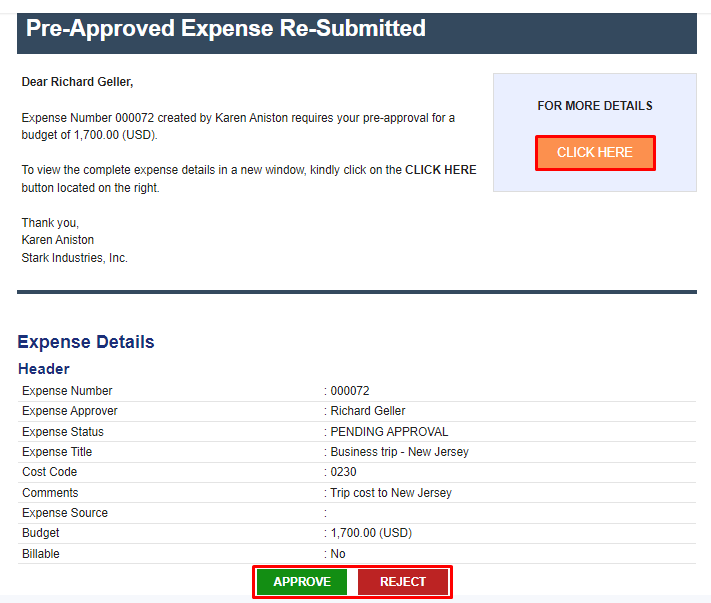
17. The Expense Approver will receive an email notification such as shown below. The Expense Approver can approve the expense by either selecting the “Click Here” option on the top left or simply click on the “Accept”/ “Reject” buttons at the bottom of the email, as highlighted in the Screen: 17.
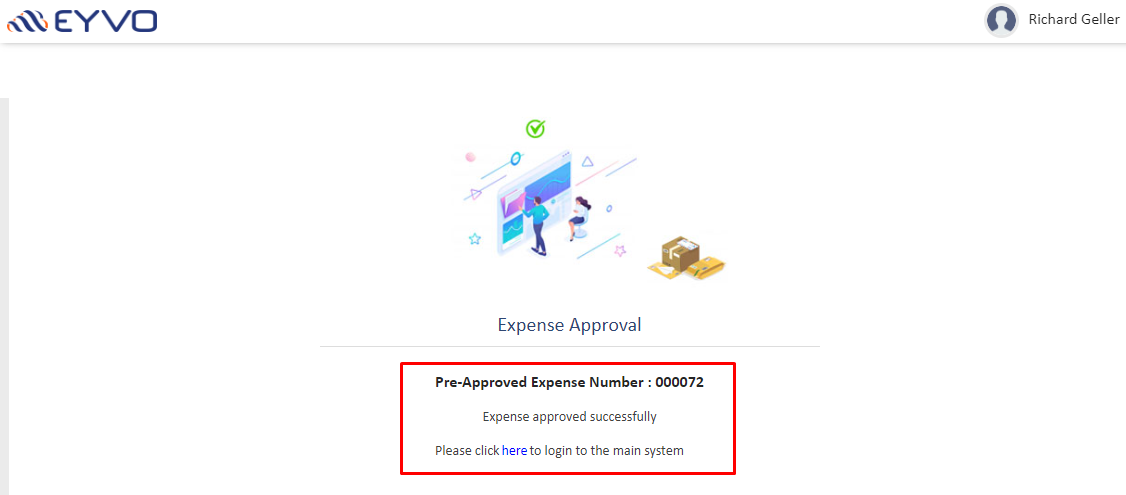
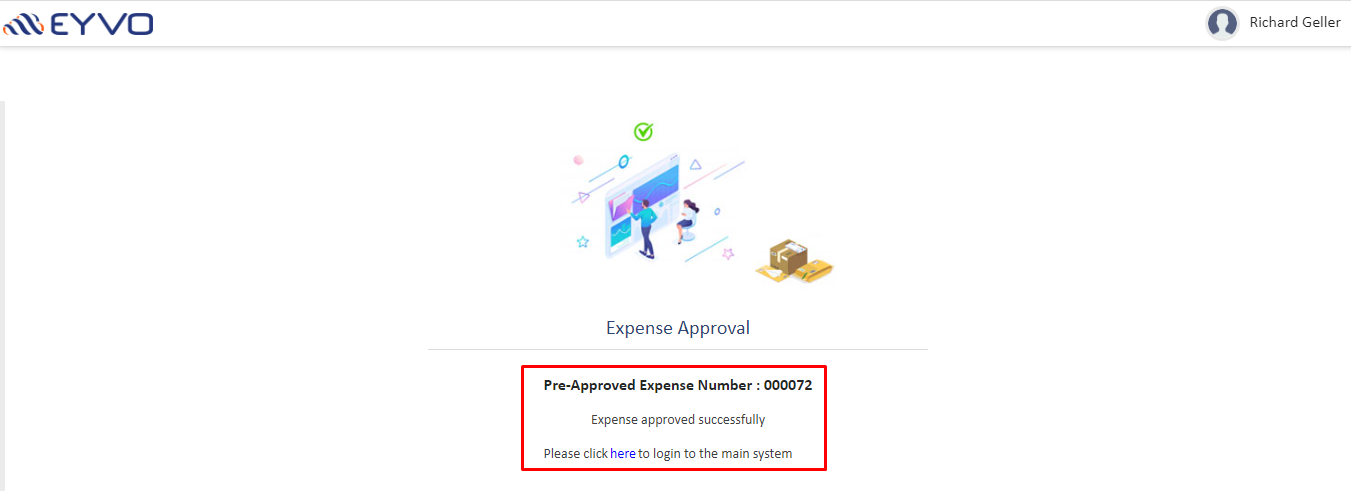
When the Expense Approver clicks on the "Approve" button, they will be presented with Screen: 17.1 as shown below.
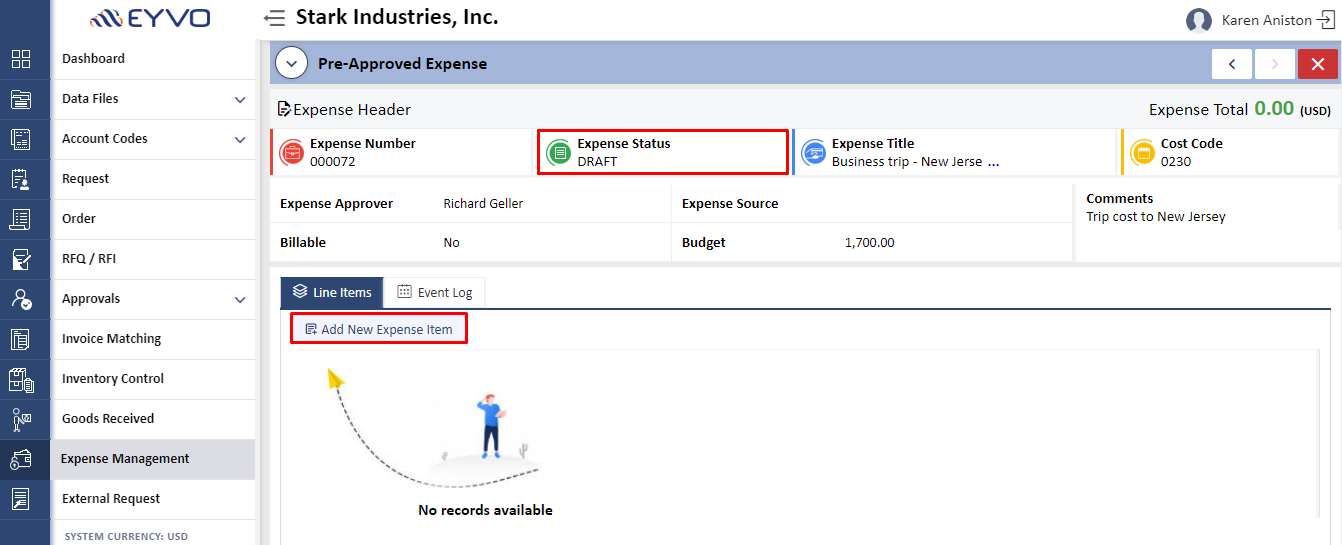
18. After approval from the Expense Approver, the originator could start adding items to the expense by selecting the “Add New Expense Item” option as shown in Screen: 18.
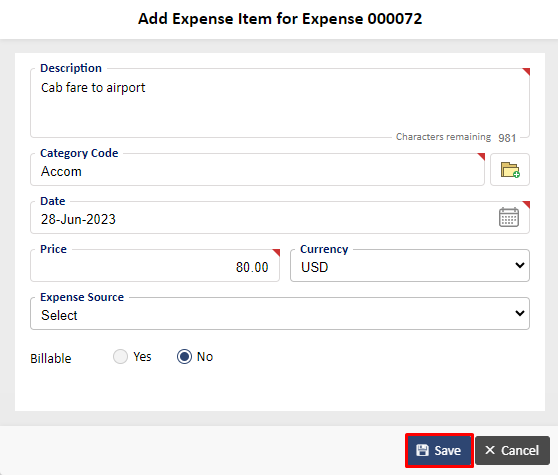
The system will pop-up a screen, where the originator will need to enter the required information of the expense made as shown in Screen: 18.1 such as Description, Category Code, Date, Price & Currency, Expense Source and whether the expense is Billable. Once the originator enters the details, they will need to click on the “Save” button.
19. A pop-up will appear, when the expense originator clicks on the “Save” button. It will ask for the originator's confirmation whether they want to add a corresponding image of the receipt. The expense originator will need to click on the “OK” option to proceed with it.
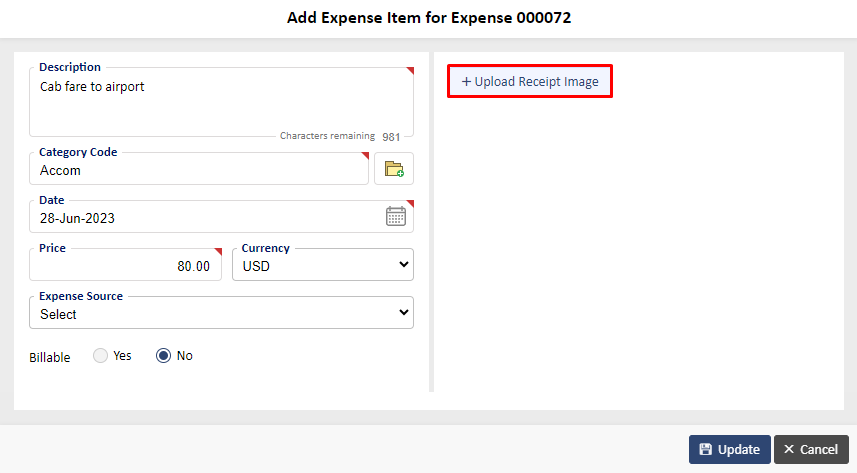
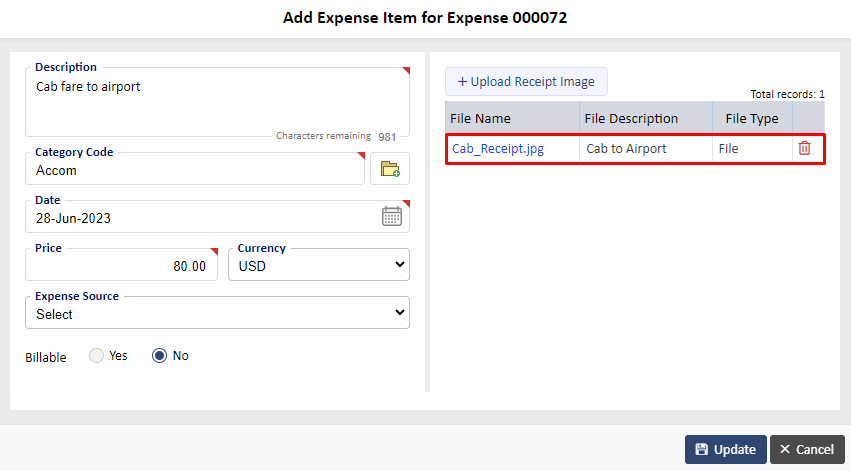
20. When the expense originator selects the “OK” option, the header detail page will change to the page as shown below. The expense originator will then need to select the “Upload Receipt Image” option if they have any corresponding image of the receipt.
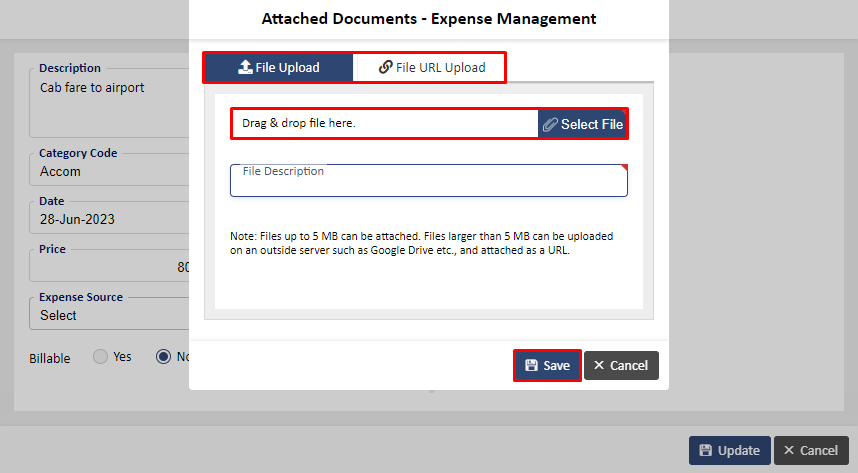
21. On selecting “Upload Receipt Image”, the Attach Documents - Expense Management screen will pop-up. This gives you the option to upload files from the system by browsing or drag & drop option. Another option is through cloud database, the originator can paste the URL link of the image under File URL Upload. The expense originator will then need to enter file description and click on the “Save” button.
22. Once the expense originator has uploaded the image file successfully, it will be visible on the screen as highlighted below and then the expense originator will need to click on the “Update” button as highlighted on the Screen: 22.
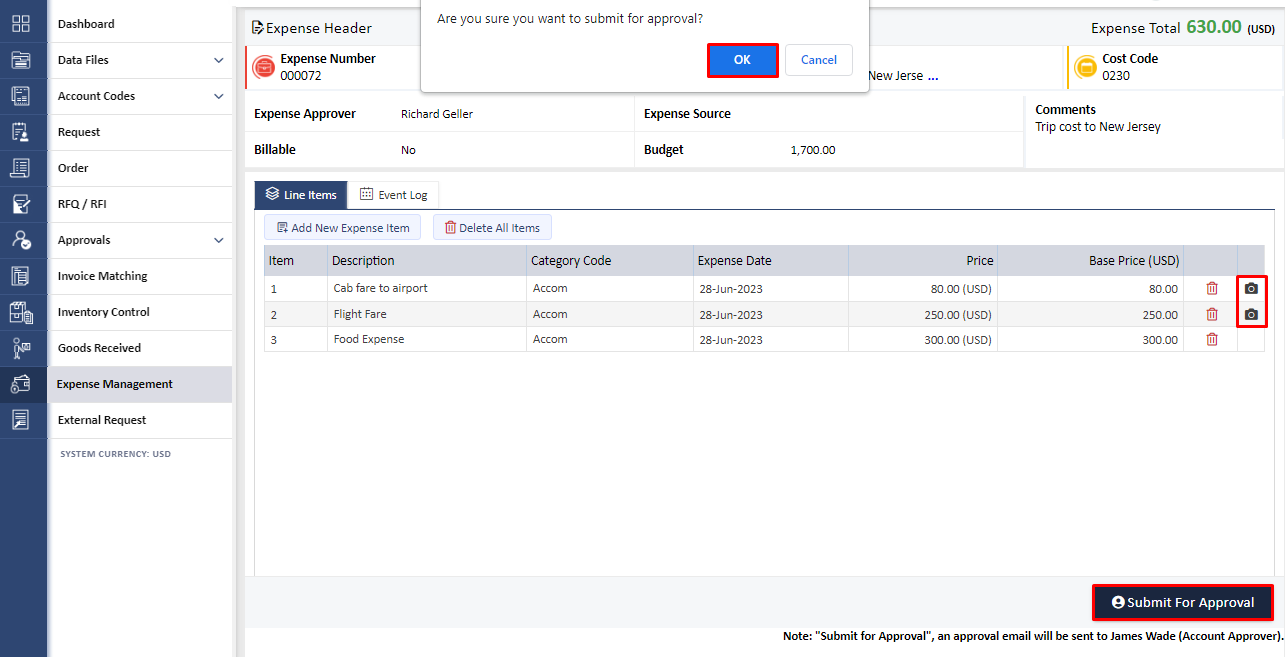
23. The expense originator can see the newly added item on the Pre-Approved Expense page and the camera icon on the right side indicates that an image has been attached. To add more items to the list, the expense originator will again need to select “Add New Expense Item” and follow the same process as above. After the expense originator has added all the expense items to Expense, they will need to click on the “Submit For Approval” button. A confirmation pop-up will appear asking for confirmation to submit the expense for account approval and then the expense originator will need to select the “OK” option as shown in Screen: 23.
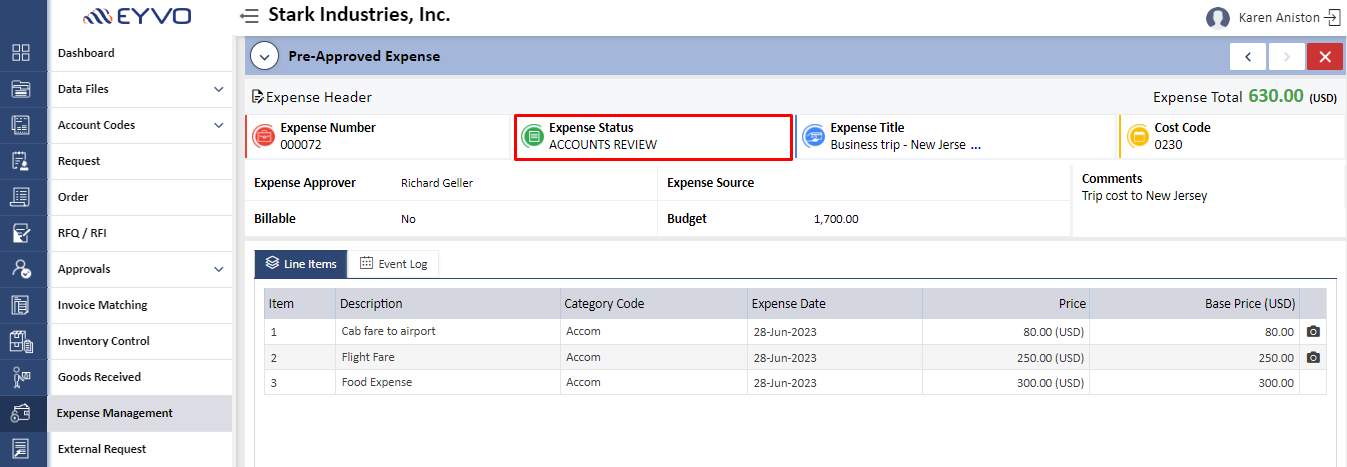
24. The Expense status will now change to “Accounts Review” as it’s awaiting approval from the Account Manager as shown in Screen: 24. This approval will be directed to the Account Manager for reimbursement.
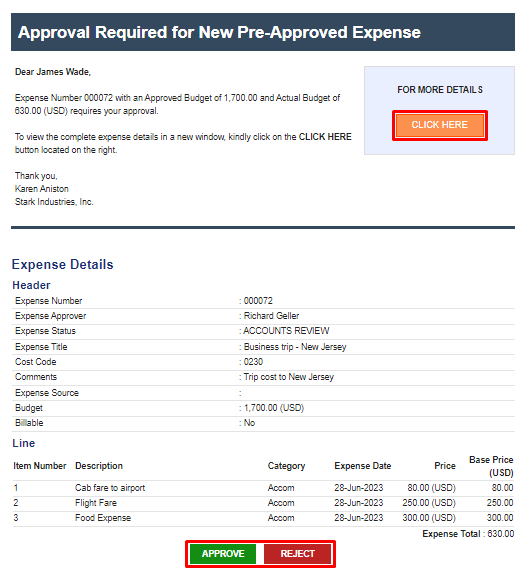
25. The Accounts Manager will receive an email such as below, as the next step of the approval process. In this scenario, James Wade is the Accounts Manager and they will approve or reject the expense by clicking the “Approve” or “Reject” buttons provided at the bottom of the email or select the “Click Here” option as highlighted in screen below.
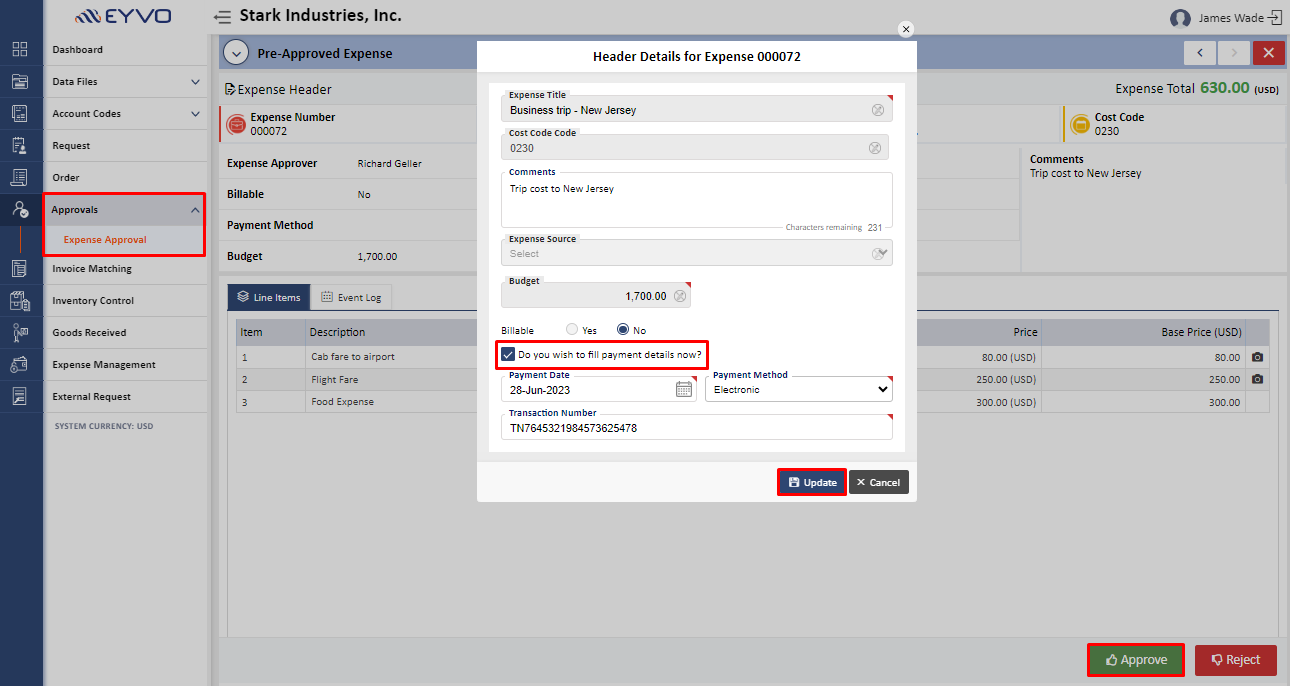
When the "Click Here" button is clicked, the screen displayed below will be visible to the Accounts Manager. On this screen, they have the option to select the checkbox labeled "Do you wish to fill the payment details now?" on clicking expense header. If they choose to do so, they can enter the payment details and then proceed to click the "Update" button. Finally, they can click the "Approve" button to complete the process.
Upon clicking the "Approve" button located at the bottom of the email, the Accounts Manager will be directed to a screen where they can enter the payment details. After entering the necessary information, they can proceed by clicking the "Save" button to finalize the process.
26. On approving the expense, the below screen will appear in front of the Account Manager stating that the expense has been approved successfully.
27. In another option, the account approver has the ability to approve or reject the expense by logging into the main application. They can do this by navigating to the "Approvals" tab, locating the specific expense number, and then simply clicking on the appropriate buttons labeled "Approve" or "Reject", as shown in Screen: 27.
Additionally, the account approver has the option to access the "My Awaiting Approval" section within the "Dashboard". By clicking on the expense number in the Dashboard, the system will automatically redirect the approver to the "Approvals" tab, where they can proceed to click on the appropriate buttons labeled "Approve" or "Reject", as shown in Screen: 27.1.
28. The originator will see the Expense Status changed to “Reimbursed”, on the “Pre-Approved Expense” page as shown in Screen: 28.
In addition, the expense originator will also receive an email notification, stating that their expense has been approved by the “Account Manager” as shown in Screen: 28.1.
29. If the Account Manager approves the expense by clicking the "Approve" button without entering the payment details, the Expense Status will be updated to "Reimbursement Pending." To enter the payment information, the Accounts Manager should log in to the main application and access the expense header as displayed on Screen: 29.
Within this screen, the Accounts Manager is required to input reimbursement details such as the Payment Date, Payment Method, and Transaction Number. After entering the necessary information, they can proceed by clicking the "Save" button. The entered payment details will now be visible in the header section for the Accounts Manager. Once the details are successfully updated, they can finalize the process by clicking on the "Reimbursed" button located at the bottom, as illustrated in Screen: 29.1.
30. Now the Expense Status will changed to “Reimbursed” as shown in Screen: 30. Also, the expense originator will also receive an email notification, stating that their expense has been approved by the Account Manager.
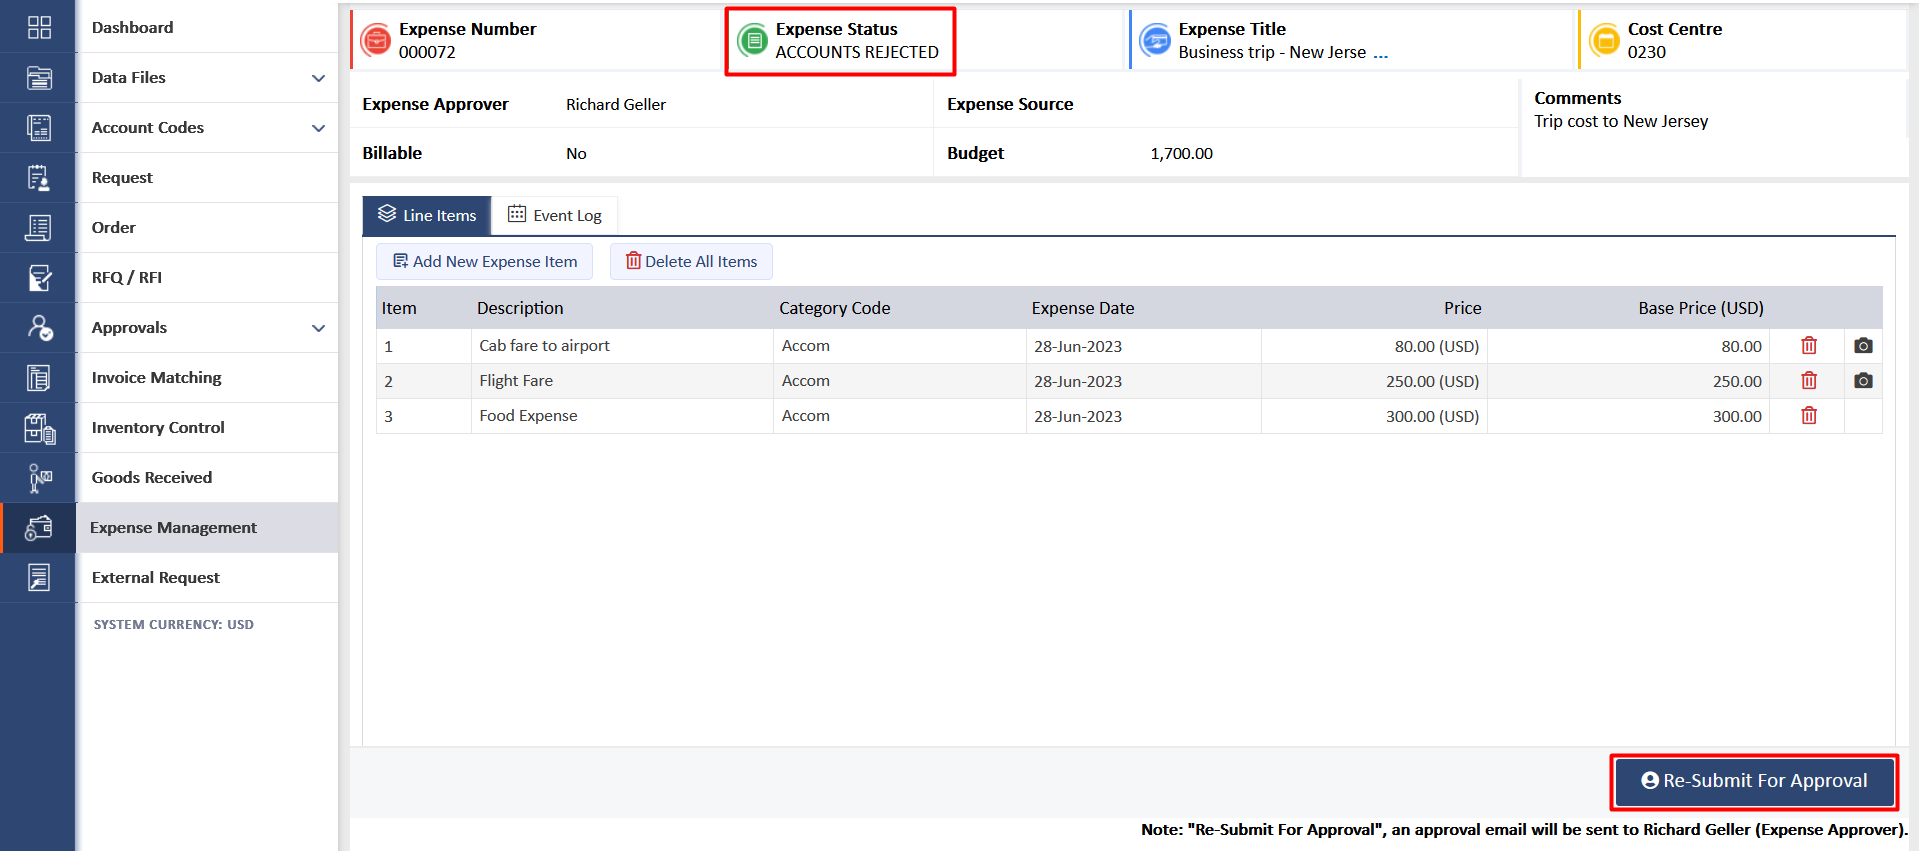
31. In a scenario where the Account Approver chooses to reject the approval for a particular expense due to specific reasons, they will need to click on the "Reject" button. Following the rejection, the expense status will be updated to "Accounts Rejected". If the originator decides to proceed by clicking on "Re-submit for Approval", the expense will be resubmitted to the Account Approver for their approval, as depicted below.
32. To search for a particular expense, enter the details on the search field and choose the relevant search criteria from the dropdown on the Expense Listing page as shown below and click on “Search” button.
33. To do an Advanced Search, click on the advance search icon as shown on the below screen: 33.
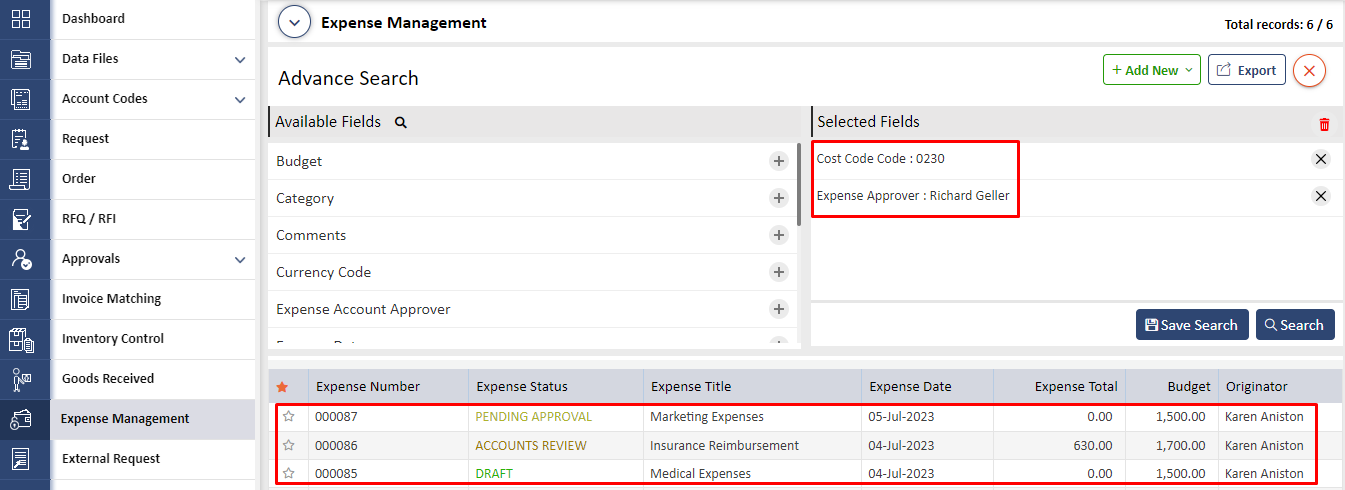
This will give you options to search as per the fields that you choose as shown on the below screen:
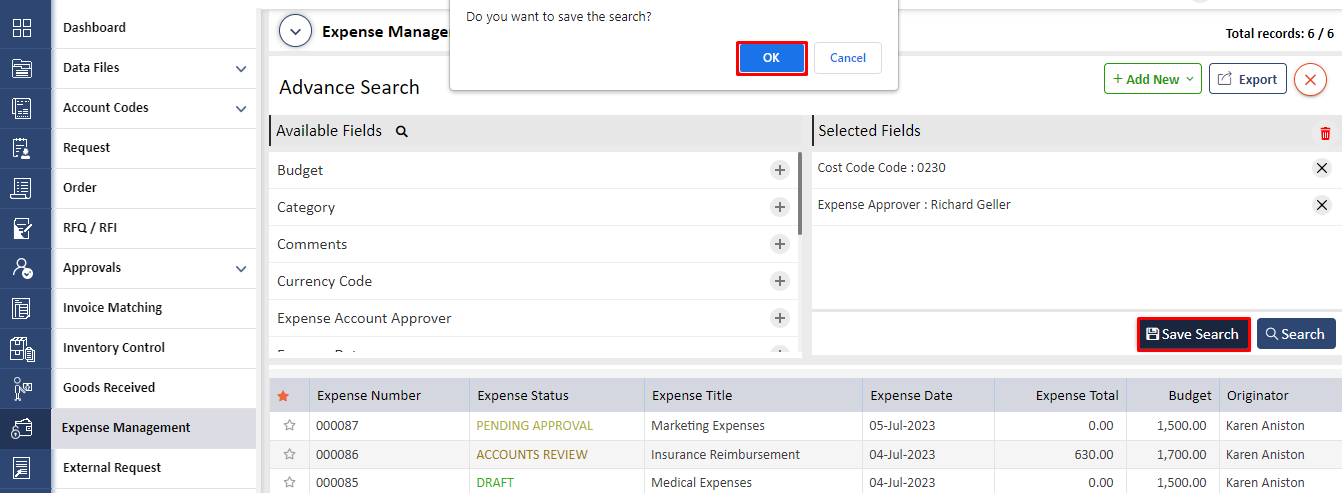
34. Once done, you can also save your search for future reference by clicking on the “Save” button as highlighted in the below screen.
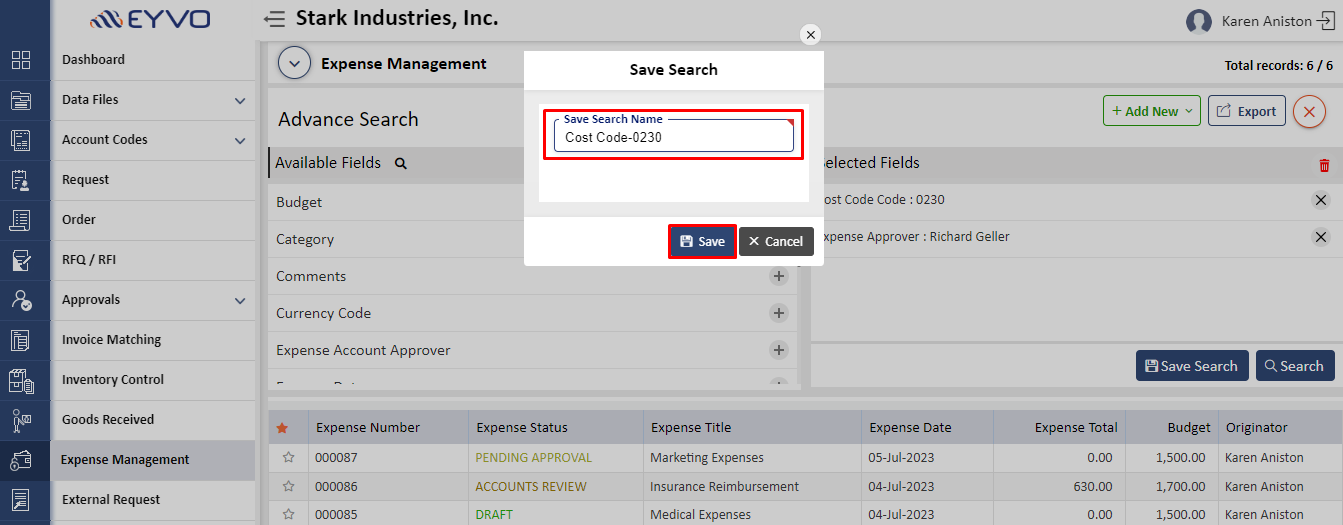
Enter name for the saved fields in the 'Save Search Name' section and click 'Save'.
The 'Saved Search' will be visible in the Expense Management's menu.
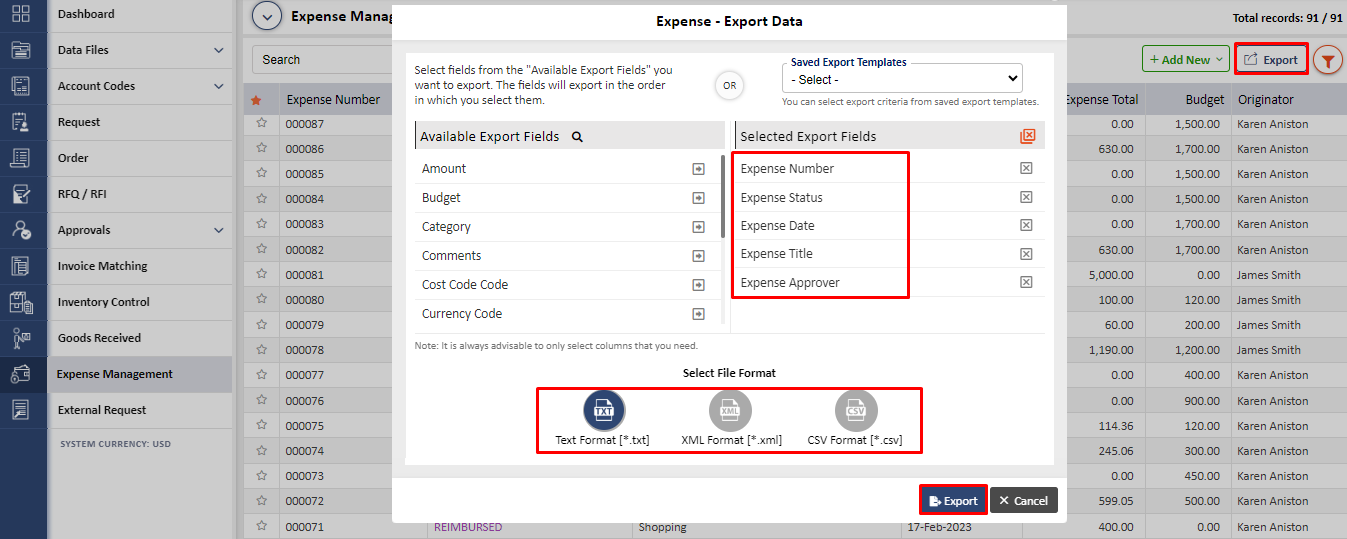
35. To export the data in Text, XML, and CSV formats, the user has the option to click on 'Export'. To perform this action, simply choose the desired fields for export under 'Selected Export Fields', select the preferred file format for the exported data, and then click the 'Export' button
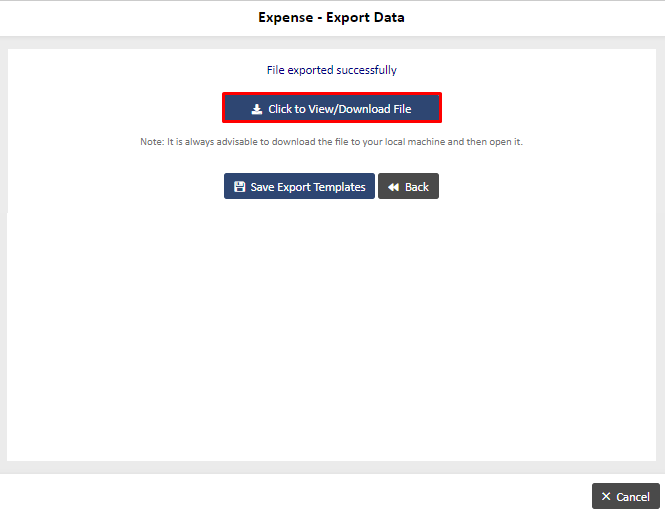
Click on the 'Click to View/Download File' button to view or download the exported file.
QUICK LINKS :
a.Expense All – This link will show all the expense entered in the system.
b.Expense Personal – This link will show expenses where you are the originator.
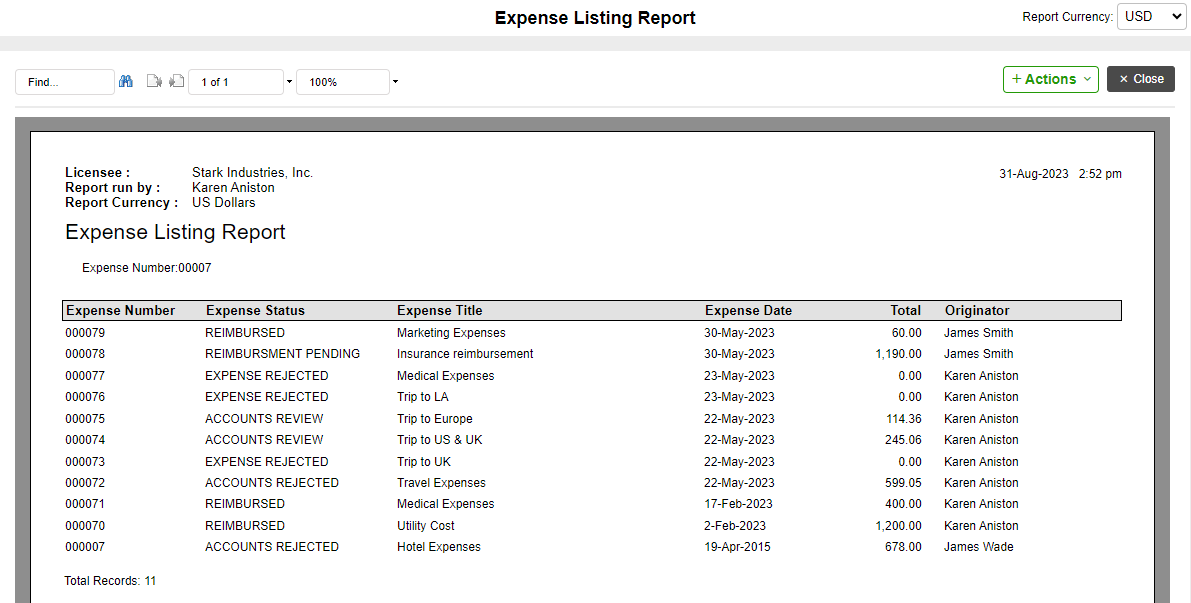
REPORTS :
Expense Listing Report- This report displays all the expenses fields listed on the expense listing page as shown in Screen- 37 & 38.

