INVENTORY MODULE
Inventory is a module in the Eyvo eProcurement application that caters to all aspects of stock Items. The Inventory manages two types of items, Consumable Stock and Current Asset. It is important to understand the distinction between the two types of items, so that users can avoid making a mistake that would result in some extra work to move items in Consumable stock to Current Assets and vice versa.
Consumable stock items are suitable for products that are used in the main line of a business. For example, a manufacturer who ships items on a regular basis would treat shipping boxes as Consumable stock with proper location and inventory count, as this item would be a part of the Cost of Goods on the accounting side. In contrast, the same shipping boxes would be non-stock Consumables to a law firm who would consider these items as an expense in their accounting system.
Current Assets differ from Consumable stock items as they are listed individually since they have optional Serial numbers and Asset tags amongst other things. Current Assets are generally suitable for higher value items whether or not they are used in the company’s main line of business. Examples could include microwaves, small printers or shelving units. Current Assets may be converted to Fixed Assets (this can only be done if the user has the Asset module).
SECTION: I
User - System Administrator
1. The System Administrator (Sysadmin) can go to Inventory Management > Inventory Control and select a mandatory expenditure code to start with. Also, to generate an automatic order when stock levels drop below the re-order level, they can select the second option of Auto Create Order as shown below in Screen: 1.
Note: Fixed Asset Items and Service Items will not show under Inventory
The Expenditure Code is selected to connect the Item to a particular account so that you can account for the usage of the stock. Sysadmin can also decide whether to make this mandatory by checking the Mandatory Box. Once made mandatory, it will show against the Item when it’s being manually issued.
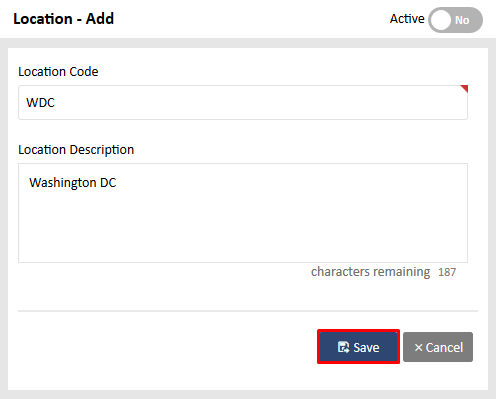
2. The next step for the Sysadmin is to create a new location. This can be done under Inventory Management > Location Master. You can click on Add New to reach Screen: 2, so that you can add details. (We are proceeding assuming the Auto Create Order option is not selected)
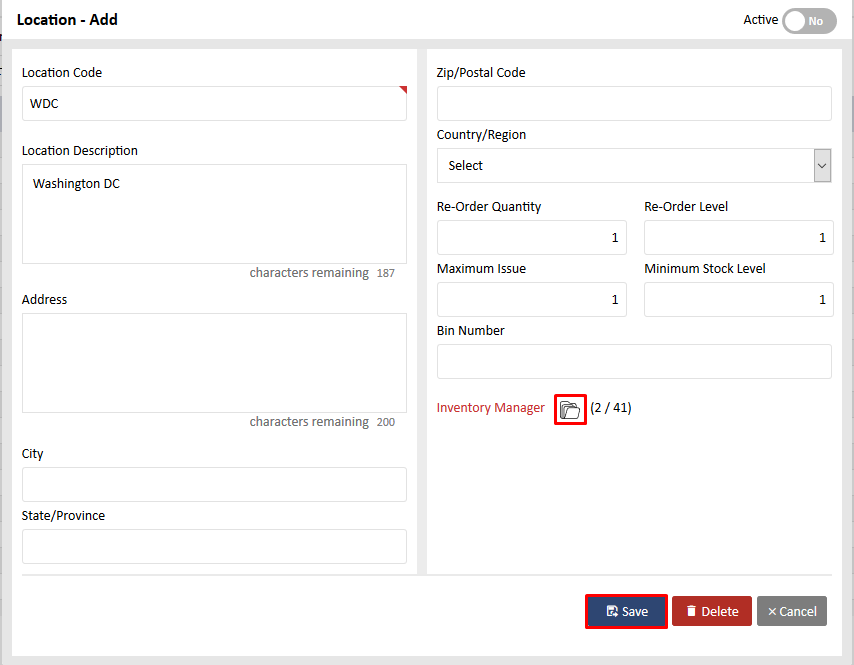
Click Save to reach the next section as shown in Screen: 3.
Saved successfully message will appear at the bottom of the screen.
You can have multiple Inventory Managers for each location. To do so, click on the
folder icon as highlighted in Screen: 3 and select Inventory Managers.
You can also have multiple locations and the option to set a default Re-Order Quantity, Re-Order Level, etc. values. The inventory Item under a particular location will automatically have its default values. Users will have the option to change these quantities for each Item under the same location.
User – Requestor, Buyer, Senior Buyer
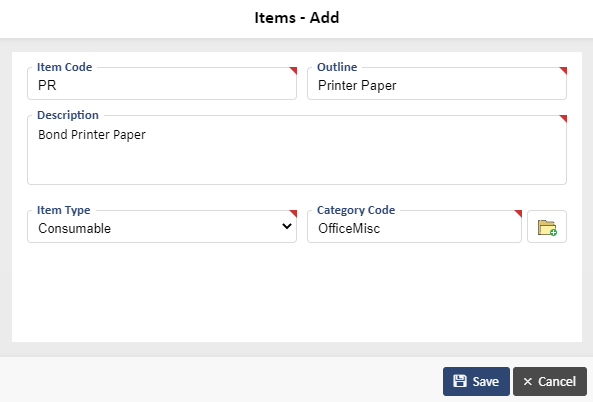
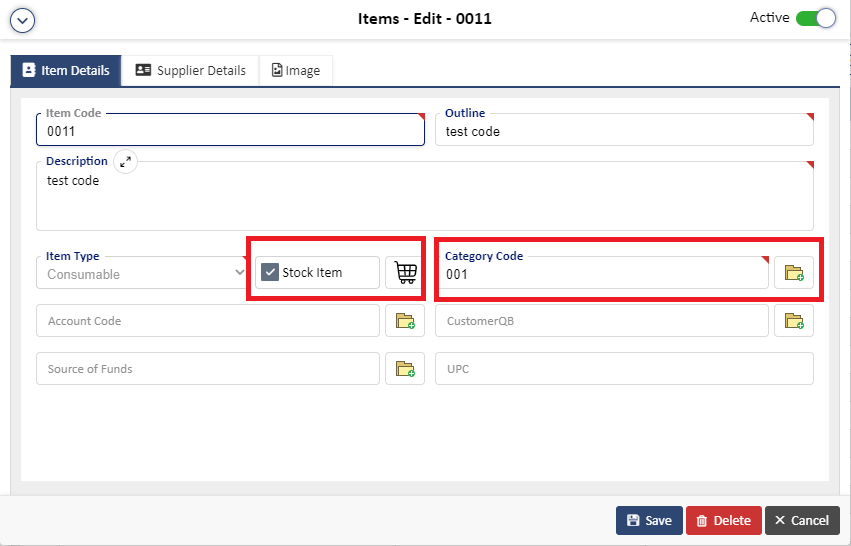
- 3. When you are logged into the User System, you can add Items to inventory from Data Files > Items > Add New. There are 2 types of Items that will show under Inventory - a Consumable Item and a Current Asset Item. Current Assets are always stock items. However, Consumables have an option to make them stock or non-stock items by checking the Stock Item box. Only stock items will be shown under Inventory.
Note : Fixed Asset Items and Service Items will not show under Inventory
Below is the flow for a consumable Item.
5. Add details, choose Consumable as an Item type and after you click on Save, you will reach Screen: 5.
Checking the Stock Item checkbox will ensure this Item shows under Inventory. The Inventory Icon as shown in Screen: 5 will appear. You can add the codes, Supplier details and an image for the Item on Screen: 5. Click on Save once done.
Note: A food Item can be a consumable and can have the allergies checked for it under the Allergy tab as shown in Screen: 5. Non-food Items will not show the Allergy tab if the System Administrator assigns food categories
6. You will see Inventory Control on the left menu bar under which you can search for the above Item. (You can also click on the Inventory Icon on Screen: 5 to see the Item details). When you click on the Item, the below options will show:
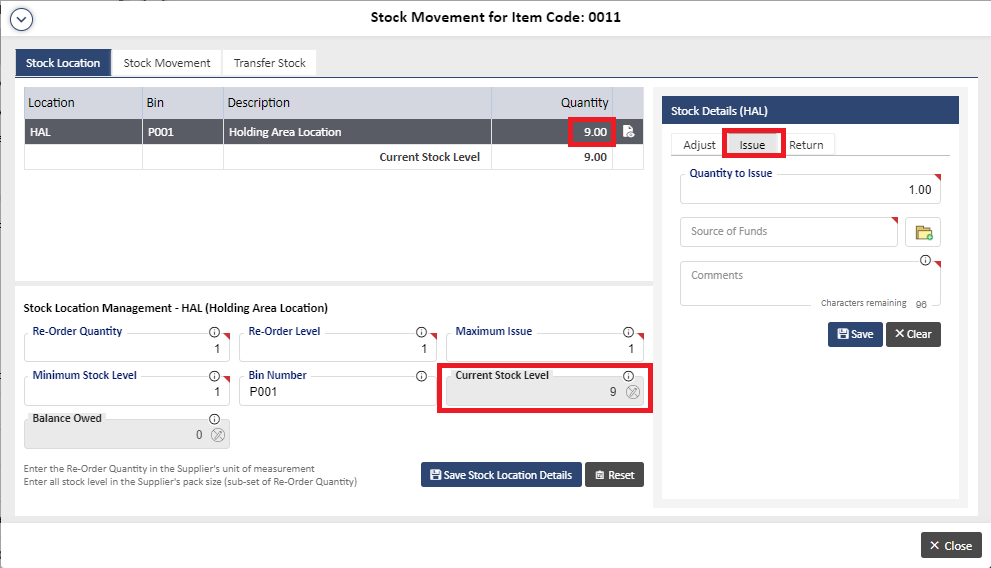
a. In the Stock Location Tab, you can see the default location HAL with its default values. You can leave the default location values as is or change them as shown in Screen: 6.
If you change any details, click Save Stock Location Details. A message Stock Location Details Saved Successfully will be displayed.
The Stock Location tab and Stock Movement will show the details when the “Adjust” function has been used as shown in Screen: 8 as shown below:
c. Click on Issue when you wish to give the Item to someone. Enter the details and click on Save to see the message Saved Successfully. This function will reduce the stock.
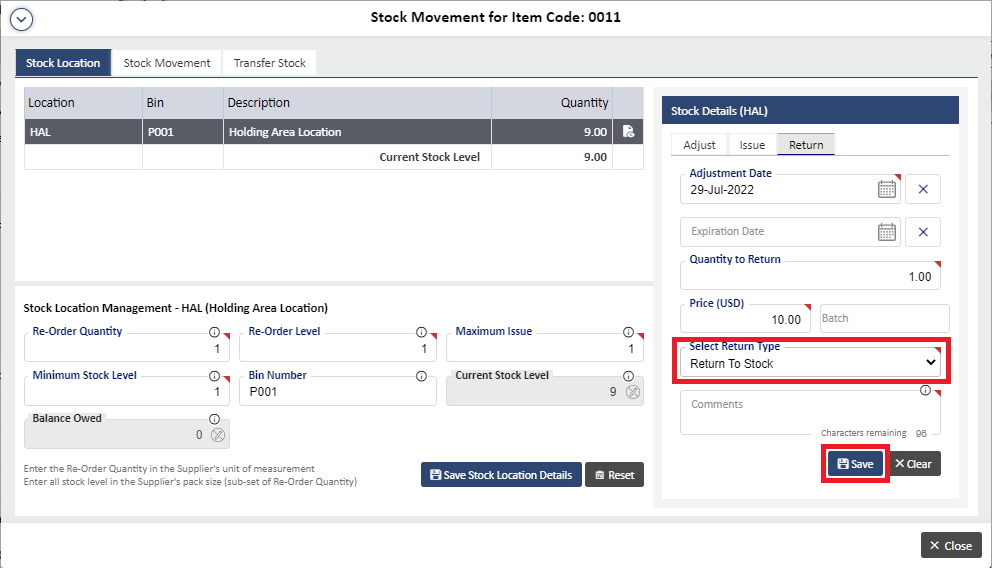
d. Click on Return (tab next to Adjust) when you want to return an Item to the Supplier which will reduce stock or click on Return to Stock to bring the item back to stock. This will increase the stock Enter the details and click on Save to see the message Saved Successfully.
e. Under the Stock Movement Tab, you can see the details of the actions taken on this Item.
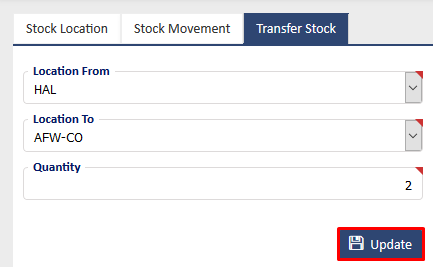
A message Update Successful will display.
g. Once transferred, you can see stock in the other location with that location’s default quantities such as Re-order Quantity etc., as shown in Screen: 13
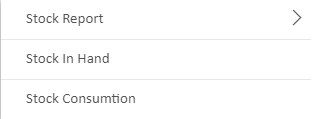
h. Under Menu, you will see 3 reports as shown in Screen: 14
Stock Movement – This report will show the details of the Stock Movement in report form.
Stock Location – This report shows each location’s details such as Re-order Quantity, Re-order Level, Maximum Issue and Minimum Stock Level and Total Quantity available at the time the report is run for that Item.
Stock in Hand – This shows a graph indicating stock in hand on a monthly basis and can be filtered location wise. This can also be exported to png, pdf and excel formats
Note : These reports will give details about a particular Item only.
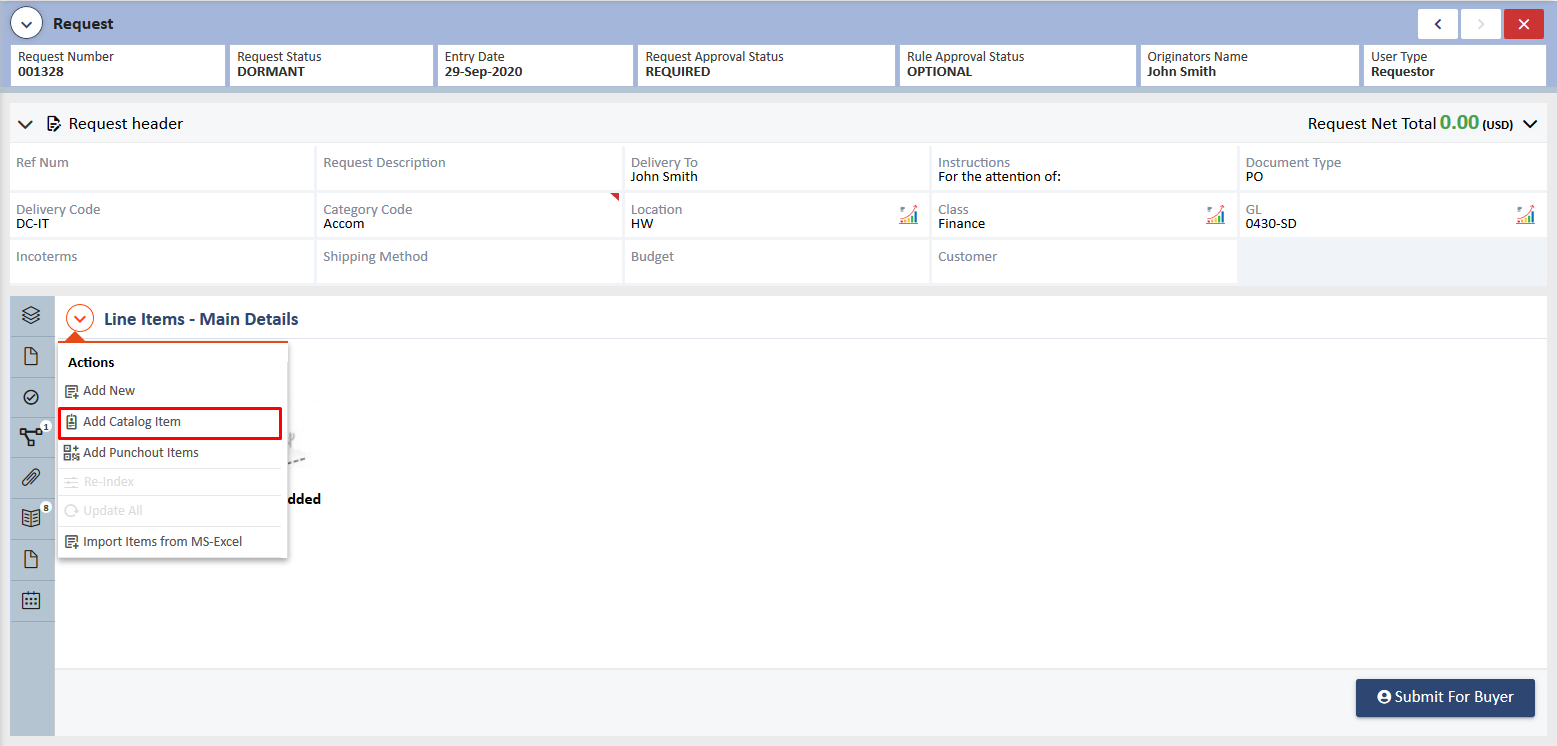
7. You can create a new request for an existing consumable Item in inventory by clicking the Catalogue Item tab on the Request Page as shown in Screen: 15. You can add the details of quantity and price and submit for approval.
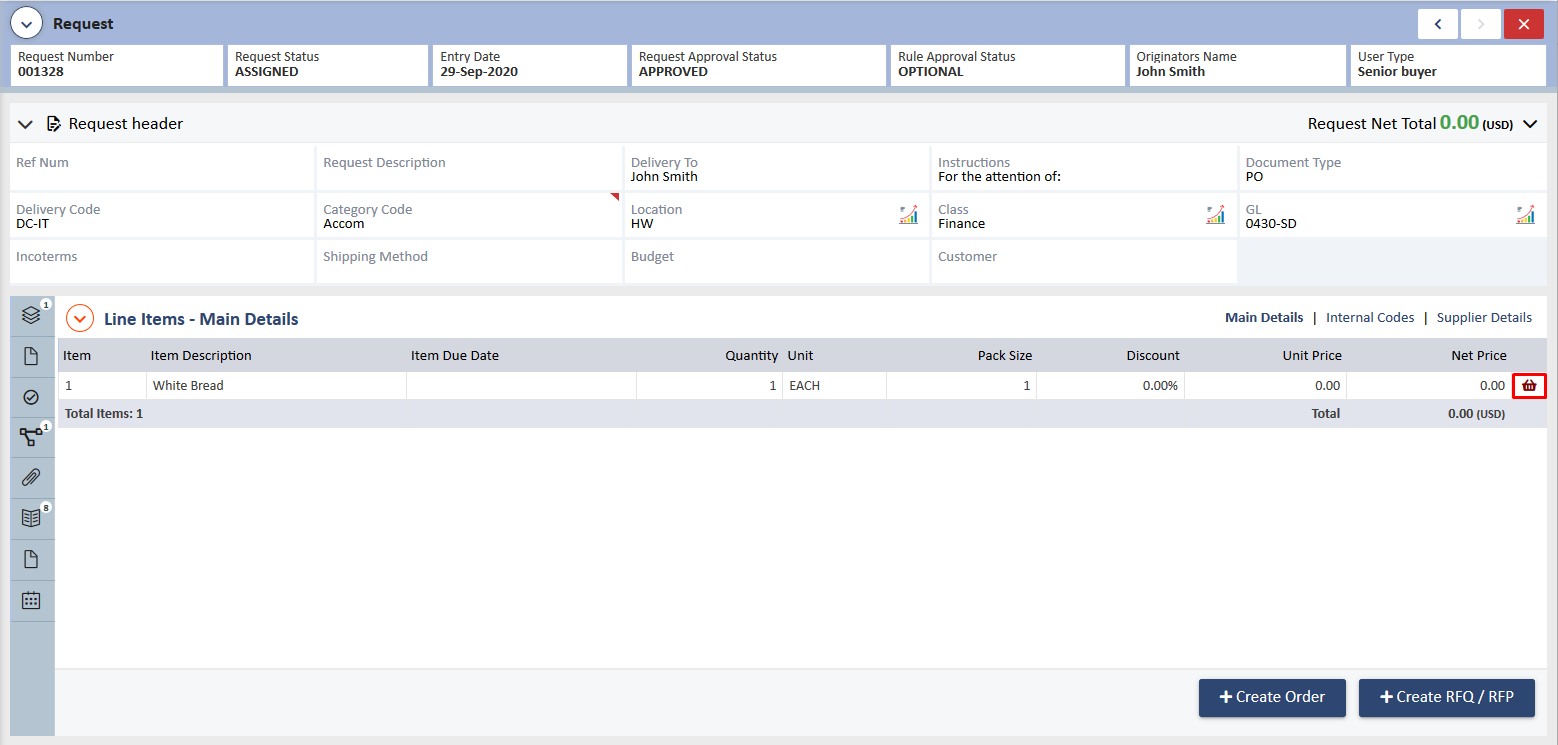
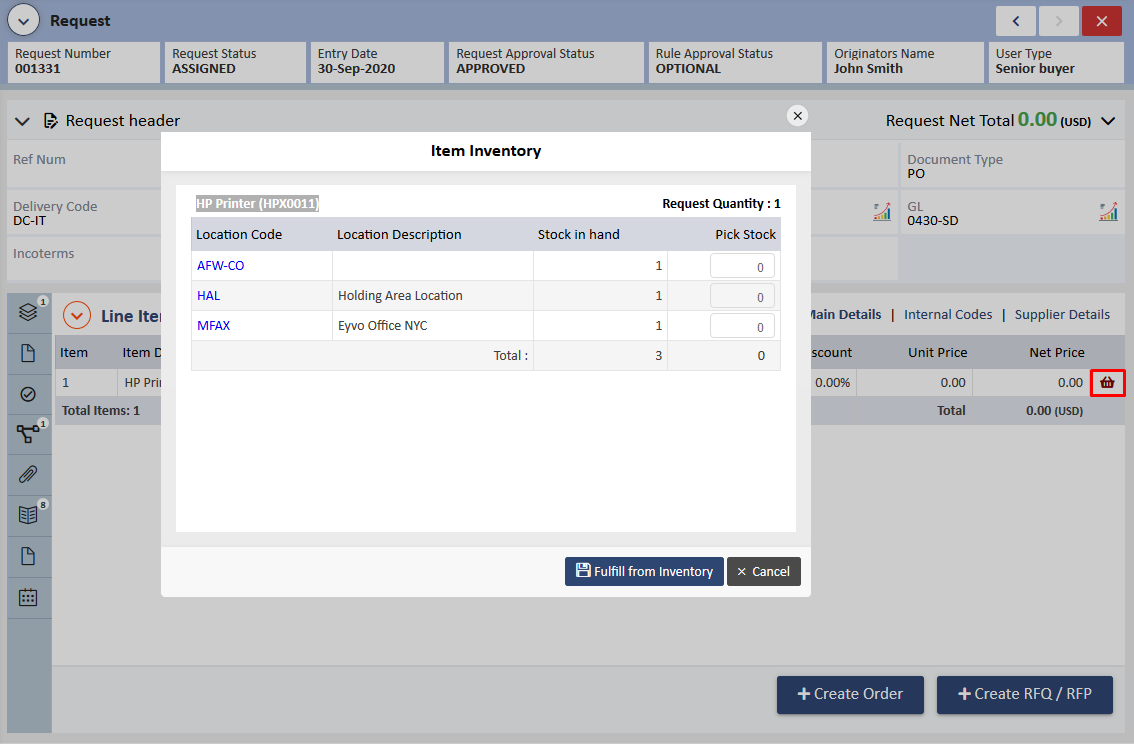
8. Once the request is approved, you will see the Screen: 16 with the Item in Stock will help pull stock from the existing inventory to proceed further.
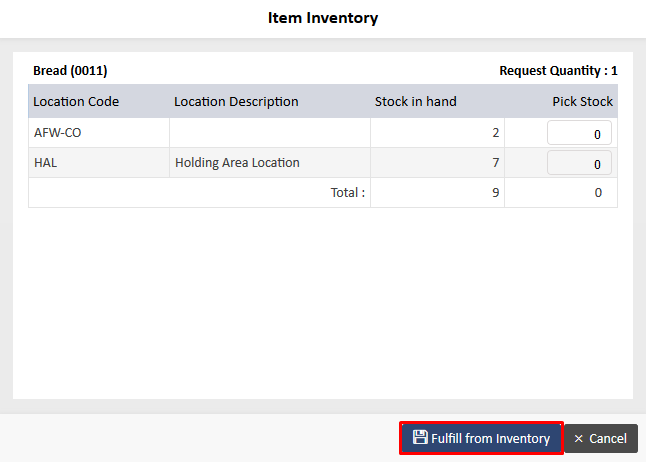
9. When you click on the highlighted icon as shown in Screen: 16, a pop-up allowing you to pick Items from the existing stock as shown in Screen:17 will appear:
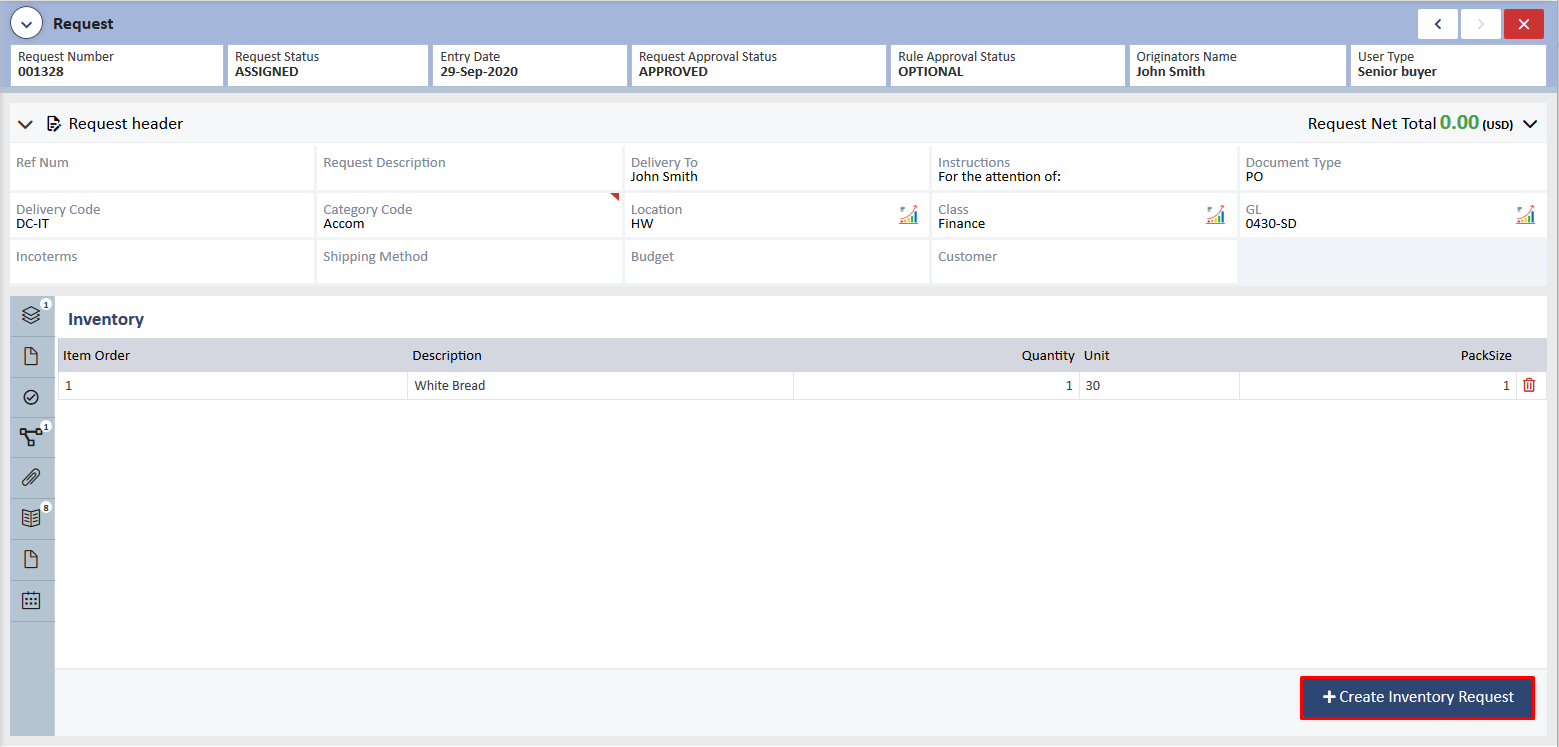
10. Enter quantity in the Pick Stock field and click Fulfill from Inventory button. You will get a message Item Booked Successfully after which you will see Screen: 18 to help you Create Inventory Request
11. When you create an Inventory Request, an email goes to the Inventory Manager of that particular location informing him/her that Items are reduced as shown in Screen:19
Note : Only the Inventory Manager of this location will receive this email
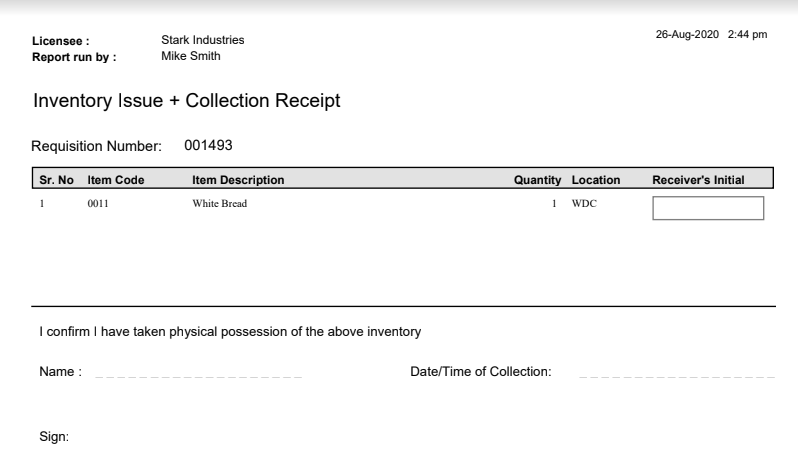
12. At the same time, the Requestor will get an email with a pdf attachment (to be printed) to collect the Items from inventory as shown in Screen:19.1 and 19.2.
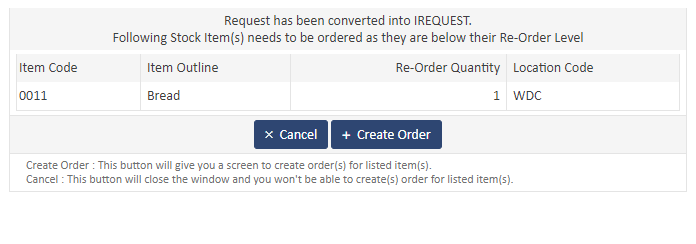
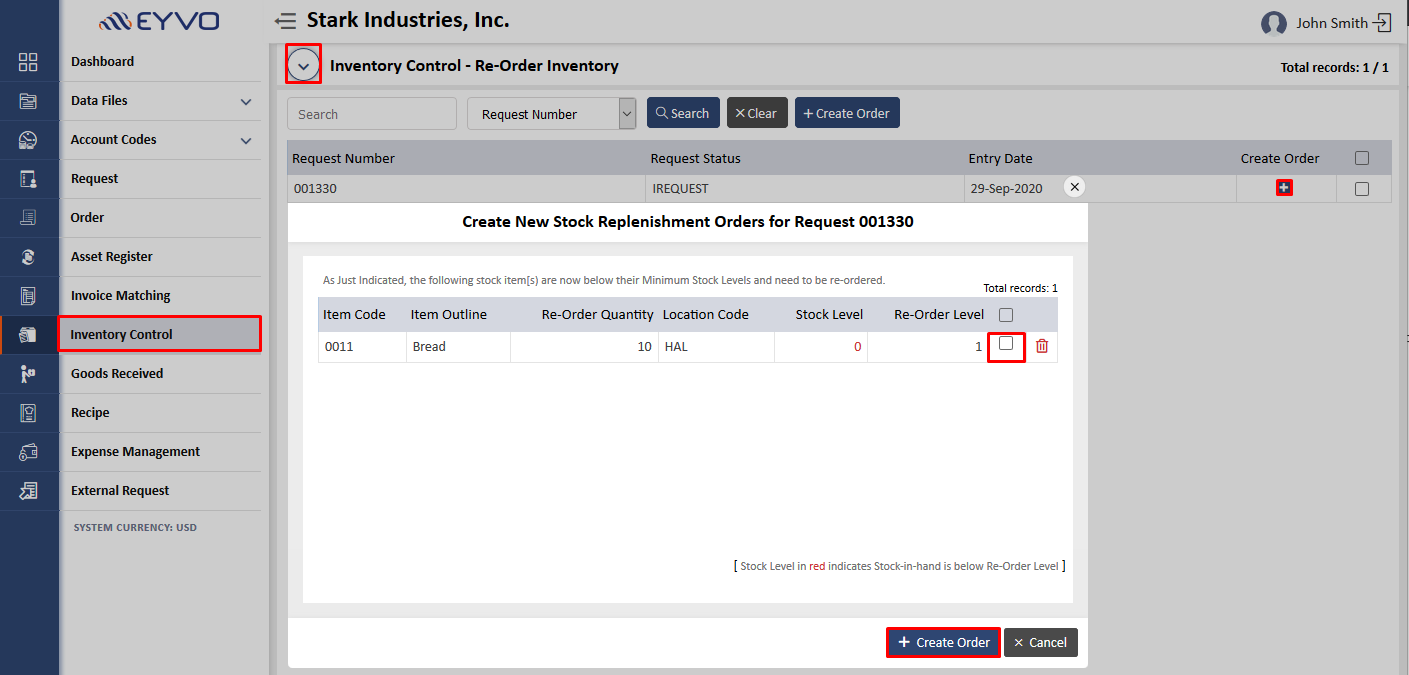
13. If at the time of creating an Inventory Request, the current stock level equals or goes below the re-order level of that location, the system will ask you to create an order to replenish the stock as shown in Screen: 20
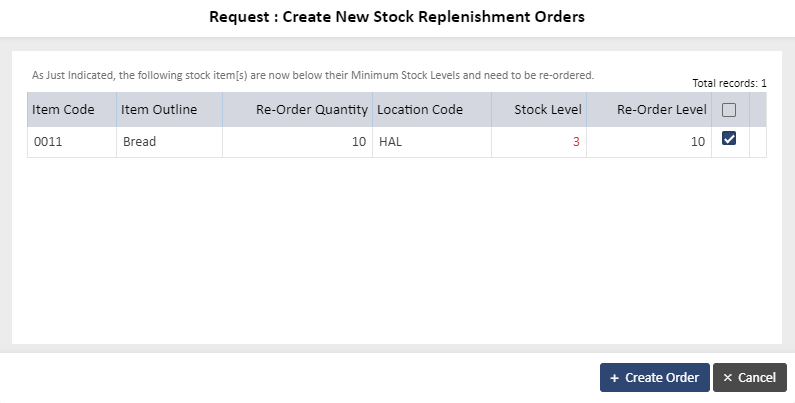
14. When you click Create Order option, it will show take you to Screen: 21, Screen: 21.1. You can check the box and confirm by clicking Create Order.
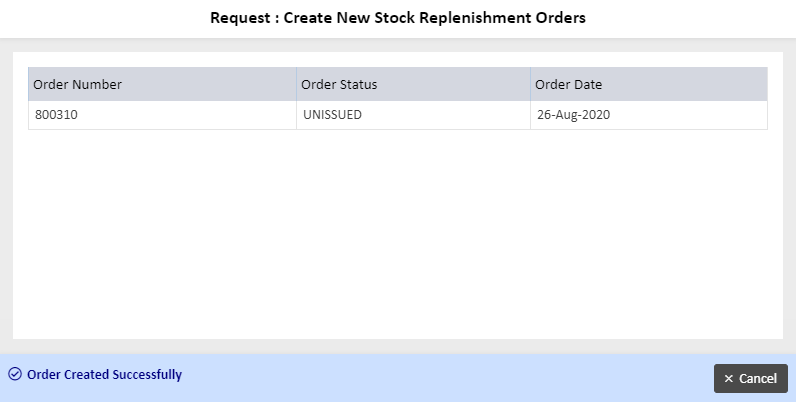
15. This will generate an order for the re-order quantity for the specified location as shown in Screen: 22
16. As soon as this order is generated, an email goes to the Inventory Manager of that location as shown in Screen: 22.1
You can proceed with this generated order in the usual way by entering costs, supplier etc., proceed for approvals and issue it to the supplier.
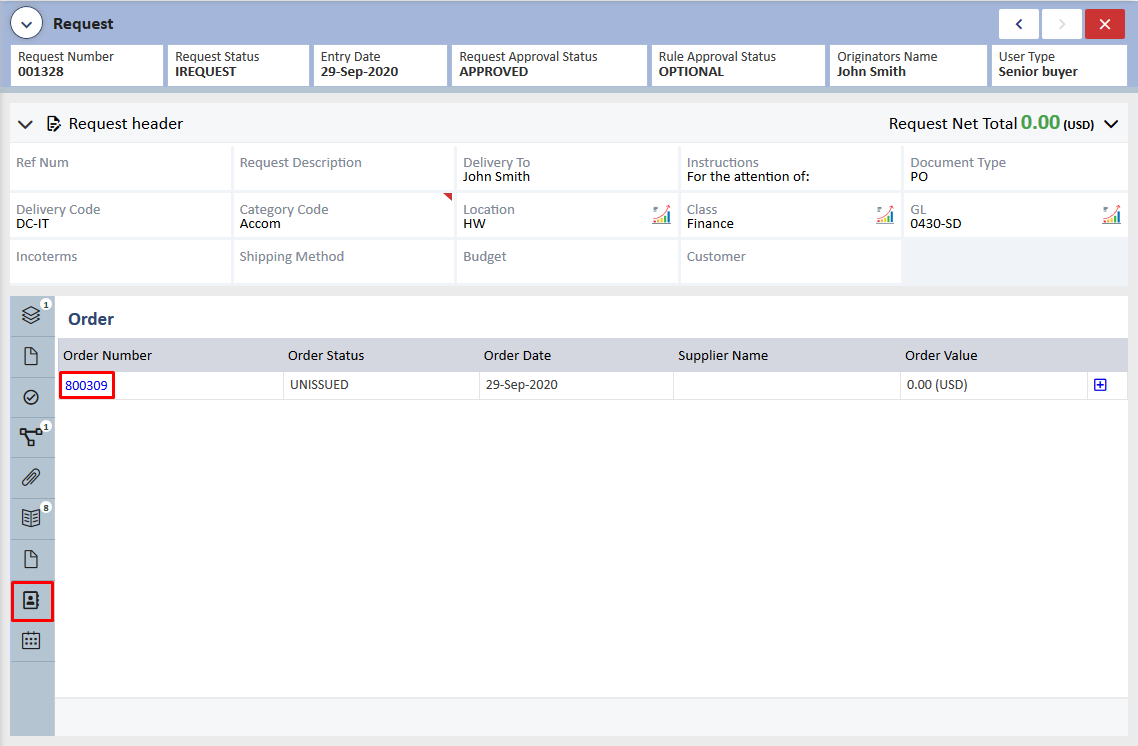
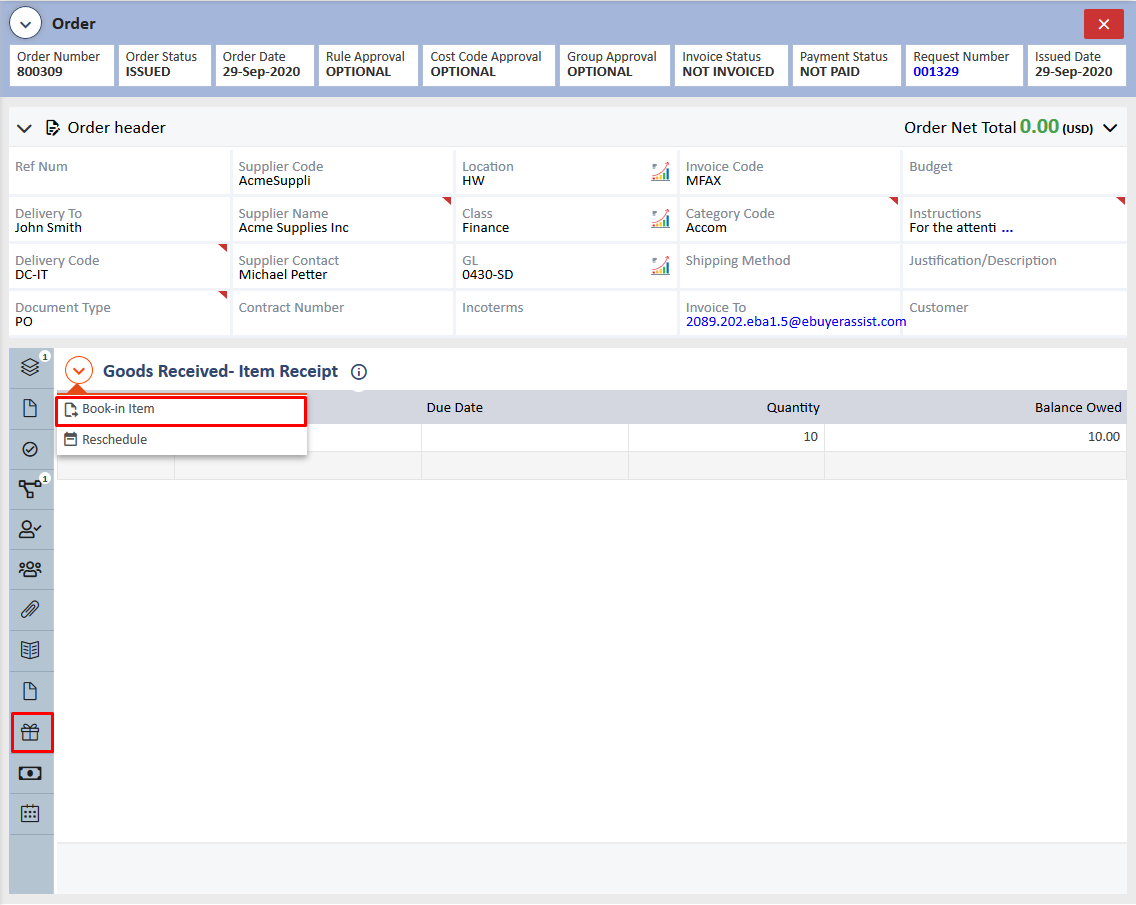
17. Once the Items are supplied, you can go to the order and receive these goods by clicking on Receiving and book in the Items by clicking on the highlighted button to see Screen: 23.
Note : This can be done only if you have the Goods Receiving Module.
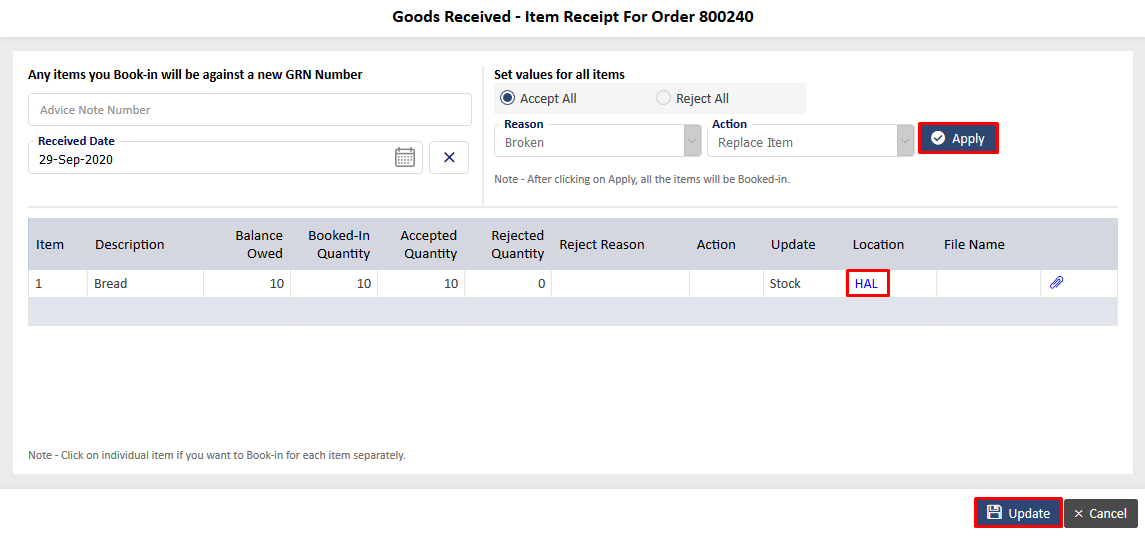
To accept all Items, click Apply followed by the Update option to receive all Items as shown in Screen: 23.1.
Note : You can also select the location on this screen by clicking on the location hyperlink.
You will also receive an email as seen in Screen: 23.2.
18. This will ensure that these Items are automatically updated in the Inventory as seen in Screen:
23.3 and Screen: 23.4
The steps above show placing a Request for an existing Consumable Inventory Item.
19. Another scenario is where an order is placed for, say 10 laptops. You can choose to pick only 4 Items from the existing inventory. The system will then allow you to place an order for the remaining 6 laptops. In the event that the inventory equals or falls below the ReOrder Level (after Items are picked out of the inventory during the Request Stage), the system will generate 2 Orders. One for the 6 laptops and another with the re-order quantity of that Item. The rest of the procedure will be the same
20. If you pull out Items from the existing inventory such that the level doesn’t equal or go below the re-order level then the Create Order option will not come up and the request will be created into an IRequest only.
21. There is another option here for you. Going back to point no. 13 and 14, you will see Screen: 24 to create an order. However, you can choose to skip it and click on Cancel.
In this case, the Inventory Manager of that location can create the re-order. The manager can log in and go to Inventory Control> Quick Links I Reports> Re-order Inventory and create the order.
Note : The Re-order Inventory option is only available to an Inventory Manager
System Administrator
22. A System Administrator can also select the option to Auto Create Order under Inventory Management> Inventory Control as shown in Screen: 25.
This process will work the same way as shown with the help of screens in Section: I above except point no. 13 and 14 will be excluded (only if the current stock equals or falls below the re-order level). The system will automatically generate an order for the re-order quantity.
23. The Inventory Manager can create this order. To do so,the Inventory Manager can log in and go to Inventory Control > Quick Links I Reports > Re-order Inventory and create the order as shown in Screen: 26
Note: The Re-order Inventory option is only available to an Inventory Manager.
SECTION: II
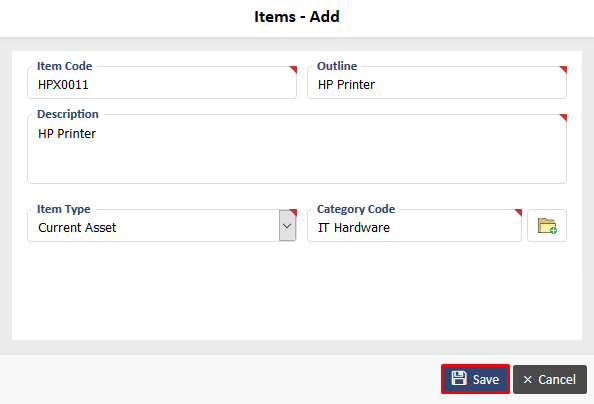
1. Firstly, you need to add a Current Asset Item. To do so, go to Data Files> Items> Add New as shown in Screen: 27.
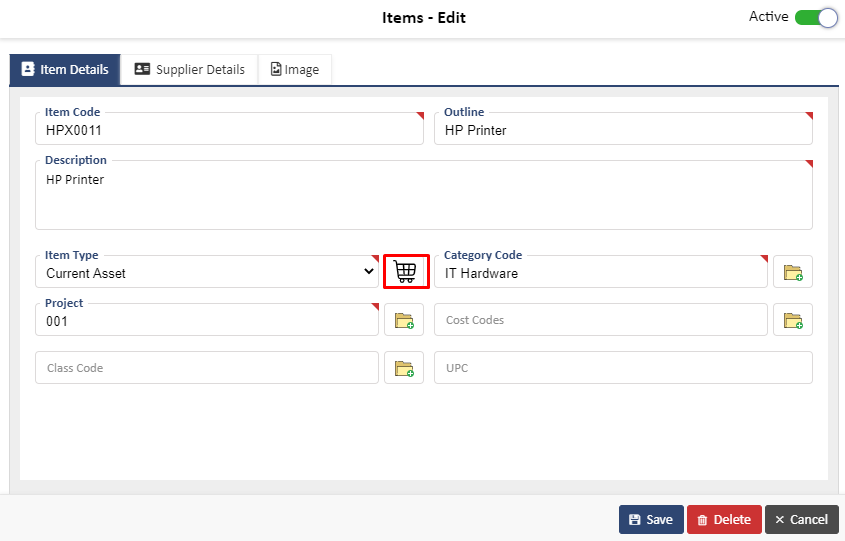
Add details, choose Current Asset as an Item type. You will see Screen: 27.1 as soon as you click Save.
This Item selected will show under Inventory. You can add the codes, Supplier details and an image for the Item on Screen: 27.1.
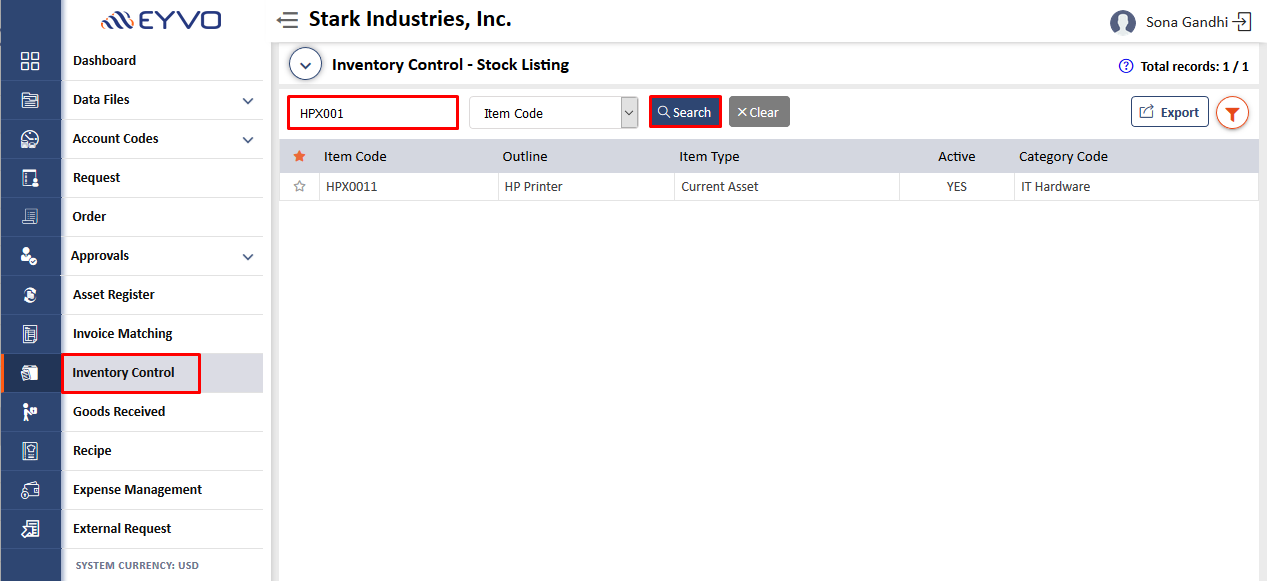
2. In the Inventory Control Screen, you can search for the above Item. (You can also click on the Inventory Icon on Screen: 27.1 to see the Item details) as showen in Screen: 28.
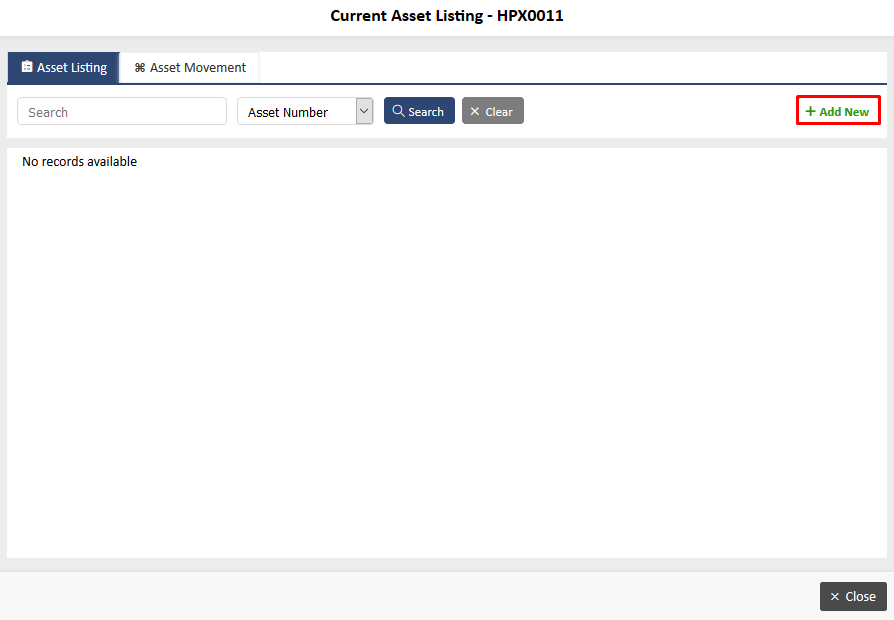
3. When you click on the Item, Screen: 29 will appear. Click on the Add New button to register asset.
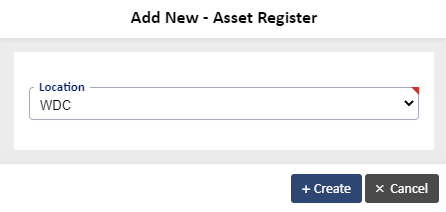
You can select the location where this Item needs to be from the Location dropdown and save details as seen on Screen: 30 and Screen: 31
4. You can add a new Record Number under this Current Asset Item
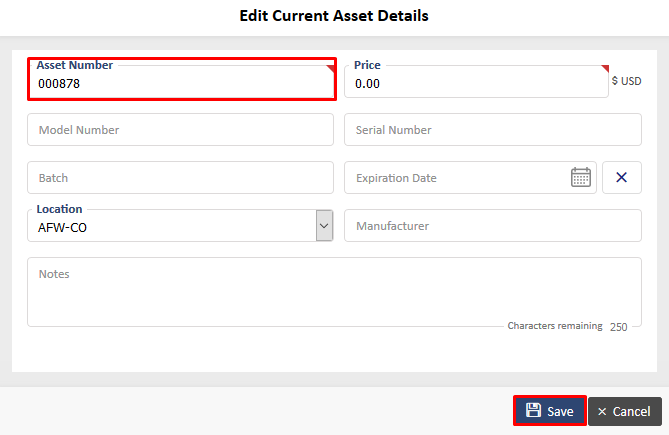
You will see Screen: 31 next to add details. Click on Save once done. In this way, under one Current Asset, you can add multiple records of the same Item with different record numbers, model numbers, serial numbers etc
Note: Asset Location and Asset Movement screens will show only after one record is added
Price Field will show if the price was not added at the time of creating this item. This would be an estimated price.
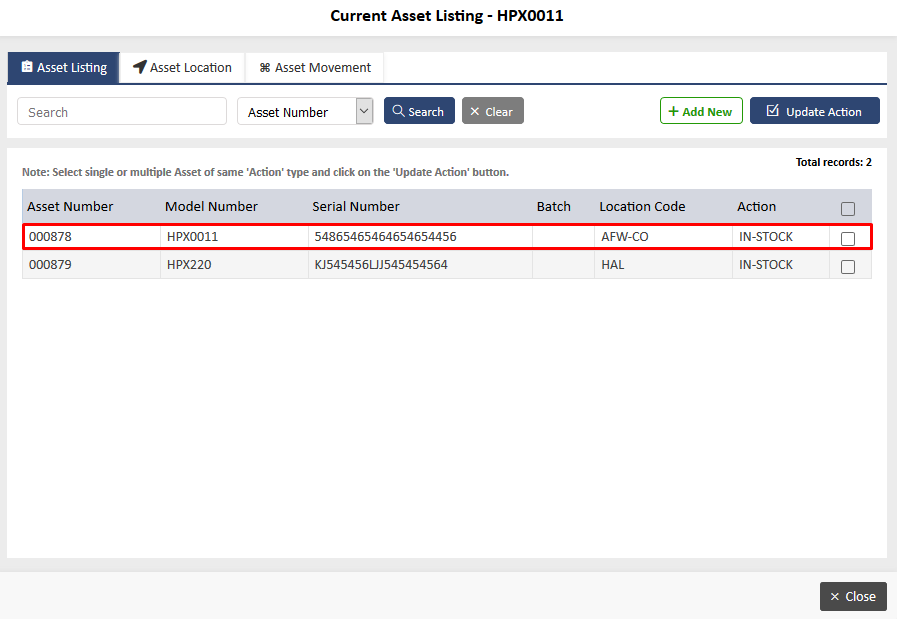
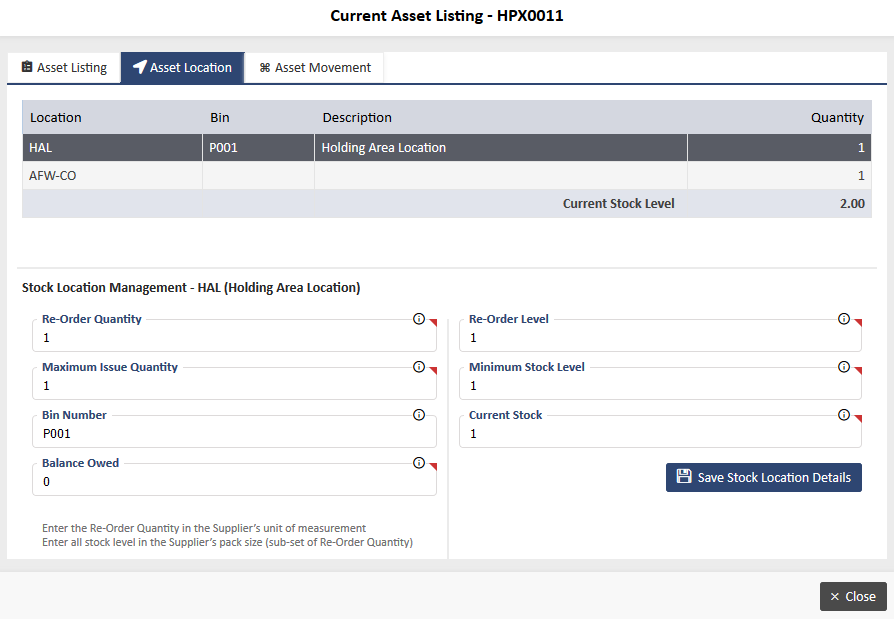
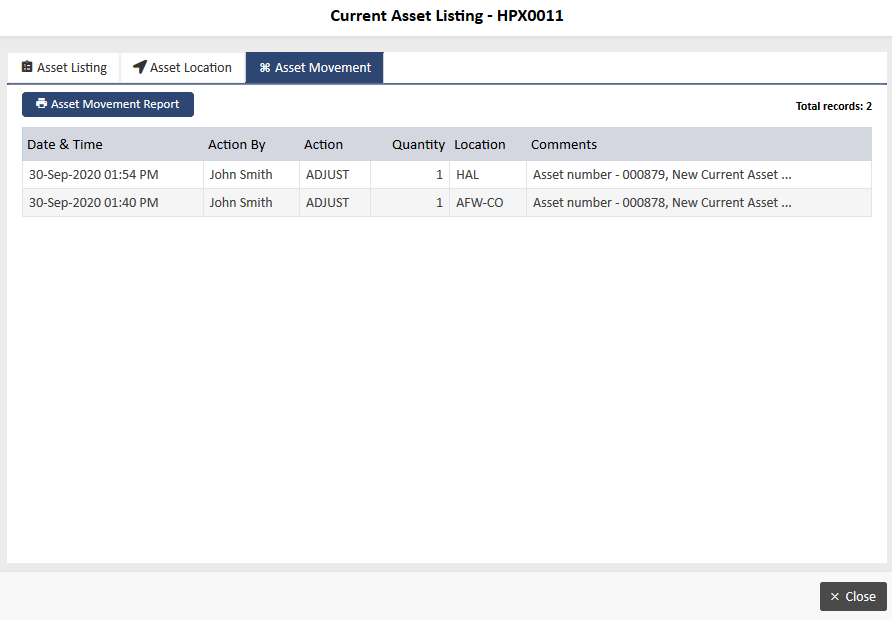
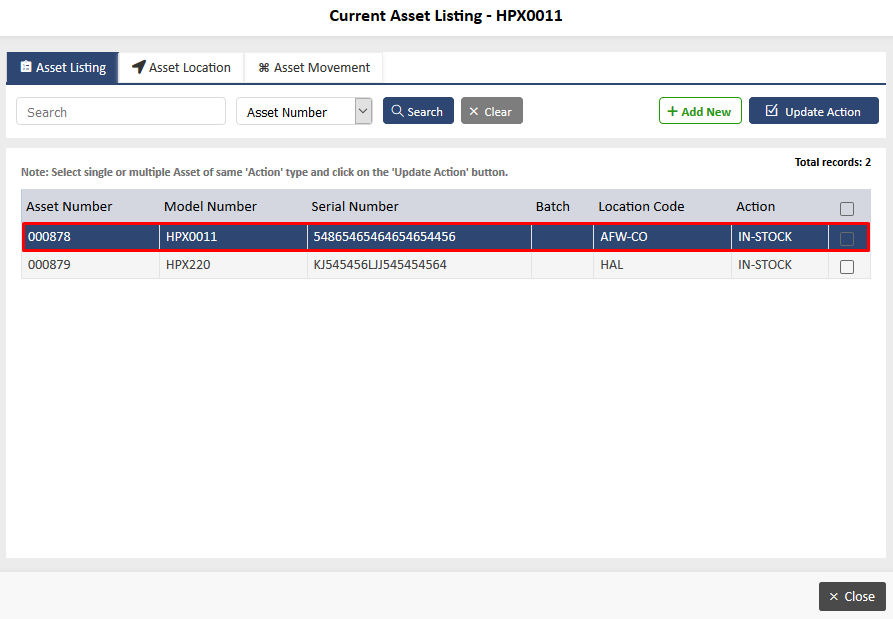
5. Once record numbers are added, you will see the below Screen: 32 - Asset Listing ,32.1 - Asset Location and 32.2 - Asset Movement
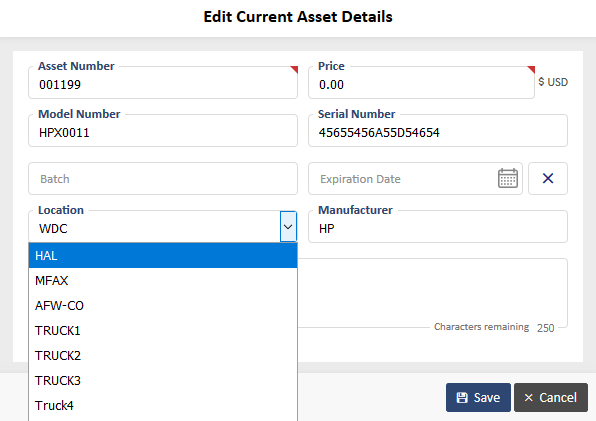
6. To move a record from one location to another, click the Edit button next to the Record Number, as shown in Screen: 33.
Once done, select the Location from the dropdown as shown in Screen: 33.1.
Once selected, click Save. A message Saved Successfully will appear.
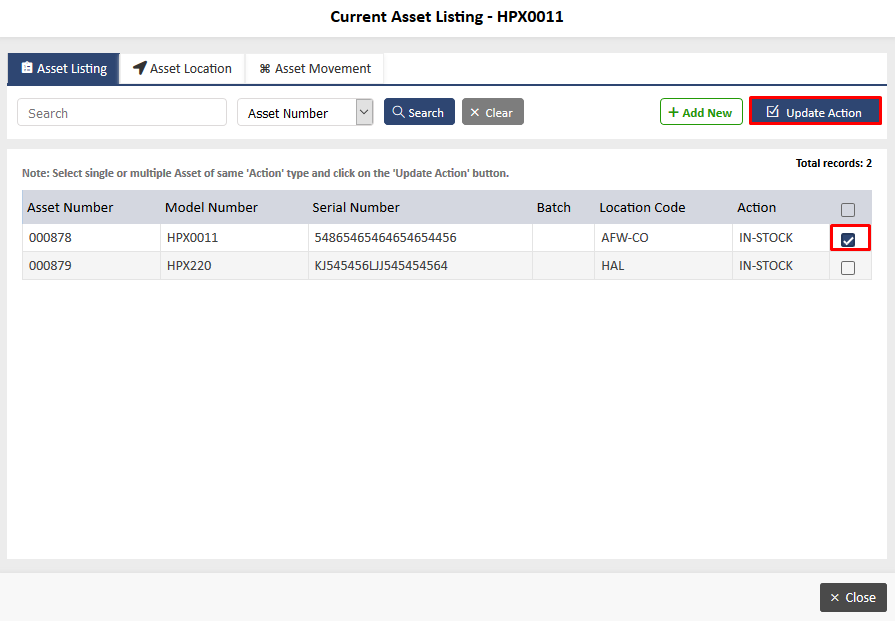
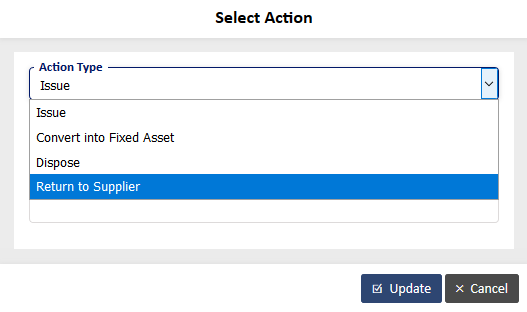
7. There are some more action types in a Current Asset Item. You can check the box for a particular record number and click on Update Action as shown in Screen: 34.
This will show you the below options as shown in Screen: 34.1
OPTION: I
If you Issue a record, it will reduce from stock and the action on the Asset Listing Screen will show as Issued as shown in Screen: 35, & 35.1.
Note: If you have Asset Register module, then this record will show under Asset. Also, if the Asset Register module is on, the Inventory manager will see one more option in the dropdown called Convert to Fixed Asset This will also transfer the record from current to fixed asset. However, this option is only available to the Inventory Manager.
OPTION: II
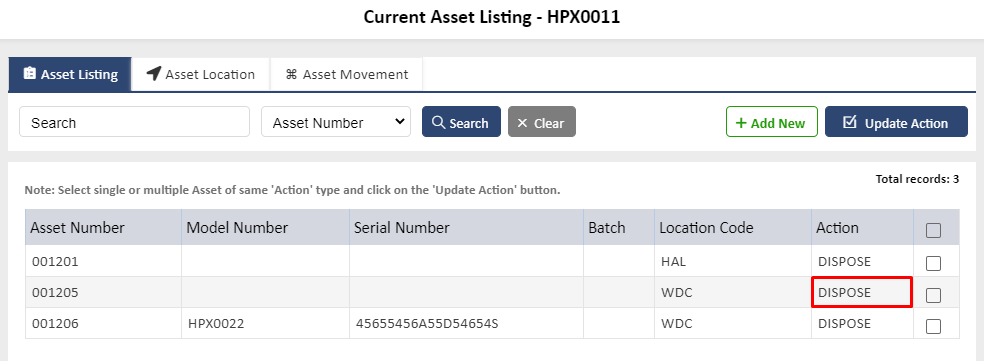
If you Dispose a record, it will reduce from stock and the action on the Asset Listing Screen will feature as Disposed, as shown in Screen: 36.
Once disposed, the Asset Movement doesn’t show it as In-Stock
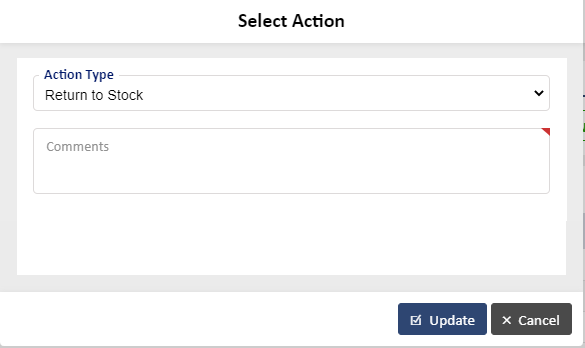
because you have the option to bring this back to stock. To do so, check the box for this record and click on Update Action as shown in Screen: 36.1.
Clicking on Update Action (Screen:36.1) will bring this stock back and the action on the Asset Listing Screen will show as In-Stock again.
OPTION: III
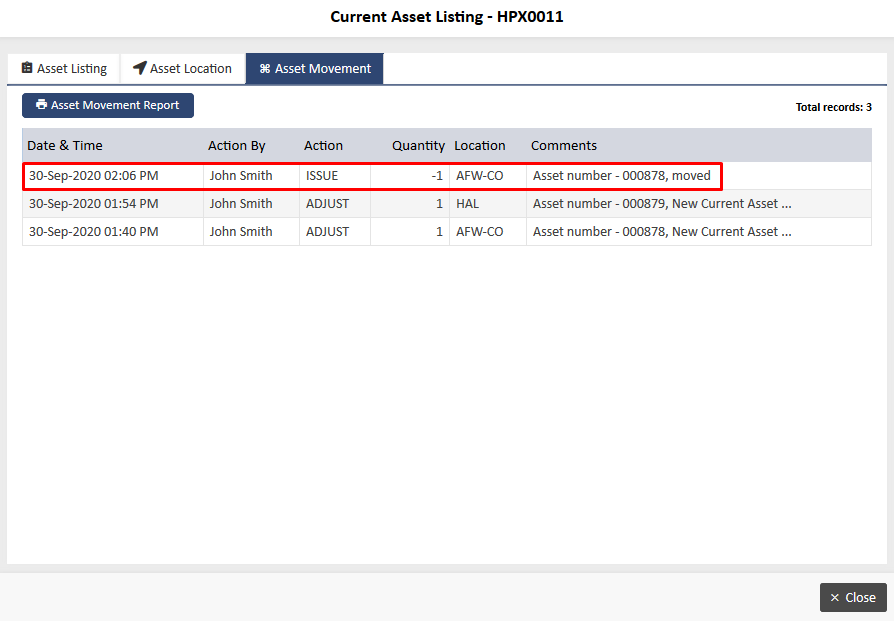
If you select Return to Supplier, it will reduce from stock and not show on the Asset Listing Screen. However, the Asset Movement will show details as shown in Screen: 37
8. You can create an IRequest by following the same steps as adopted for Current Asset Item in Section: I while dealing with a Consumable. There are only a few different screens that you will see as follows:
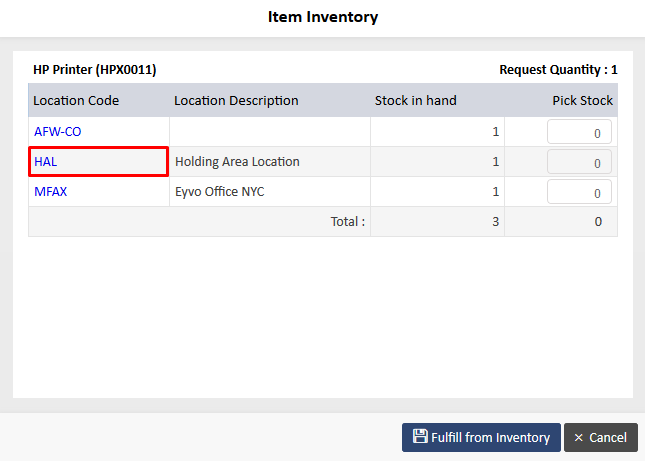
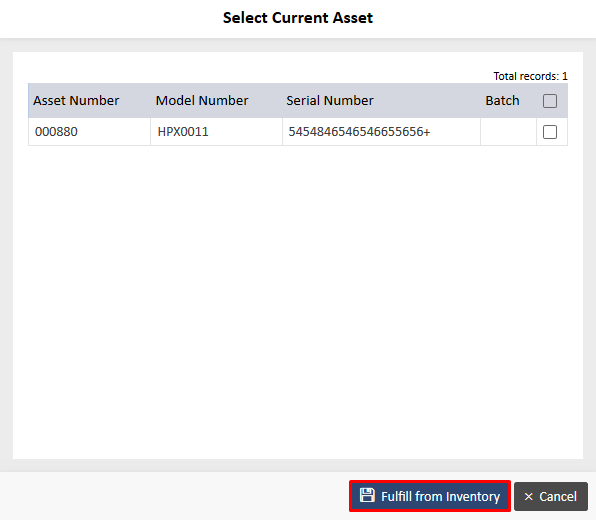
9. When your request has been Approved and you pick stock from inventory, Screen: 39 will appear for a Current Asset Item asking you to select the record numbers that you wish to pick from stock. The location will be a hyperlink and will show the next screen when clicked.
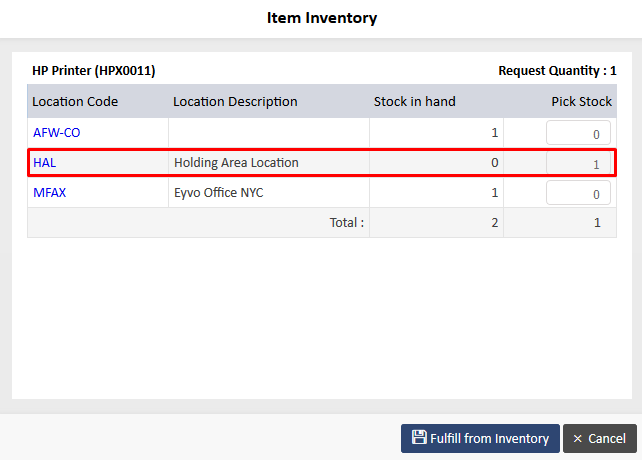
10. You need to check the boxes for the Record Numbers you wish to pick and click Fulfill from Inventory as shown on Screen: 40. This will take you to the next page as shown in Screen 41 below:
11. After clicking Fulfill from Inventory (as shown in Screen: 41), you will see the same Request Page asking you to create IRequest and the remaining process will be the same followed for a Consumable Item in Section: I.
12. Another variation in Section: II as compared to Section: I is that the mail received by the Inventory Manager when the IRequest is created will now have details of the Record Numbers selected, instead of the Number of Items as shown in Screen: 42
13. The next change is witnessed when Current Asset Items are booked in and received. They show in inventory as Individual Record Numbers added under that particular Current Asset as shown in Screen: 43 & 43.1.
The rest of the process stays the same.
Inventory Manager:
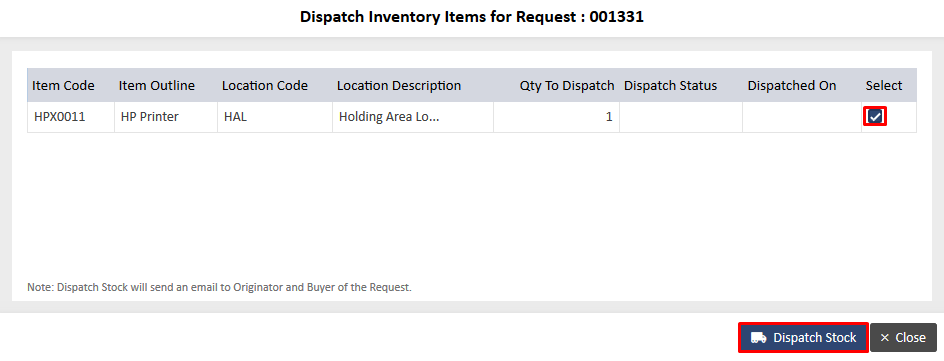
14. The Inventory Manager also needs to dispatch the stock from the system at their end for the IRequests that are created in the system. This can be done under Inventory Control> Quick Links I Reports> Dispatch Inventory Items as seen in Screen: 44 & 44.1, through an example:
15. When the Inventory Manager clicks on Dispatch Items, an email will be send to requestor as shown in Screen: 45.
The Inventory Manager needs to check the box and click on Dispatch Stock (Screen: 44.1). Once dispatched, the Originator and Buyer will get an email and the status will be changed to Fully Dispatched as shown in Screen: 46
If required and if the you don’t have the pdf (the one that is received in the email), the Inventory Manager can print the pdf from Inventory Control> Quick Links I Reports> Dispatch Inventory Items> View Report (of that IRequest) and take the signature, thereby, completing this process.
Reports that you will see:
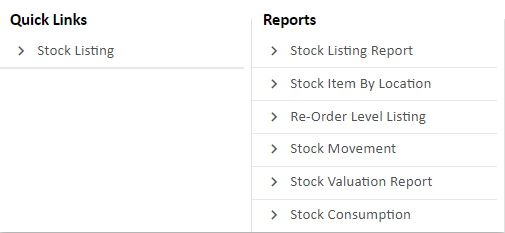
There are various reports that can be generated under the Inventory Control Module under Quick Links I Reports as shown in Screen: 47.
Below are the details:
a. Stock Item by Location – This report can be generated for all Items or a particular Item. This can also be further filtered by choosing all locations or a particular location. This report shows the last movement of the Item, quantity of stock at the time of running the report, estimated cost and estimated stock value.
b. Re-Order Level Listing – This report shows the Current Stock Level and re-order levels of all Items by location.
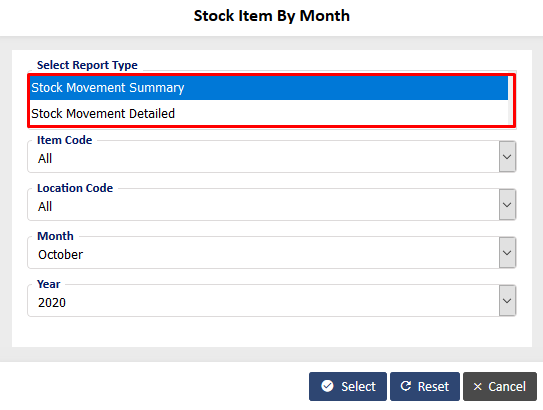
c. Stock Movement – This has 2 types of sub reports as shown in Screen: 48.
- Stock Movement Summary – This will show the Item stock at the start of the month, end of the month, usage and current stock levels. This report can be filtered using various criteria such as Item code, location code, month and year.
- Stock Movement Detailed – This will show the details of the actions taken on Items and can be filtered using various criteria such as Item code, location code, month and year
d. Stock Valuation Report – This shows the current stock quantity and the current stock value of all Items filtered using the category code
e. Stock Consumption Report – This shows stock consumption that can be filtered by various criteria such as Item Code, Location Code, Month, Supplier Code, G/L Code and Finance Code.
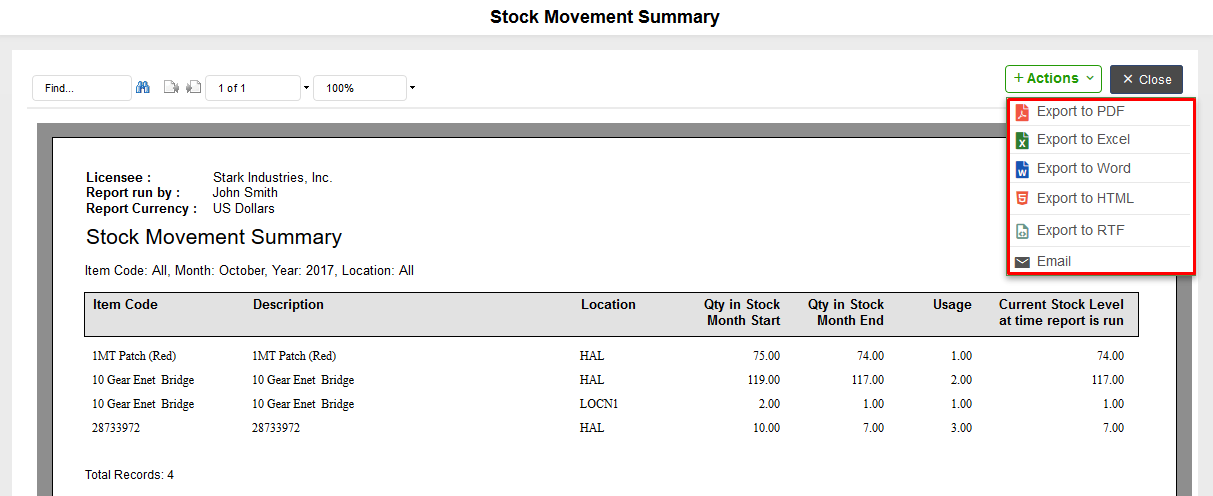
All the 5 reports mentioned above can be exported to a PDF, Excel, Word, HTML or RTF and can be printed or emailed as shown in Screen: 49.
Apart from the reports that you see, the Inventory Manager can generate additional reports as shown in Screen: 50 under Inventory Count section:
The Inventory Count process consists of four interconnected steps that must be followed sequentially.
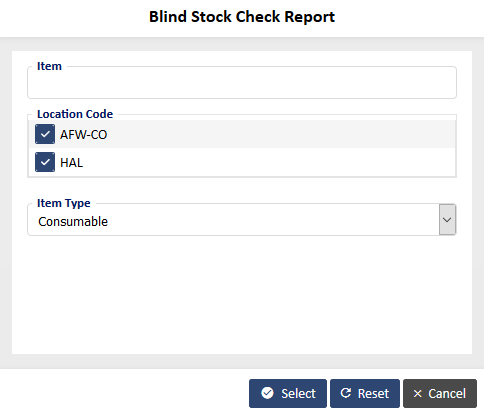
a. Blind Stock Check Report – This report provides the Inventory Manager with the ability to document the physical stock count of items. The report can be printed or exported in the desired file format. The inventory manager can choose to generate the report for a single item, all items, or specific item types. It is also possible to specify particular locations to include in the report as shown in Screen: 51.
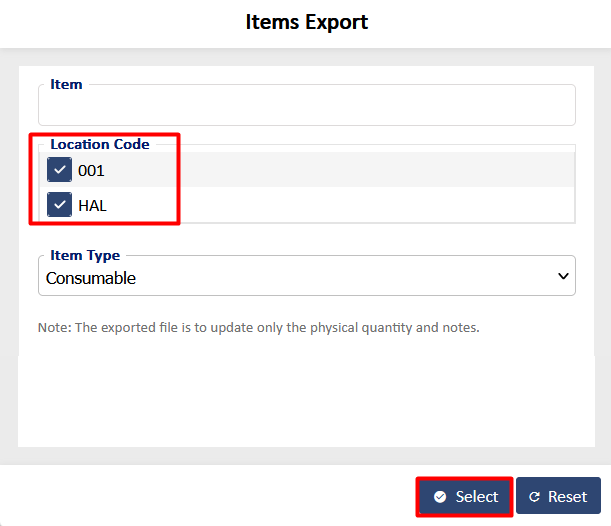
Once the items are exported, the inventory manager can utilize the exported sheet to enter the physical quantity and notes for the items, as demonstrated in Screen: 54
For demonstration purposes, we will be using the item shown below to illustrate the process.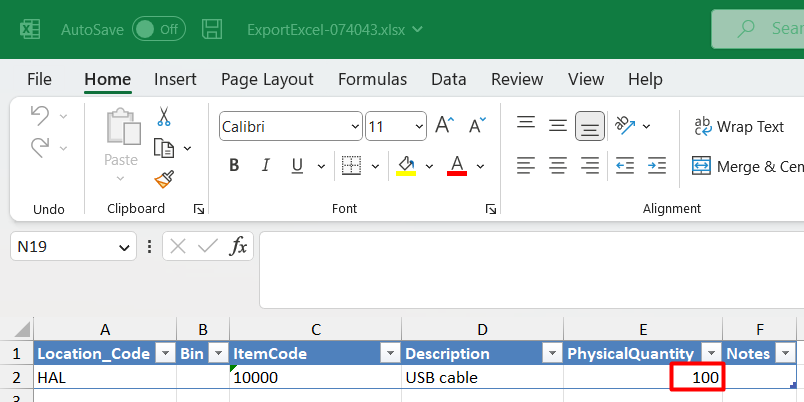
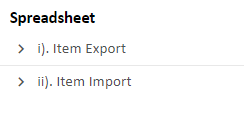
In order to import the physical quantity for the exported items in bulk, the inventory manager should navigate to the "Spreadsheet" section and click on "Item Import." Then, they need to choose the file and click on "Save" as shown in Screen: 55.
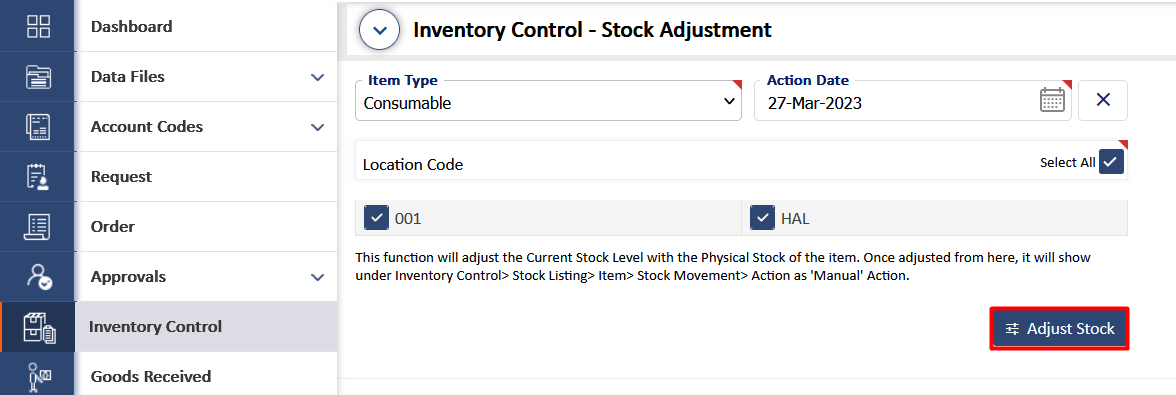
It is important to note that after a successful import, the system will hold the physical quantity of the items but will not update the actual current stock level of the items.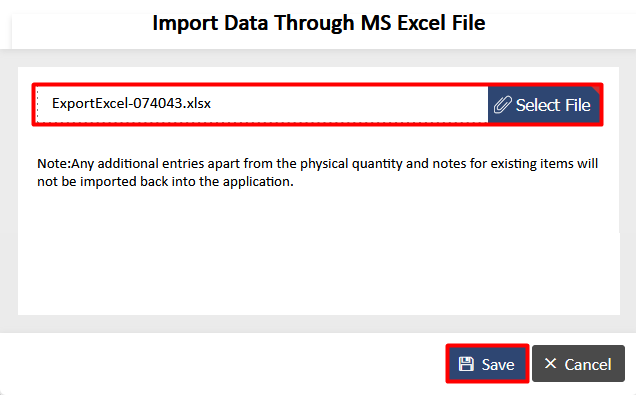
Note: Updating the physical quantity of items can be achieved through two methods - firstly, via bulk import using the "Item Import" option, and secondly, by clicking on the "Item Physical Quantity" option to manually update individual items
b. Item Physical Quantity – The inventory manager has the ability to enter the physical quantity of items, add notes, and click on the "Update All" button. To properly differentiate between consumable items and current assets, be sure to utilize the corresponding tabs as shown in Screen: 56.
However, it's important to note that this action will only hold the physical quantities and won't affect the actual current stock level of the item.
c. Stock Variance Report – By running this report, the difference between the present stock levels and the manually entered physical quantities will be displayed, along with the stock variance and variance cost. (this will only be visible if the supplier price or unit price of the item were entered in the system) as shown in Screen: 57.


