ASSET REGISTER
Our Asset Register module is to keep track of the book value of the assets and determine depreciation to be calculated and recorded for management and taxation purposes.
-
To begin with, the System Administrator is required to start the Depreciation Process. To do so, they need to go to Environment Settings> Asset Register and click on Depreciate Assets as shown in Screen: I This screen also explains the two methods to depreciate assets.
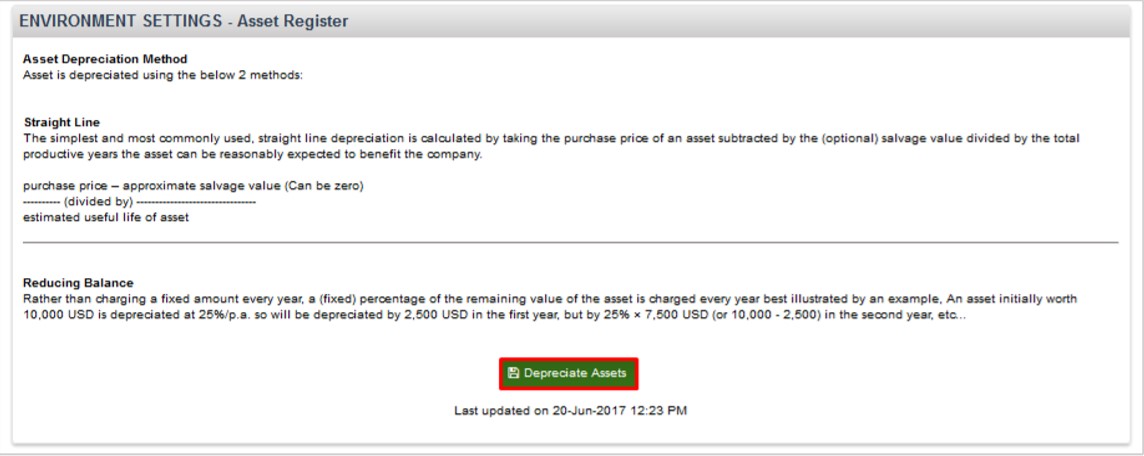 Note: When the System Administrator clicks on Depreciate Assets , a View Depreciation button will be seen on existing assets with statuses
dormant or in - use. This will show the old value, depreciated value and new val ue. This can be seen under the Asset Depreciation tab
-
The System Administrator will also need to also give you an access to the Asset Register. They can do so under User Maintenance> User Register and select you or other users. Under Permissions Functions, the System Administrator can give Read and Write permission to you as shown in Screen: II.
Screen: II 
As a User, you can then go to Asset Register on the left side menu bar and click on Asset Class under Quick Links I Reports as shown in Screen: III.
Screen: III 
-
To add a new Asset Class, click Add New to arrive at Screen: IV. Add the details, select the Depreciation Type (straight line or reducing balance), Depreciation Year, check the box for Active and click Save.
Screen: IV 
To Search for Asset Class, add details in the search field, select the drop down option and click Search as shown in Screen: V.
Screen: V 
To Edit an Asset Class, click on the Asset Class as shown in Screen: VI, make changes and click Save.
Screen: VI 
-
To add a New Fixed Asset, click on Data Files, on the left side Menu bar to select the Items and click Add New, as shown in Screen: VII.
Screen: VII 
Add details as shown in Screen: VIII, select Fixed Asset as an Item Type and click Save to reach Screen: VIII. Add further details such as the codes, supplier details (unit and price etc.), and image and click Save. The Asset icon as highlighted in Screen: VIII will appear.
Screen: VIII 
-
You can click the Asset icon to start adding individual assets under this item. Click Add New as shown in Screen: IX.
Screen: IX 
The system will ask you to select a Location from the drop down where the asset needs to be held. Select the Location and click Create> as shown in Screen: X.
Screen: X 
-
The next screen would have the Asset Number automatically created as shown in Screen: XI. Add details under Asset Details tab as shown in Screen: XI.
Screen: XI 
-
Under the Asset Depreciation tab, you will see that Depreciation term in years is already entered as per the Asset Class that was chosen on the Asset Details tab as shown in Screen: XII.
Screen: XII 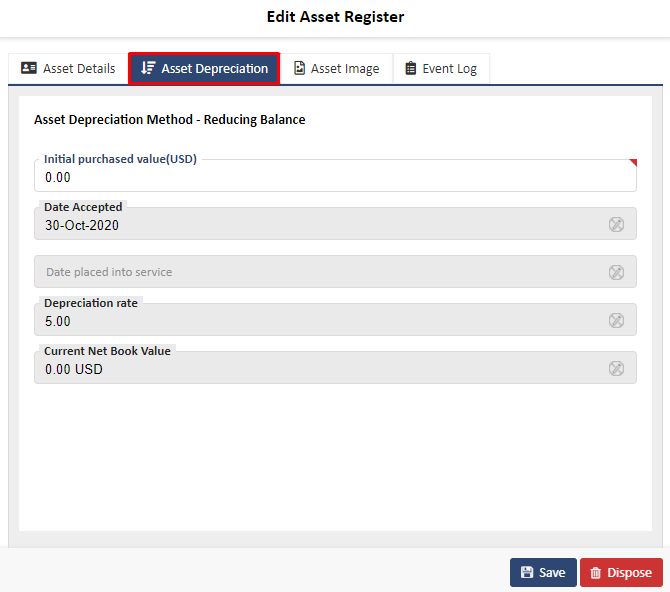
You can add the Initial purchased value of the asset in the field on this screen. Once saved, the value will reflect under Current Net Book Value The Date Accepted reflects the date on which the asset was created.
-
The Date Placed into Service would be the date when the status of this asset is changed to In-Use on the Asset Details tab. As of now, the status is Dormant which is why there is no date specified against the entry. You can change the status to In-use and select the date placed into service. This status can be changed back to Dormant a any stage.
Note: Depreciation for an asset starts from the date the asset is acceptedUnder the Asset Image tab, you can add an image of the asset as shown in Screen: XIII.
Screen: XIII 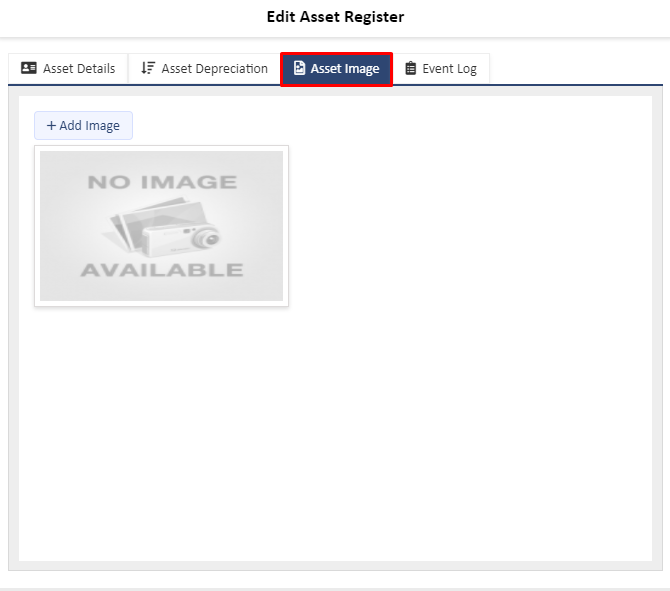
Under the Event Log tab, you will see the details of the actions taken on this asset with comments as shown in Screen: XIV. You can add as many assets under one item as required
Screen: XIV 
-
You can search for a particular asset under that item by entering the details in the search field and selecting the relevant drop down option and clicking the Search button as shown in Screen: XV.
Screen: XV 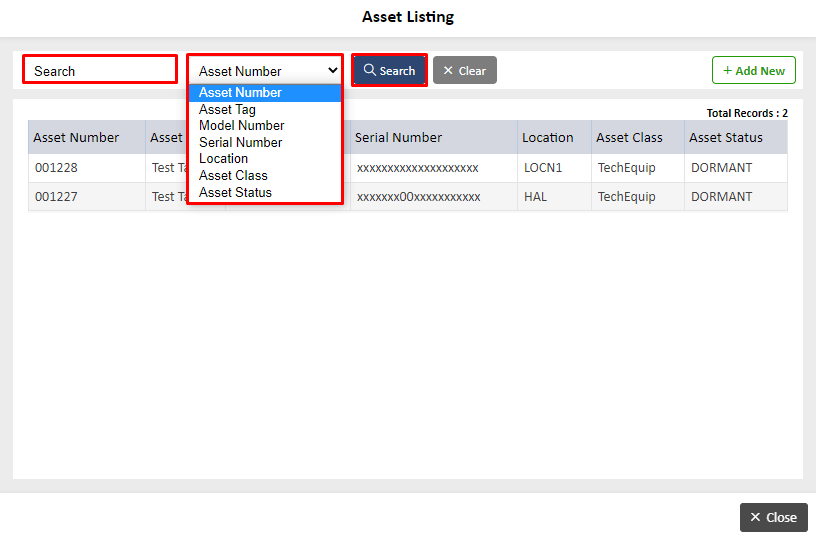
These assets will appear as individual asset entries under Asset Register as shown in Screen: XVI.
Screen: XVI 
-
To search for a fixed asset under Asset Register, add details in the search field, select the drop down option and click Search as shown in Screen: XVII.
Screen: XVII 
-
To do an Advanced Search, click the Advance Search Icon as shown in Screen: XVIII.
Screen: XVIII 
This will give you options to search as per the fields that you choose as shown in Screen: XIX.
Screen: XIX 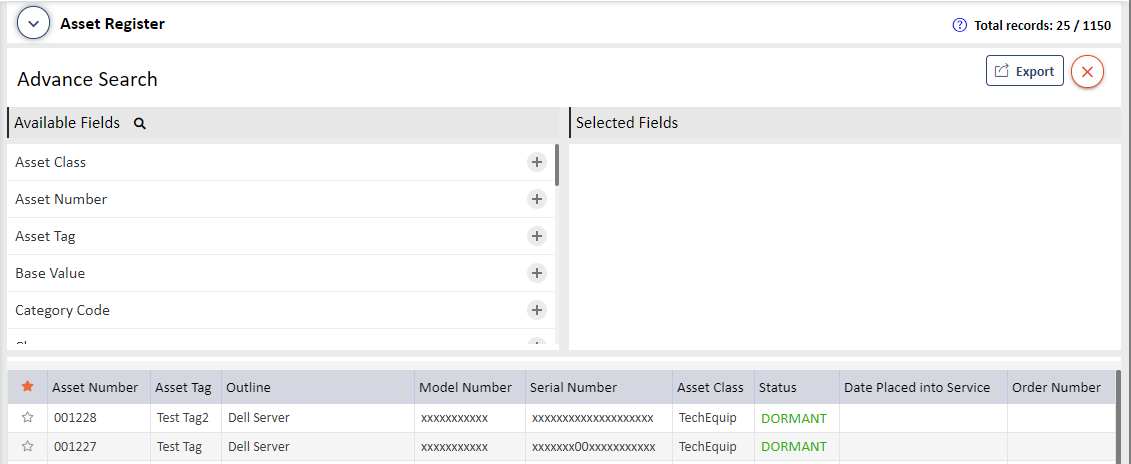
You can select various fields using the icons in the middle and search as shown in Screen: XIX
Once done, you can also save your search for future reference by clicking the Save Search button as highlighted Screen: XX.
Screen: XX 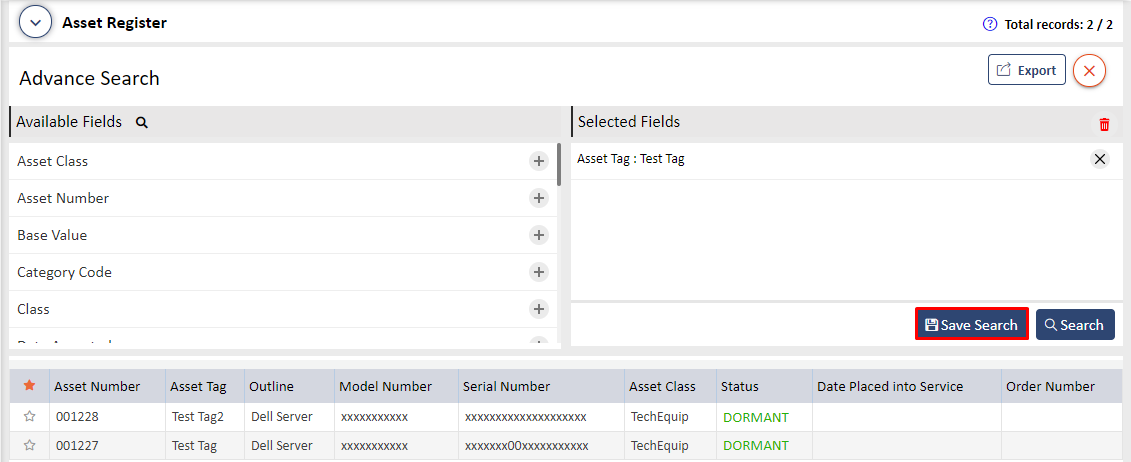
-
You can also Export Data in Text, XML and CSV formats. To do so, click the Export button on the Asset Register Listing Page as shown in Screen: XXI and XXII.
Screen: XXI 
Screen: XXII 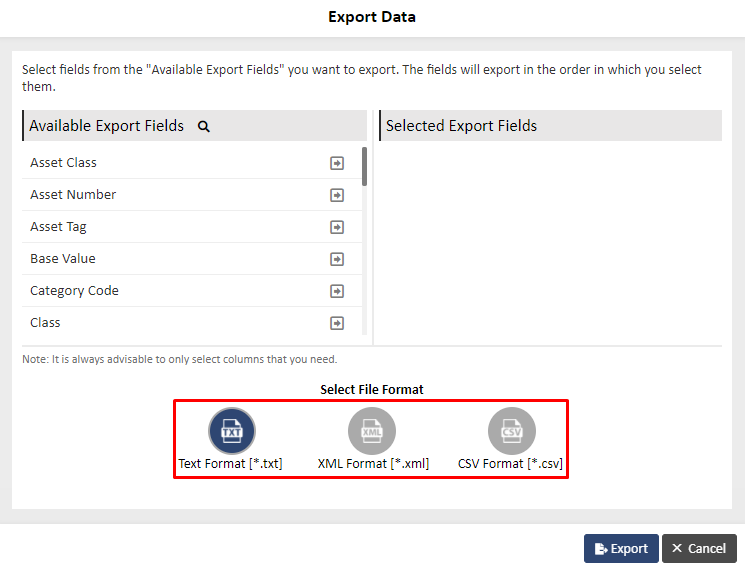
-
To Edit a Fixed Asset, click the record as shown in Screen: XXIII, make the changes as required and click Save.
Screen: XXIII 
Screen: XXIV 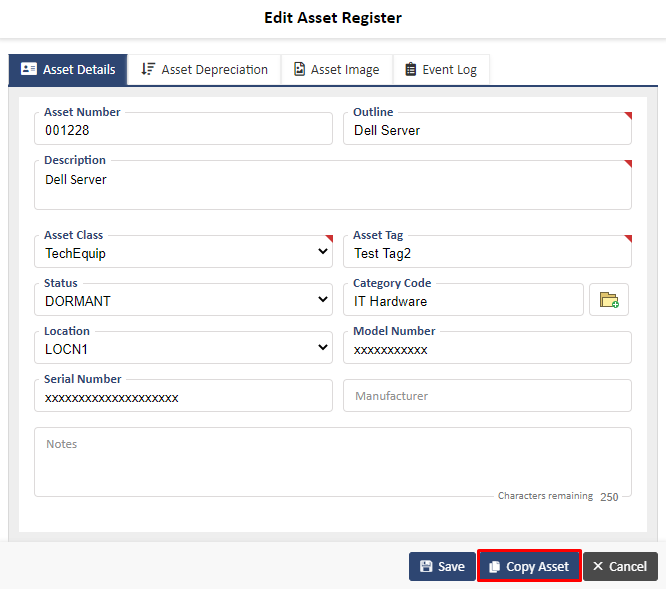
To Copy a fixed asset, click an Existing Asset followed by the Copy Asset as shown in Screen: XXIV.
-
A new asset with the message Asset Copied Successfully will appear. The Asset Number is automatically generated. The Asset Tag needs to be entered for this asset. The rest of the details will be copied. The Event log will show that this asset as copied as shown in Screen: XXV.
Screen: XXV 
Once a Fixed Asset is created, it cannot be deleted from the system. However, you can dispose the asset in two ways:Option: I: By selling it Option: 2: By scrapping it. To do so, click on an asset and under the Asset Depreciation tab, then press Dispose as shown in Screen: XXVI.
Screen: XXVI 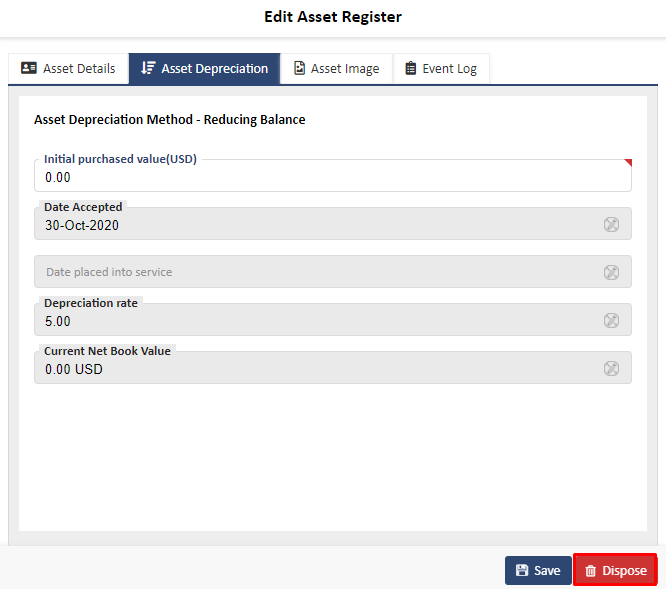
-
To sell the asset, click Sale on the Dispose Type dropdown and enter the Sale Price. Once you click Dispose as shown as shown in Screen: XXVII, the status of the asset on the Asset Register screen will change to Sold.
Screen: XXVII 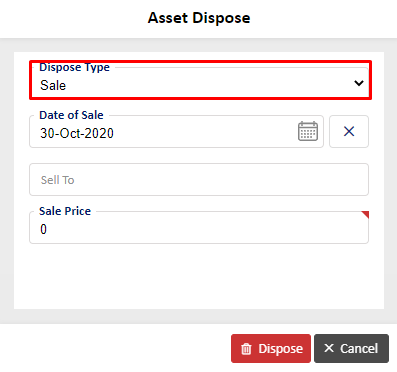
To Scrap the Asset, clickScrapped followed by Dispose as shown in Screen: XXVIII. This will change the status of the asset on the Asset Register screen to Scrapped, as shown in Screen: XXVIII.
Screen: XXVIII 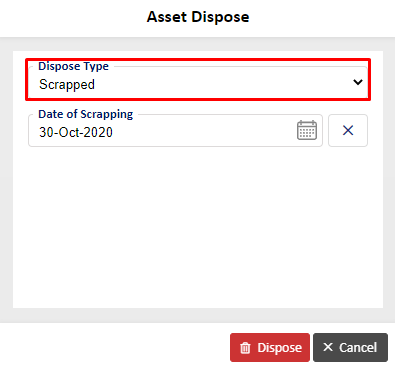
REPORTS:
There are 4 reports underQuick Links I Reports as shown in Screen: XXIII.
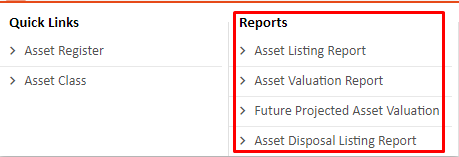
- Asset Listing Report – This report lists all the assets as per the headers on the Asset Register Listing page.
- Asset Valuation Report – This report can be generated as per Asset Class orCategory. This report shows the Net Book Value and Total Depreciation.
- Future Projected Asset Valuation - This report can be generated as per the date selected. This report shows the Total Depreciation and Future Projected Value.
- Asset Disposal Listing Report – This report can be generated by entering a start and end date. This report shows the Net Book Value, the Disposal type, Sale price (if sold), Disposed date and Assumed loss.
