EBA USER MANUAL
This document provides information on administrating Eyvo’s eBuyerAssist application. It is designed to enhance the performance and more efficient usage of the product. Using this manual, the user may find more information on configuring the application and performing specific tasks. It is intended to be used as a reference tool for users who have already completed a formal training course on the system.
eBuyerAssist provides a set of comprehensive work flow tools that will help you in improving the purchasing efficiency of your organization. This system contains all the tools required to centralize and manage your purchasing operation. The system will scale from a small department with very few users right up to a large worldwide enterprise with thousands of users.
Each user requires a license for each module that they wish to use therefore, you must purchase enough user licenses to cover the individual number of modules that are required. Although users cannot share a license, you can reallocate the existing licenses to different users.
The system employs user-level security, which allows or restricts the access of individual users to specific areas of the system. When a user logs-on, the system reads their permissions from the User file and establishes their level of access. The permissions assigned to a user decide whether a user can view, or modify the data in a particular area and if denied access, the appropriate menu option is either invisible or disabled.
Who should read this manual:
This manual is designed and prepared for daily and periodic users who will be working with eBuyerAssist as part of their normal daily routine and job function. It includes information for the different user categories such as Approver, Buyer, Senior Buyer, Requestor, etc. The status of each user is set by the System Administrator. For creating a user account, please contact the Administrator.
Technical Support
Requests for technical support should be made either through the Eyvo Website or by an email to support@eyvo.com. You can also visit http:/www.eyvo.com for more information regarding technical support.
OVERVIEW
The user application provides the users an option to maintain and manage the below:
Note : Users can only see the options for which the System Administrator has given permissions.
DASHBOARD
Screen: XXXXXXVIIWhen you log into the system, the first screen that you will see is the Dashboard as shown on the screen below:
The top left will allow you as a user to edit your personal details as well as the default codes as shown below:

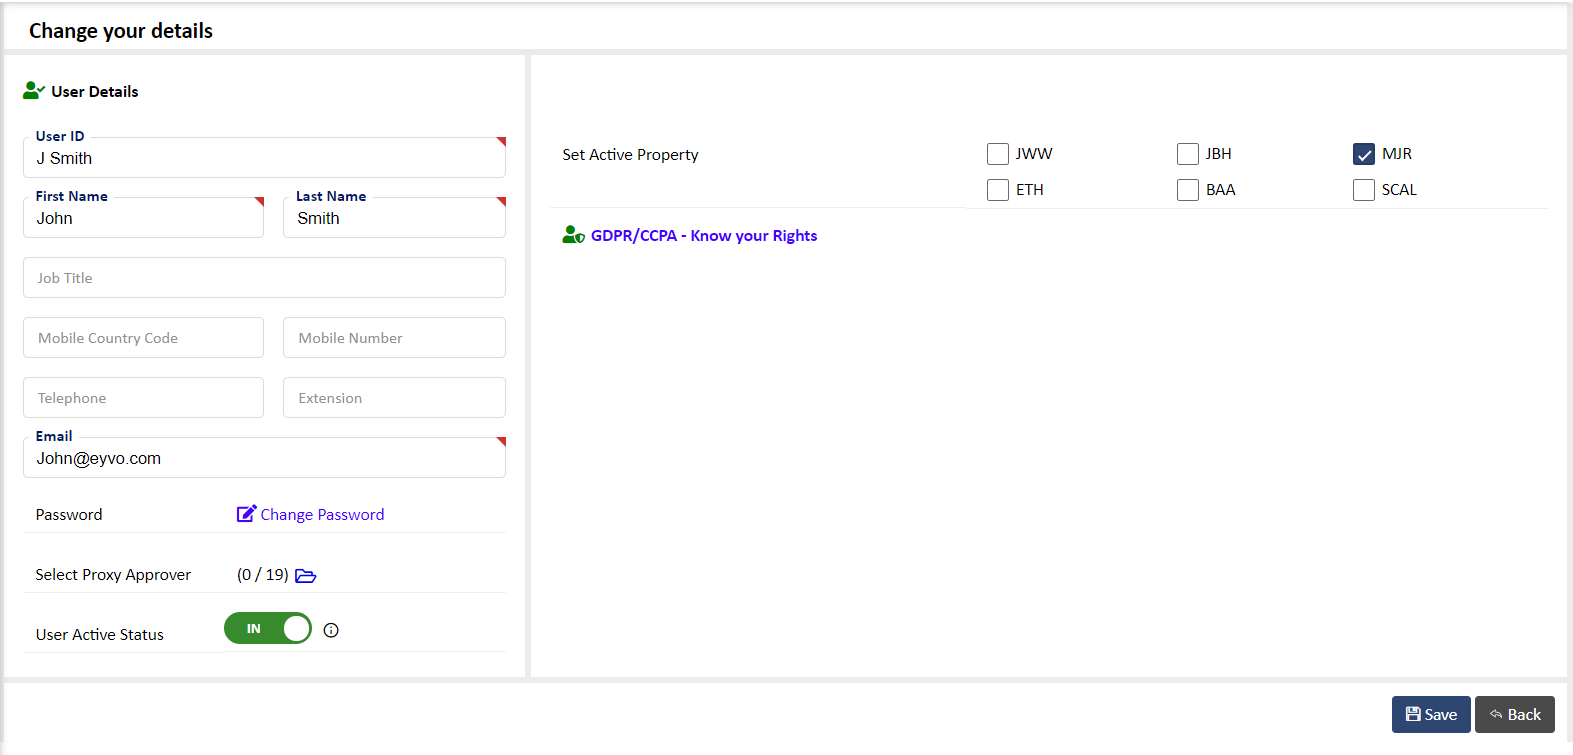
GDPR/CCPA
On the above screen, you will also see link to know more about GDPR/CCPA as highlighted.
In accordance with Legislation concerned with User Privacy, Eyvo complies with both the GDPR and CCPA stipulations.You can learn about both of these in the following links,
https://en.wikipedia.org/wiki/General_Data_Protection_Regulationhttps://en.wikipedia.org/wiki/California_Consumer_Privacy_Act
Please read Eyvo's own Privacy Statement https://www.e-procurement.com/privacy-statement/ - You have the right to know what information we hold on you and also the right to be deleted from the system under the 'Right to be forgotten rule'.
- 'Subject Access Request' This is a formal request under GDPR/CCPA that is a report showing you 'GDPR/CCPA Subject Access Request report' what information we hold on you - please click on the link in the application to access this report
- 'Right to be forgotten' To initiate the process for the right to be forgotten from the system please click on the link in the application and your request will be reviewed with respect to the legislation of your country and the application you are being asked to be deleted from - Please note that this 'Right to be forgotten' is not absolute and so this review step is mandatory to ensure your request still allows compliance from an audit perspective. Someone will revert back to you within 24hrs.
The dashboard along with showing you the system order totals and values at the top, will let you customize the widgets that you would like to see when you log in. To do so, click on the Menu button on the top right as highlighted below and choose the widgets you want to see on your dashboard:


Click on the widgets and click on Save to add these. The widgets will give you an idea of the top spends by various criteria, my pending external invoices and invoice(s) that are awaiting your approval.
Various graphs will also give you an idea of the orders and spends.
The graphs and charts when clicked on will further show you a drill down of details with an option to export as shown below in some examples:


The menu options next to the widgets will also allow you to further granulate the details as highlighted in an example below:

Note:The dashboard is user specific so you can see only see options and menus that you the permission to view. For more information about the permissions assigned to you, please contact your company’s System Administrator.
The top right corner under your (user’s) name will show you your profile along with details about our product and help documents for various modules and functions in the system.
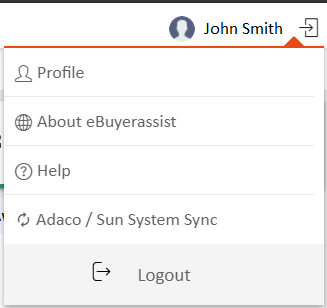
Adaco/Sun System Sync
If you have been given the permission to run the Adaco/Sun System Sync, then you will see the sync option as well as shown above.
Our Eyvo system syncs Item, Supplier, Order and Goods Received(GR) files with Adaco and Invoice and Payment files with Sun Systems.
To run a manual sync, click on the Adaco/Sun System Sync option to see the below screen. This screen will show all the logs for previously run syncs

You can also filter the logs using the relevant dropdown option and clicking on Search as shown on the below screen.

Next, click on the Log Details dropdown to initiate a manual sync with Adaco as highlighted.
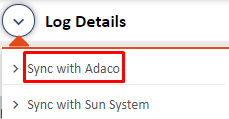
The system will pick up all the files that have been in queue for the sync. When the sync runs, an email will be sent to the Property's Purchasing Manager with the sync details as shown below:
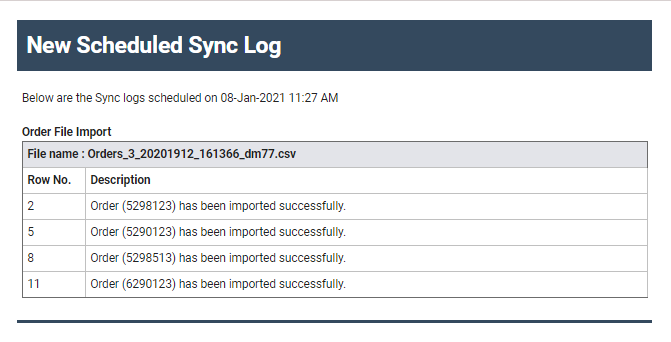
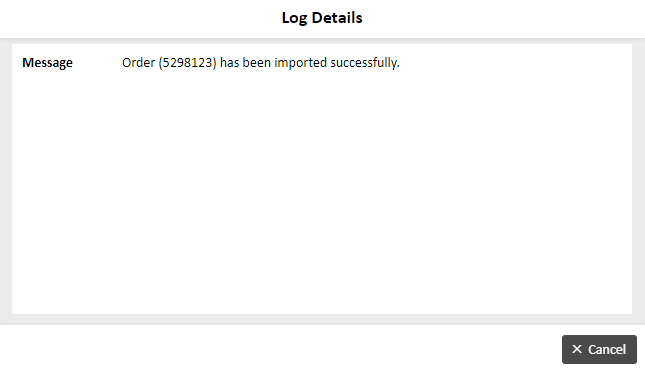
Below is an example of the Order file that has been successfully synced with our system.

An example of the Order excel file is shown below for your reference.

Click on the log order line item on the above screen to see more details about the sync. An example of the details is shown below.
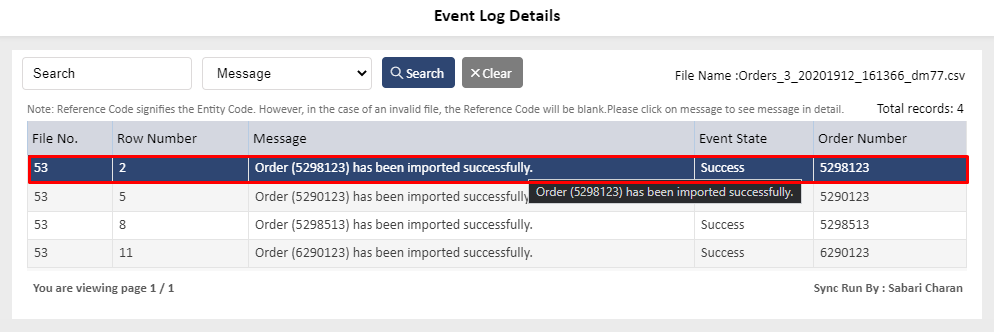
Further details can be seen by clicking on each Event Status line that the system displays as shown below.
DATA FILES :
This section provides the user with options to maintain static data files such as category data files, delivery points, invoice points, items catalogs, suppliers etc.
These are found under Data Files on the left menu as shown in the screen below:
CATEGORY CODE :
Note : The steps described in this section are repeated frequently throughout the application and apply to other databases that operate in a similar fashion to the Category Code system.
1.To add a new Category code, click on “Add New” on the Category Code Listing page to see the below screen:
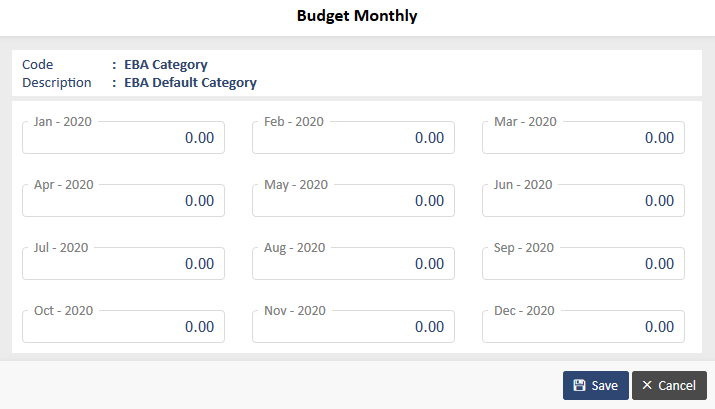
You can add a supplier and budget and further allocate a budget monthly by clicking on the monthly budget icon as highlighted above:
2. To Edit a category Code, click on the category as shown below:
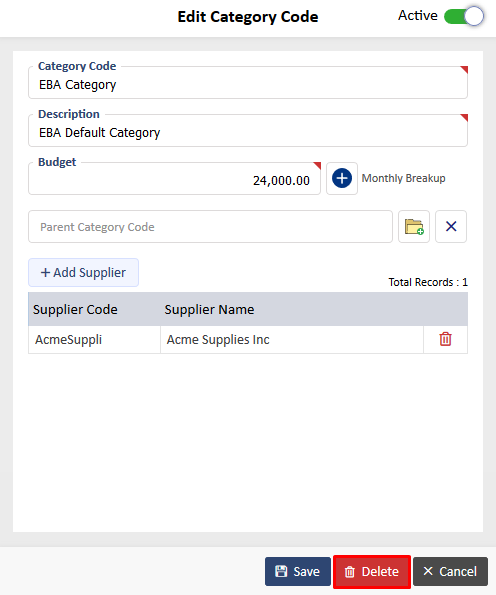
3. To Delete a Category Code, click on that particular code and click on the “Delete” button as shown on the screen below:
4. To Search a Category Code, enter the details on the search field and choose the relevant search criteria from the dropdown on the Category Code Listing page as shown below and click on the “Search” button.
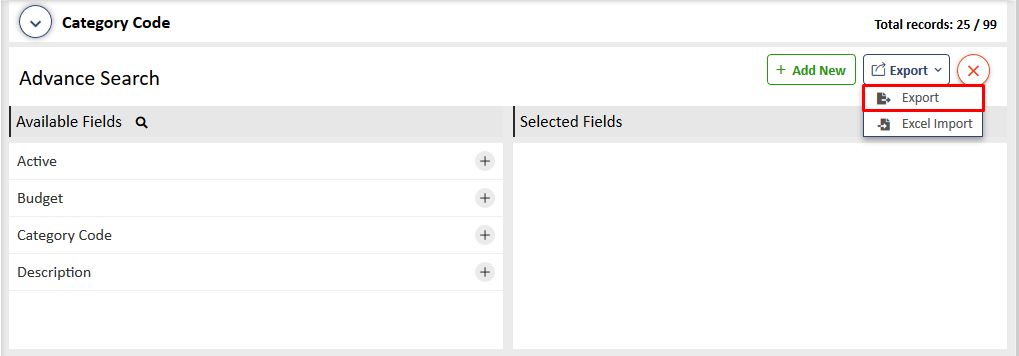
5. To do an Advanced Search, click on the advance search icon as shown on the below screen:
This will give you options to search as per the fields that you choose as shown on the below screen:
You can select various fields using the plus icons in the middle and search as shown below:
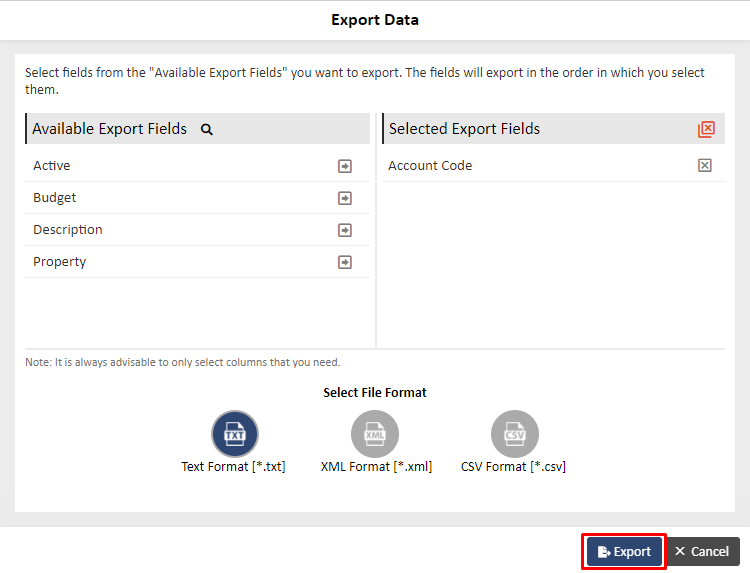
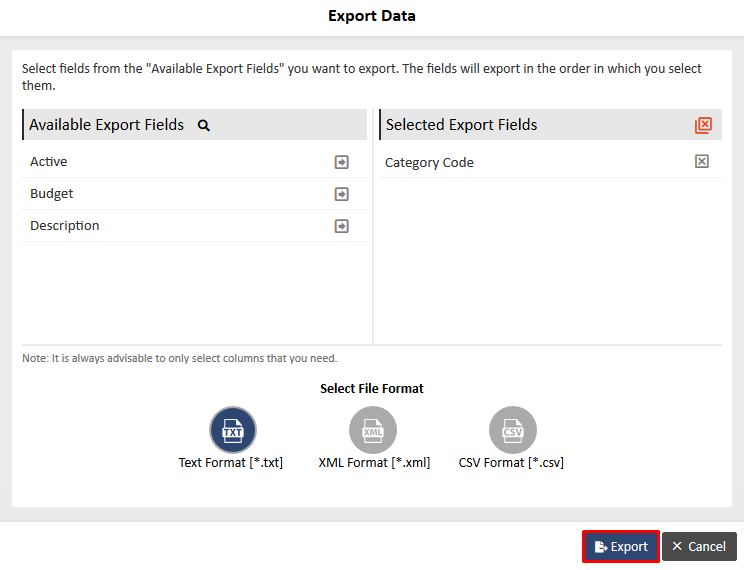
6. You can Export Data in Text, XML and CSV formats. To do so, click on the “Export” button on the Category Code Listing Page to see the below screen:
Select the fields that you wish to export as well as the file format and click on “Export”
7. You can also import an Excel file into the application. To do so, click on the “Excel Import” button on the Category Code Listing page to see the below screen:

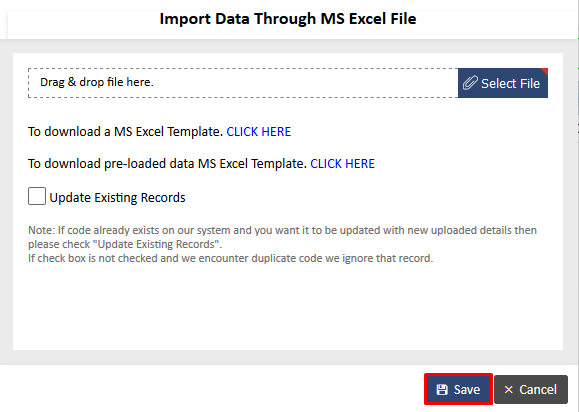
Choose an existing file or download a template to work on and then import.
Note : If the Category Code already exists on our system and you want it to be updated with the new uploaded details then please check "Update Existing Records". If the check box is not checked and we encounter a duplicate Category Code, we ignore that record.
REPORTS :
A report is an effective way to present the required data from the database based on certain criteria.
There are 4 reports under Quick Links I Reports as shown below:
a. Category Listing Report – This report lists all the categories as per the headers on the Category Code listing page.
b. Budget Analysis Breakdown – This report generates the budget, committed spend and percentage of budget as per category codes. The start and end date along with the monthly breakdown can be selected to generate this report.
Note : The committed spend will be calculated as per the Budget Status option checked by the System Administrator under Orders> Set Budget Status
c. Ordering Analysis (Pareto) – This report shows the category codes used with the number of orders they are used on and the percentage of these orders against all committed orders. It also shows the order value of those orders and its percentage share for the current financial year. This report can be further sorted by the start and end date, top codes by percentage or number and by order value or order line.
d. View Log Details – Similar to the Event Log, this will show all the details of changes done on the Currency page. This is visible only if the System Administrator has given you access.
CURRENCY CODE :
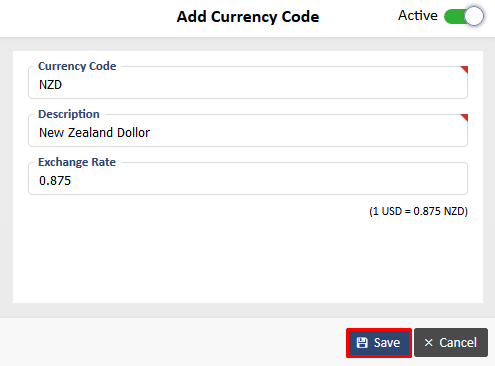
This file maintains the exchange rate of the currencies. One of the currencies listed in the file is set as the default base currency. This enables you to raise orders with overseas suppliers in their local currency but still run your own reports and convert them all to the same base currency.
1. To add a new Currency Code, click on “Add New” on the Currency Listing page to see the below screen
Add details and click on “Save” to see the below screen:
2. To Edit, Delete, Search and/or Import/Export Currency Codes, please refer to same section in the Category Code File. The processes are similar across the system, so to avoid repetition we have explained it in the Category Code section.
Note : You cannot create the same Currency Code as the system’s base currency.
REPORTS :
The reports under Quick Links I Reports as shown below:
a. Currency Listing Report: This report lists all the categories as per the headers on the Currency listing page.
b. View Log Details – Similar to the Event Log, this will show all the details of changes done on the Items page. This is visible only if the System Administrator has given you access.
DELIVERY POINT :
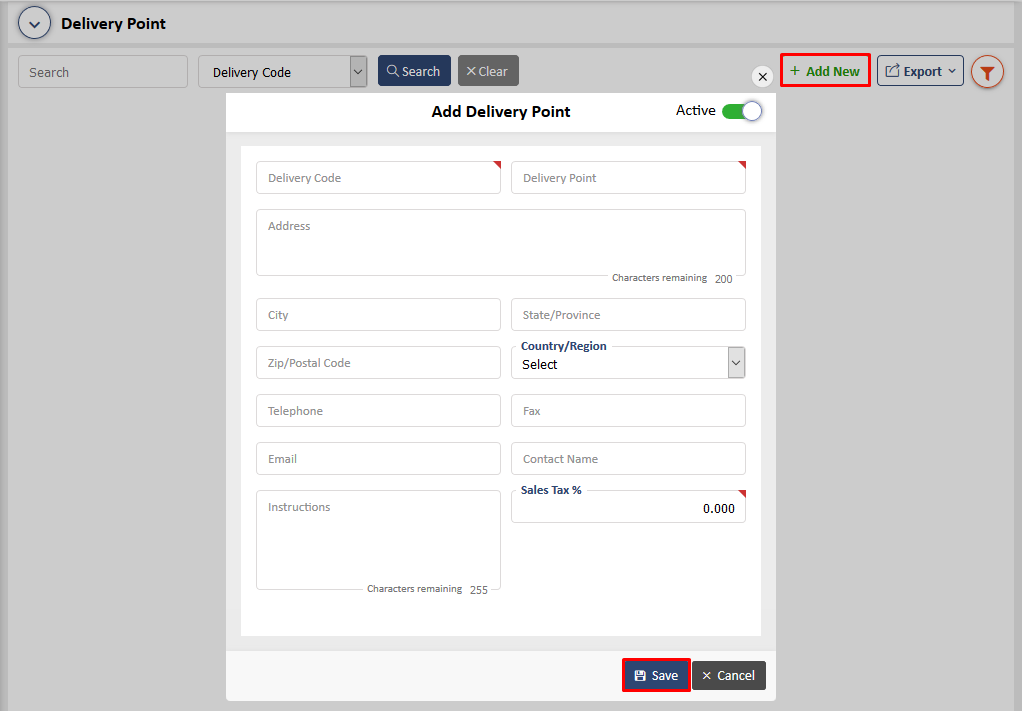
The Delivery Point file maintains the location details of where a supplier should ship the ordered items.
You can enter the required delivery details such as address, email, contact name, instructions and sales tax at each Delivery Point.
Add details and click on “Save” to see the below screen:
To Edit, Delete, Search and/or Export Delivery Point Codes, please refer to same section in the Category Code File. The processes are similar across the system, so to avoid repetition we have explained it in the Category Code section.
REPORTS :
The reports under Quick Links I Reports as shown below:

a. Delivery Point Listing Report –This report lists all the categories as per the headers on the Delivery Point listing page.
b. Ordering Analysis (Pareto) –This report shows the delivery pointcodes used with the number of orders they are used on and the percentage of these orders against all committed orders. It also shows the order value of those orders and its percentage share for the current financial year. This report can be further sorted by the start and end date, top codes by percentage or number and by order value or order line.
c. View Log Details – Similar to the Event Log, this will show all the details of changes done on the Delivery Point page. This is visible only if the System Administrator has given you access.
Document Type :
You can use the Document Types to produce a variety of order sets enabling you to distinguish between Purchase Orders and Service Orders or to classify different divisions of your company, and hence maximize the system’s cross-referencing capability.
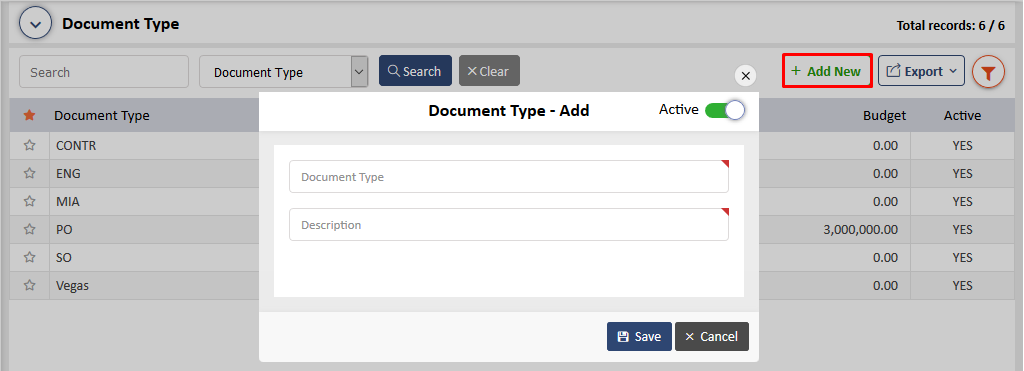
1. To add a new Document Type, click on “Add New” on the Document Type page to see the below screen:
Add details and click on “Save”.
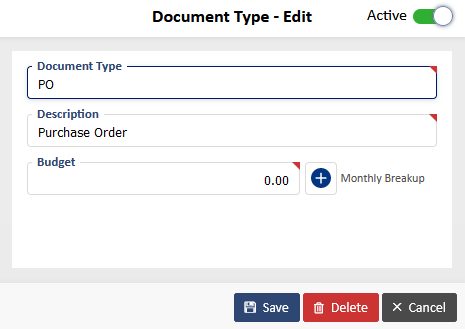
2. To Edit, Delete, Search and/or Import/Export Document Type Codes, please refer to same section in the Category Code File. The processes are similar across the system, so to avoid repetition we have explained it in the Category Code section.
REPORTS :
There are 4 reports under Quick Links I Reports as shown below:
a. Document Type Listing Report – This report lists all the categories as per the headers on the Document Type listing page.
b. Budget Analysis Breakdown – This report generates the budget, committed spend and percentage of budget as per the document type codes.The start and end date along with the monthly breakdown can be selected to generate this report.
Note : The committed spend will be calculated as per the Budget Status option checked by the System Administrator under Orders> Set Budget Status.
c. Ordering Analysis (Pareto) – This report shows the document type codes used with the number of orders they are used on and the percentage of these orders against all committed orders. It also shows the order value of those orders and its percentage share for the current financial year. This report can be further sorted by the start and end date, top codes by percentage or number and by order value or order line.
d. d. View Log Details – Similar to the Event Log, this will show all the details of changes done on the Document Type page. This is visible only if the System Administrator has given you access.INVOICE POINT :
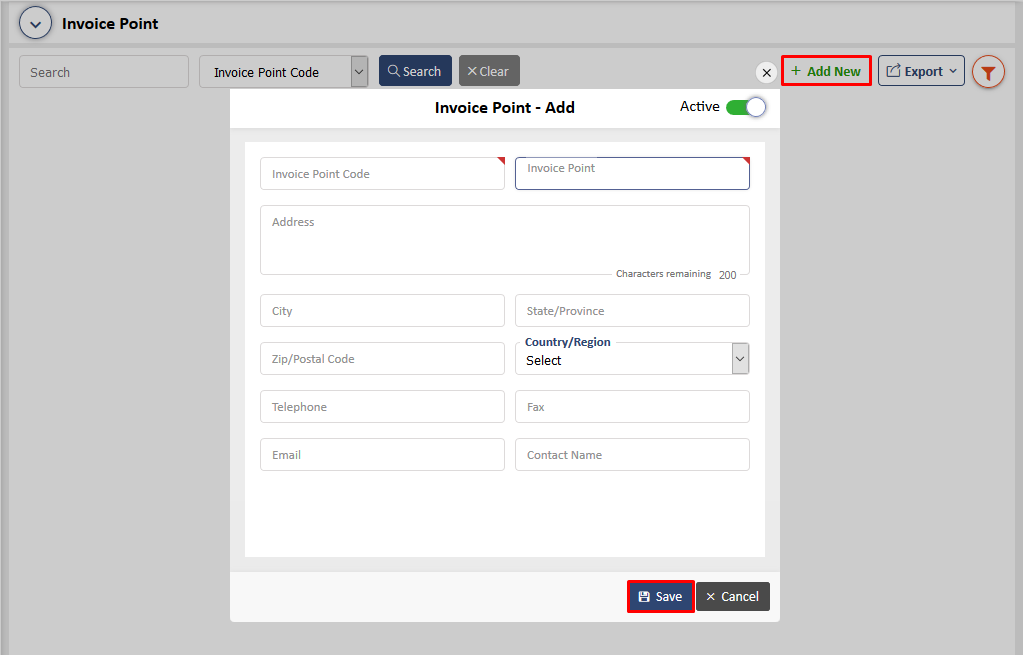
This maintains the details of the invoice location, so a supplier is advised where to send their invoices to.
1. To add a new Invoice Point, click on “Add New” on the Invoice Point Listing page to see the below screen:
Add the details and click on “Save”.
2. To Edit, Delete, Search and/or Import/Export Invoice Point Codes, please refer to same section in the Category Code File. The processes are similar across the system, so to avoid repetition we have explained it in the Category Code section.
REPORTS :
There are 3 reports under Quick Links I Reports as shown below:
a. Invoice Point Listing Report – This report lists all the categories as per the headers on the Invoice Point listing page.
b. Ordering Analysis (Pareto) – This report shows the invoice point codes used with the number of orders they are used on and the percentage of these orders against all committed orders. It also shows the order value of those orders and its percentage share for the current financial year. This report can be further sorted by the start and end date, top codes by percentage or number and by order value or order line.
c. View Log Details – Similar to the Event Log, this will show all the details of changes done on the Invoice Point page. This is visible only if the System Administrator has given you access.ITEMS :
The Items file will be synced in the same way as mentioned above under Dashboard> Sync.
Under the Items menu, you will be able to see the listing of all the Items as shown below.
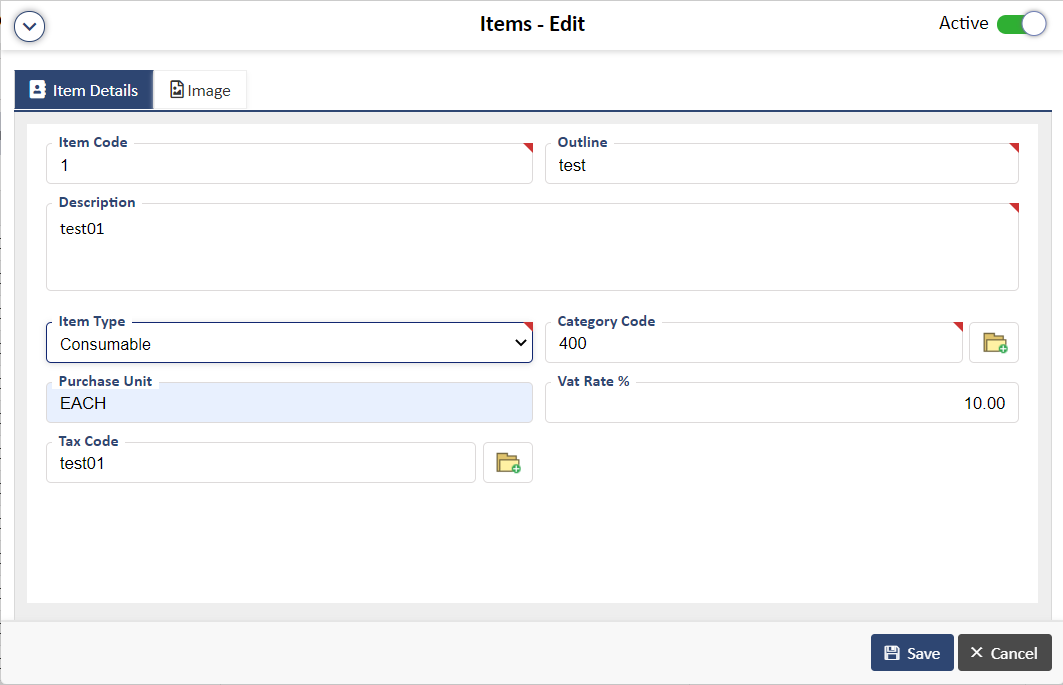
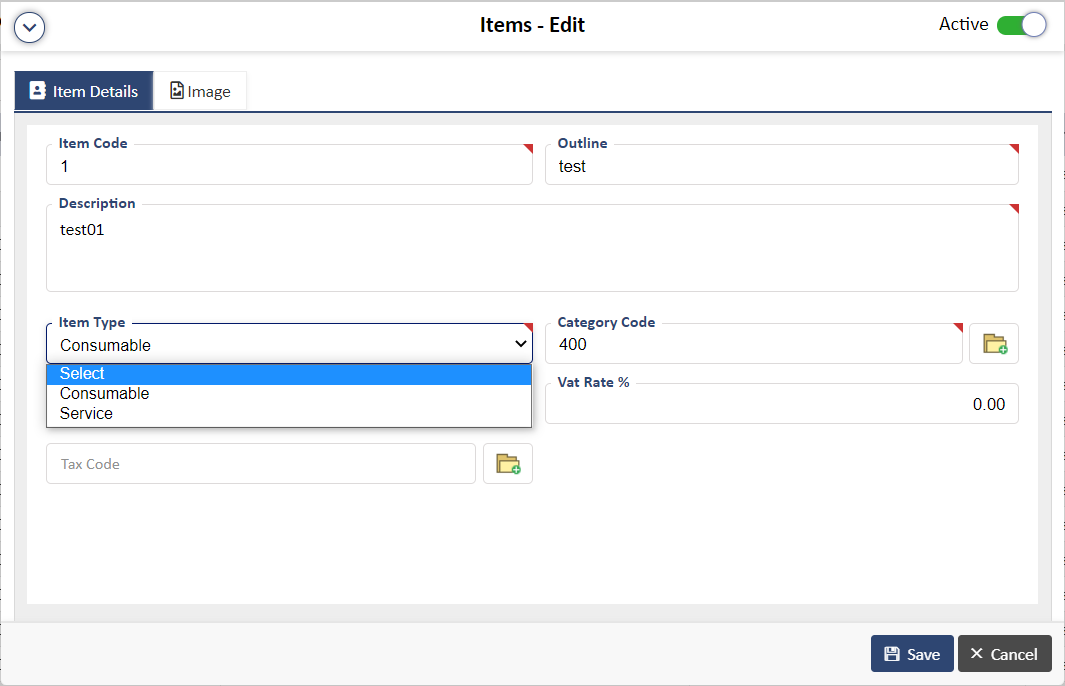
You can add the details of the item on this screen
(Item Code, Outline, Description, Item Type, Category Code, Purchase Unit, Vat Rate % and Tax Code )
There are two types of items that can be selected – Consumable item and Service item. Consumable is any item that is not stored and generally is considered an expense from the accounting perspective. Examples could include cleaning supplies, food items, USB keys, etc. Service is any item that is measured in some denomination of time or fees. Examples could include hourly IT services, monthly landscaping service charges, delivery charges, customs fees, etc.
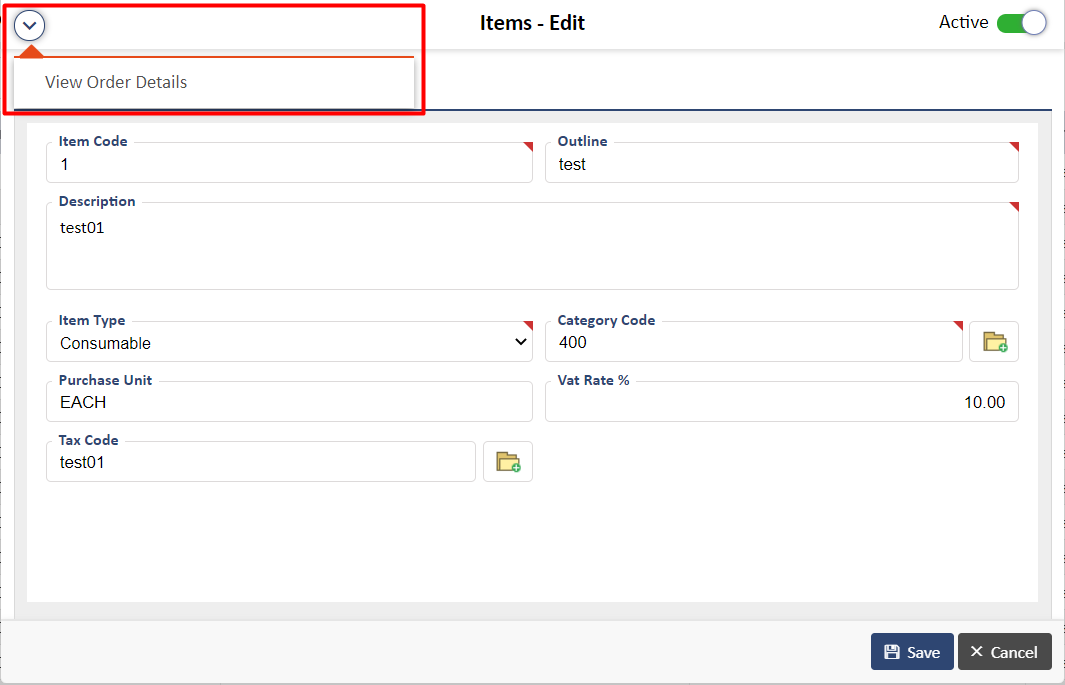
View Order Details - This report shows only those Item's records that are connected with any order.
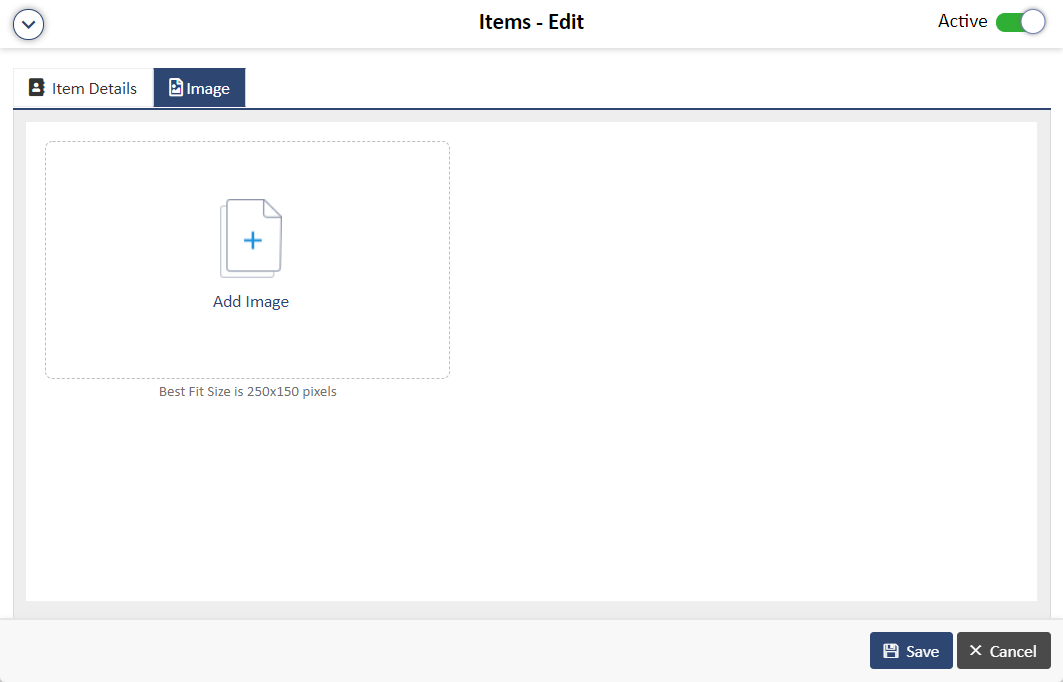
You can add the image on the separate tabs on this screen. Once done, click on “Save”for this to be a part of the Items database.
To Edit, Search and/or Import/Export Items, please refer to same section in the Category Code File. The processes are similar across the system, so to avoid repetition we have explained it in the Category Code section.
REPORTS :
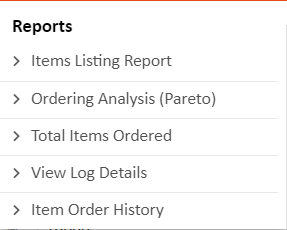
There are 5 links/reports under Quick Links I Reports as shown below:
c. Items Listing Report – This report lists all the categories as per the headers on the Items Listing page.
d. Ordering Analysis (Pareto) – This report shows the items used with the number of orders they are used on and the percentage of these orders against all committed orders. It also shows the order value of those orders and its percentage share for the current financial year. This report can be further sorted by the start and end date, top codes by percentage or number and by order value or order line.
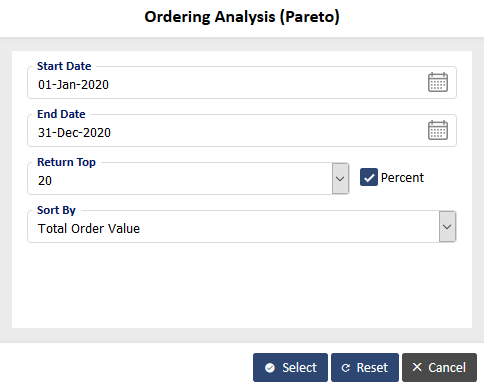
e. Total Items Ordered – This report shows the items ordered as per the start and end date selected by you.
f. View Log Details – Similar to the Event Log, this will show all the details of changes done on the Items page. This is visible only if the System Administrator has given you access.
h. Item Order History – Based on the start and end date entered, this report will show you the price of items with their supplier used on orders.
Note : Only those item(s) will be listed where Order status is ISSUED, PARTIAL, RECEIVED and CLOSED.
SUPPLIER :
The Supplier file will be synced in the same way as mentioned above under Dashboard> Sync..
Under the Supplier menu, you will be able to see the listing of all the Supplier as shown below.
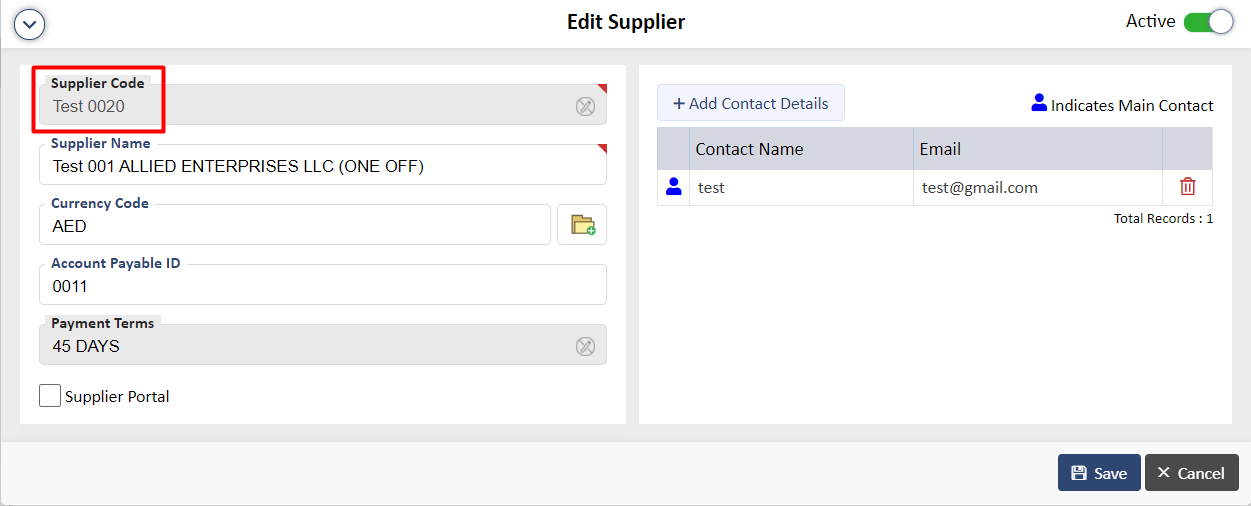
The Supplier Code will be unique to the system.
You can add the details of the supplier on this screen (Supplier Name, Currency Code, Account Payable ID and Contact Details)
note:If the supplier is used in any order, the currency code field will be seen disabled.
If you wish to give this supplier access to the Supplier Portal, then check the box for Supplier Portal.
The next tab as shown in the Screen: XXXVI [D] will allow you add the contact details. You can add multiple contacts with one being the main contact for the supplier
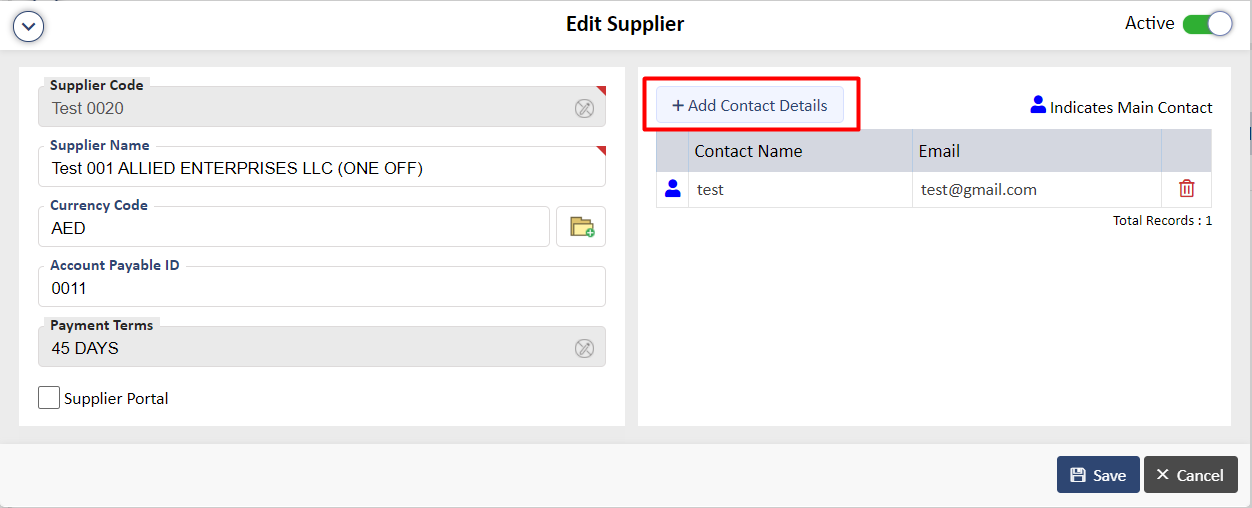
Once done, click on “Save” for this supplier to be a part of the supplier database.
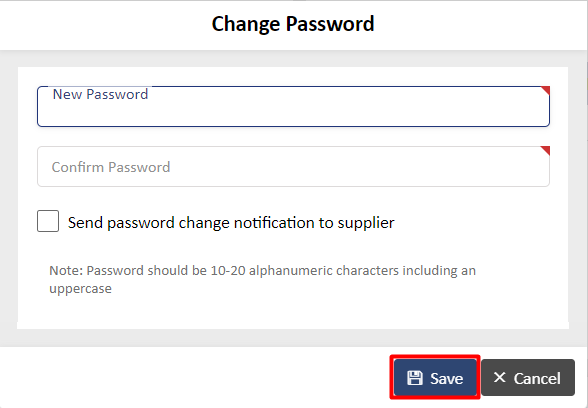
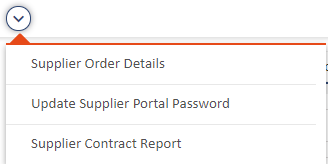
Update Supplier Portal Password - This will let you change the password for this supplier to be used to login to the Supplier Portal. You can also choose to email the changes to the supplier. If the checkbox for Supplier Portal is unchecked, it means that this supplier has not been give access to the portal. In this case, the system will prompet you to enable access before you can change the password as shown in screen below:
Send Supplier Credentials - Click on this if you wish to email the supplier their credentials.
The supplier needs to be given access to the Supplier Portal along with credentials to log in. To do so, you as a buyer need to go to Data Files> Supplier and edit the particular supplier’s details as shown in Screen: XXXVI [L]:
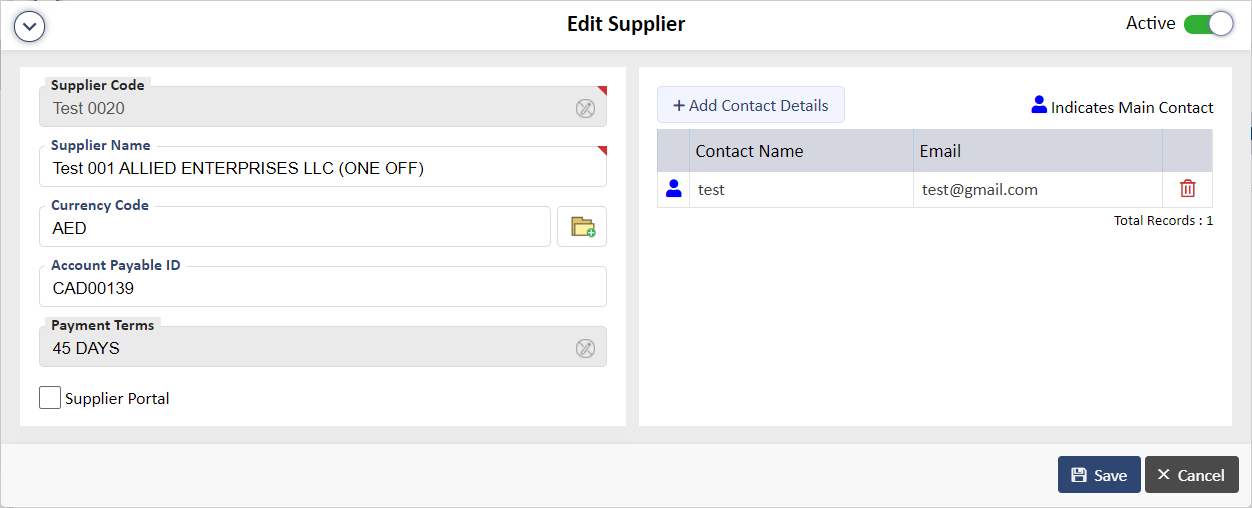
Note: You need to have the permission to read and write data files to do the above.
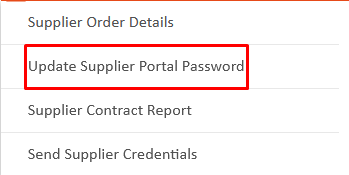
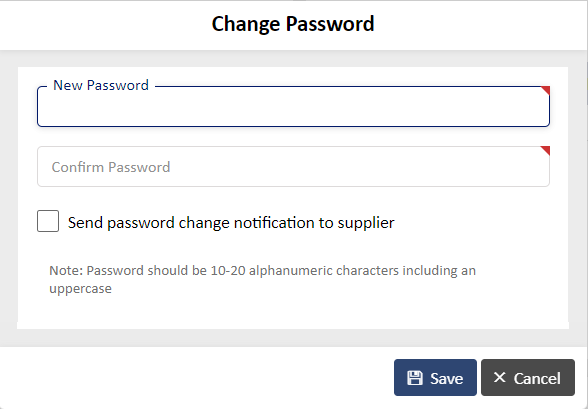
The next step would be to update the password for the supplier under Menu> Update Password as shown in Screen XXXVI [M] and Screen XXXVI [N]:
Next, you need to check the box for “Supplier Portal User” as shown in Screen XXXVI [O].
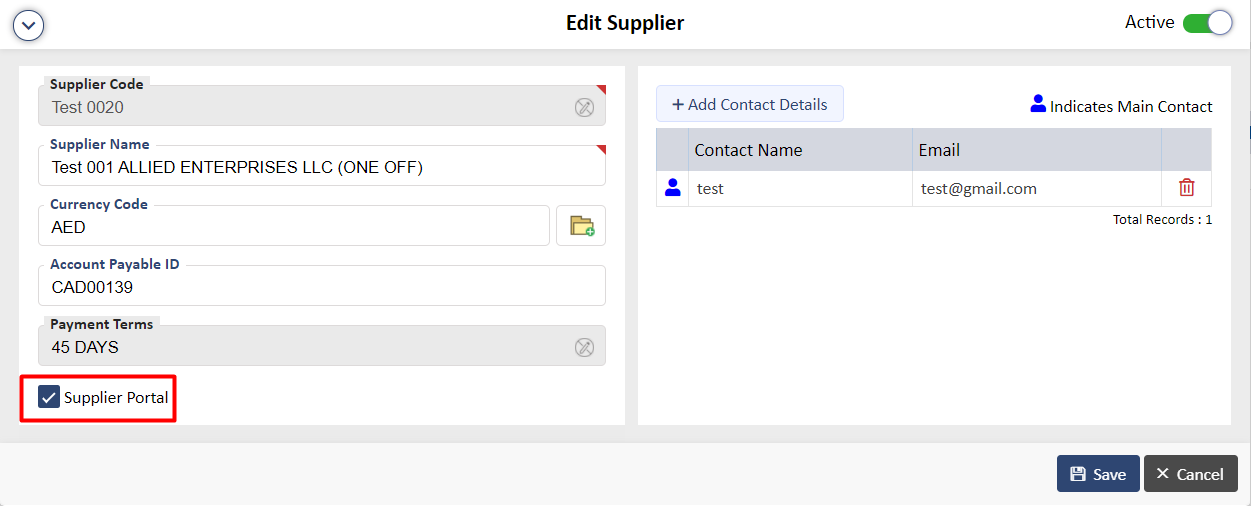
This will trigger an email to the supplier with the login credentials and URL as shown in Screen XXXVI [P] and Screen XXXVI [Q].

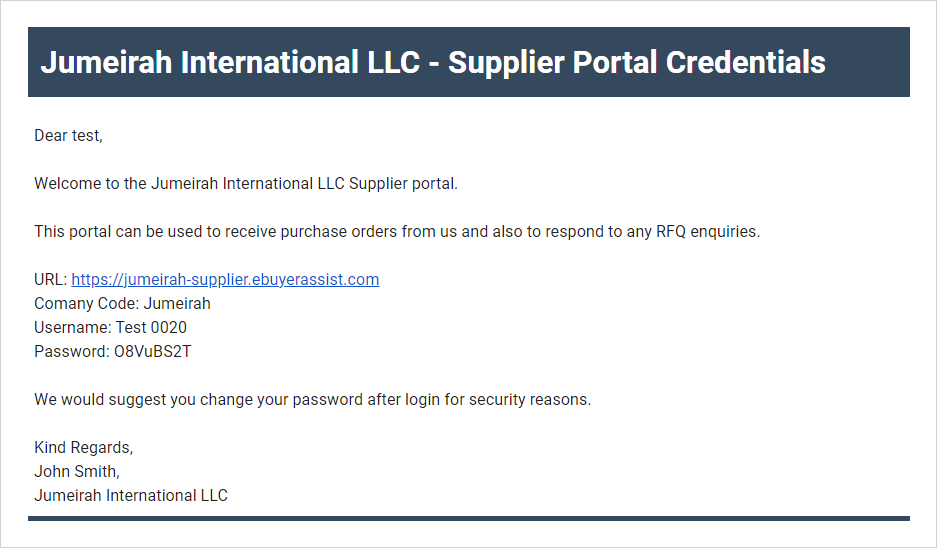
The supplier can now use the above received credentials to log into the Supplier Portal.
2. To Edit, Search and/or Import/Export Supplier details, please refer to same section in the Category Code File. The processes are similar across the system, so to avoid repetition we have explained it in the Category Code section.
REPORTS :
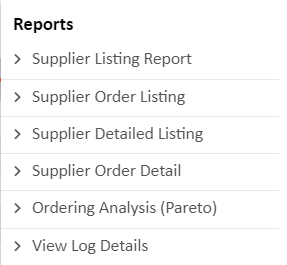
There are 6 links|reports under Quick Links I Reports as shown below:
- Supplier Listing Report – This report lists all the suppliers as per the headers on the Supplier Listing page.
- Supplier Order Listing – This report shows the order numbers that suppliers have received.
- Supplier Detailed Listing – This report shows a lot more details about suppliers such as whether it is a small firm, ISO rated,
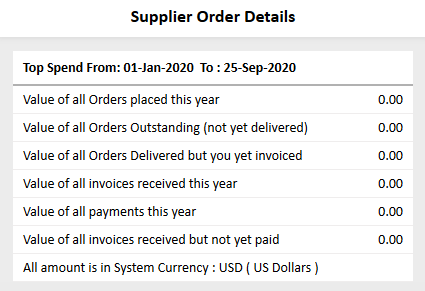
category codes assigned, category description and budget, etc. - Supplier Order Detail - This report shows only those supplier's records who are connected with any order between the selected Start Date and End Date."
- Ordering Analysis (Pareto) - This report shows the supplier codes used with the number of orders they are used on and the percentage of these orders against all committed orders. It also shows the order value of those orders and its percentage share for the current financial year. This report can be further sorted by the start and end date, top codes by percentage or number and by order value or order line.
- View Log Details – Similar to the Event Log, this will show all the details of changes done on the Supplier page. This is visible only if the System Administrator has given you access.
SUPPLIER CONTRACTS FILE :
The system maintains supplier contracts that are related to the actual order system such that when a purchase order is raised, you can add these files from the database.
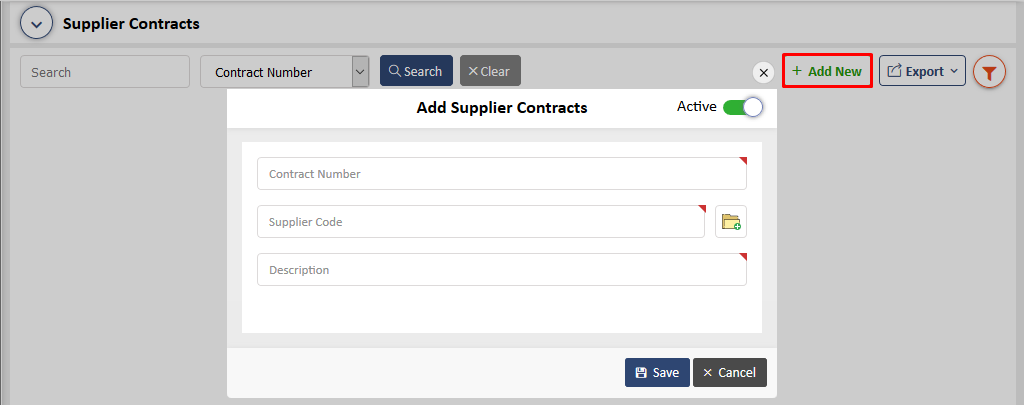
1. To add a new supplier contract file, click on “Add New” on the Supplier Contracts Listing page to see the below screen:
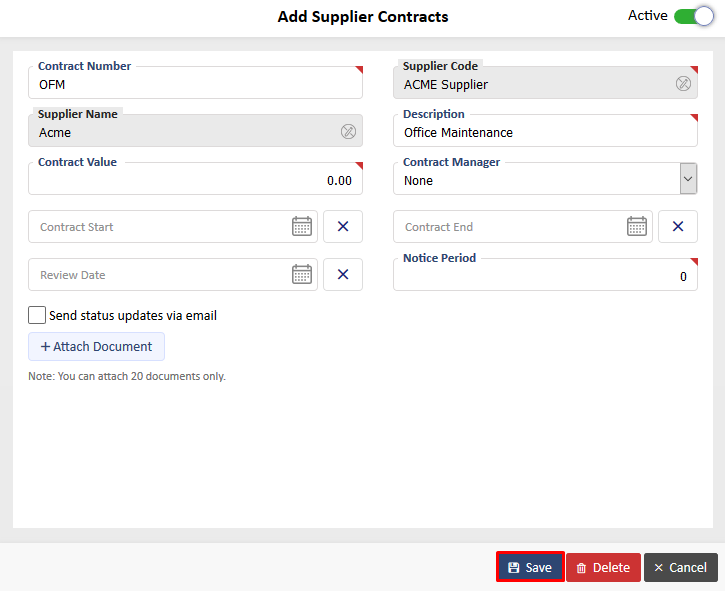
Add the details and click on “Save” to see the next screen:
You can assign a Contract Manager and check the box for the manager to receive status updates. Contract documents can be added here as well. Add all the details and click on “Save” for it to be added to the supplier contracts database.
2. To Edit, Delete, Search and/or Import/Export Supplier Contracts files, please refer to same section in the Category Code File. The processes are similar across the system, so to avoid repetition we have explained it in the Category Code section.
REPORTS :
There are 3 reports under Quick Links I Reports as shown below:
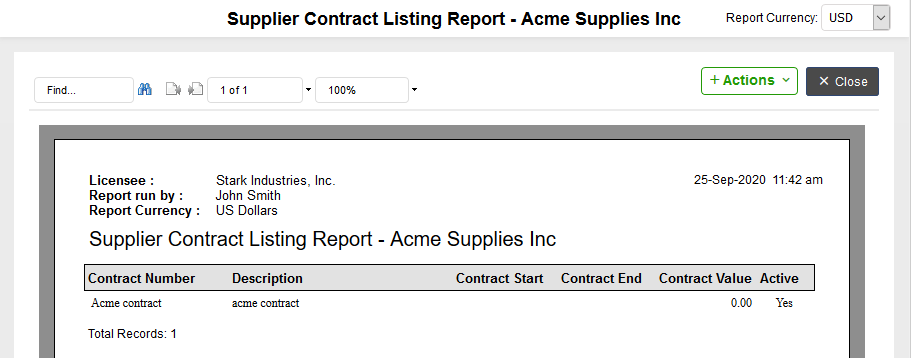
a. Supplier Contract Listing – This report shows all the supplier contracts as per the headers on the Supplier Contracts Listing page.
b. Supplier Contract Due Listing – This report shows the end date of the contracts as per the number of days selected.
c. View Log Details – Similar to the Event Log, this will show all the details of changes done on the Supplier Contract page. This is visible only if the System Administrator has given you access.
TERMS & CONDITIONS :
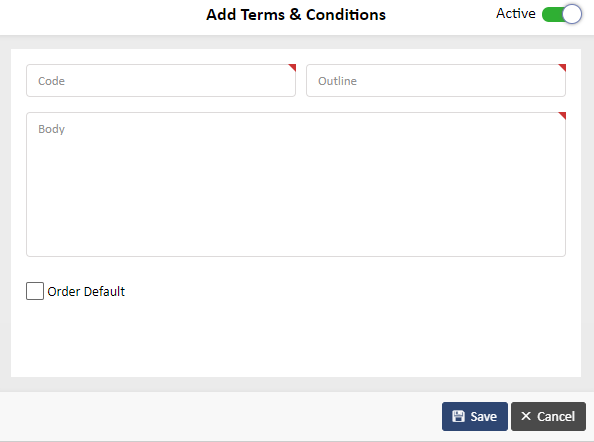
The Terms & Conditions file provides the facility for including advisory information for Purchase Order. Each record can hold an extensive description, which might include your business terms and conditions or regulations of conformity.
Add the details, select the document type to correspond with the file and whether this file should go with an Order, Request or RFQ, switch on “Active” and click on “Save” for it to be a part of the database.
2. To Edit, Delete, Search and/or Import/Export the Terms & Conditions files, please refer to same section in the Category Code File. The processes are similar across the system, so to avoid repetition we have explained it in the Category Code section.
REPORTS :
There is one report under Quick Links I Reports as shown below:
a. Terms & Conditions Listing Report – This report shows all the terms and conditions files as per the headers on the Terms & Conditions Listing page.
b. View Log Details – Similar to the Event Log, this will show all the details of changes done on the Terms and Condition page. This is visible only if the System Administrator has given you access.
ACCOUNT FILES :
This section explains how the account coding of the system works with financial cost codes, budgets, projects codes etc. and to run financial analysis and cost control reports.
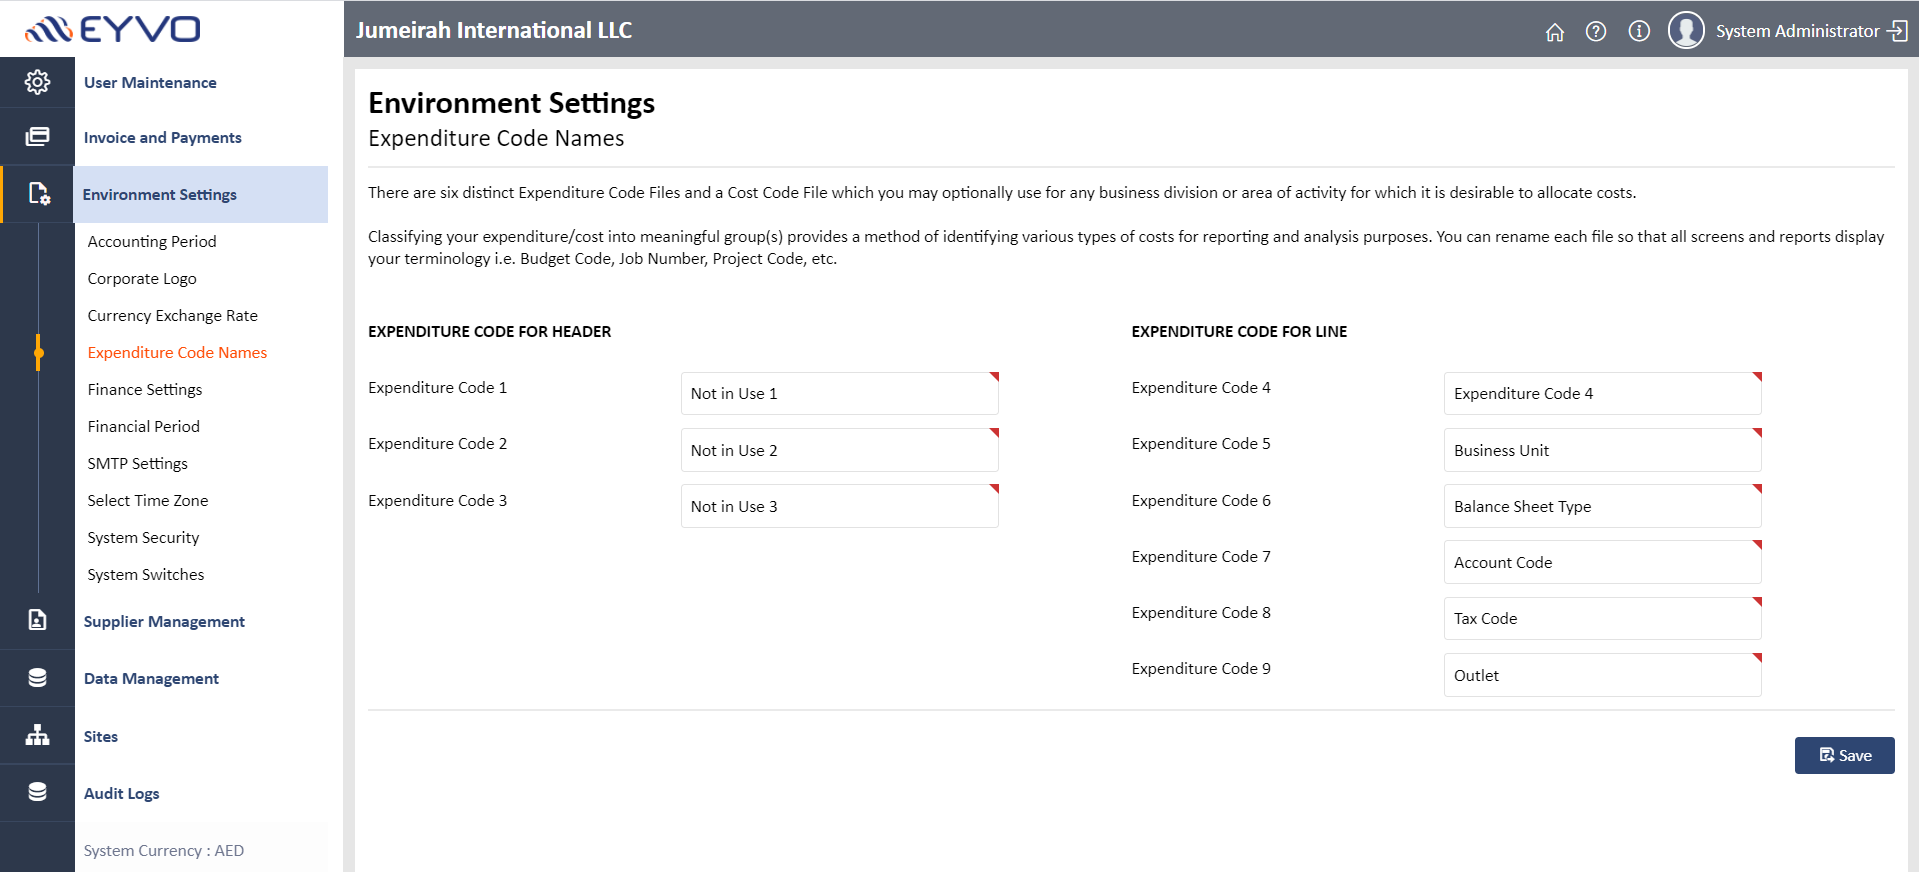
The Account Codes are used in orders to perform the financial costing and financial tracking of all expenses. There are eight account codes available to the user.
These can be set by the System Administrator under Environment Settings> Expenditure Code Names as shown below:
The first three codes (you can rename the files as per your business requirements) are related to the requisition header or order header and so any codes entered into these tables or databases are applied to the order as a whole. The last three are related to the order line.
The main difference between Data files and Account Codes is the reporting structure. Data files contain more financial information in the report. Account Codes displays the financial commitments categorized by the code.
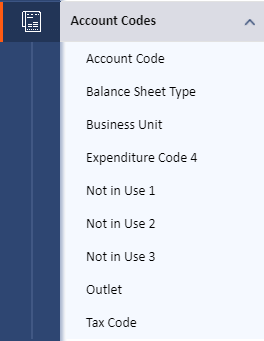
You will be able to see these under Account Codes on the left menu as shown below:
The third one shown on the above list, Cost Centre is a special code and is used to split the cost across different cost centres. Its main purpose is to get financial approval from the cost centre holders.
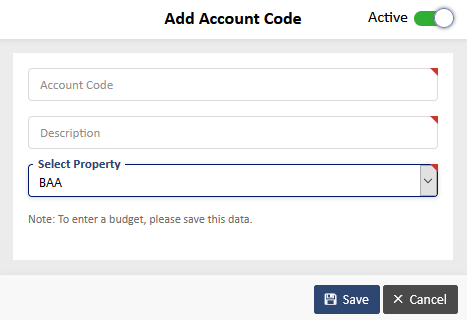
1. To add a new Account Code, click on “Add New” on a particular Account Code Listing page to see the below screen:
Add the details and click on “Save” to see the next screen:
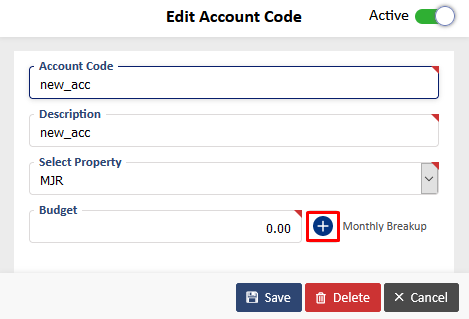
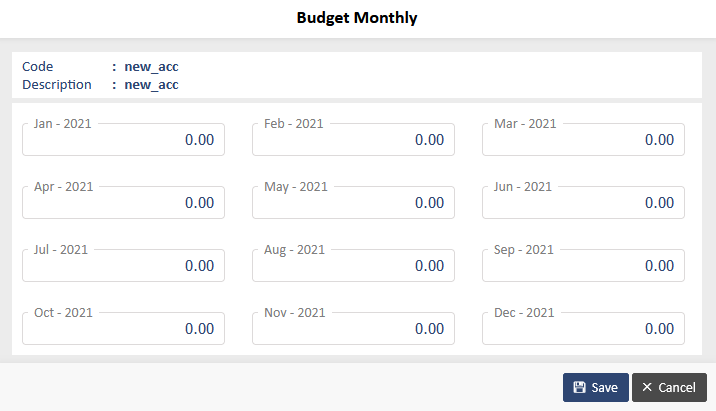
You can add the details with the budget and further allocate a budget monthly by clicking on the monthly budget icon as highlighted on the screen above to see the below screen:
2. To Edit an Account Code, click on the grid as shown below:
Make the necessary changes and click on “Save”
3. To Delete an Account Code, click on that particular code and click on the “Delete” button as shown on the screen below:
4. To Search an Account Code, enter the details on the search field and choose the relevant search criteria from the dropdown on the Account Code Listing page as shown below and click on “Search” button.
5. To do an advance search, click on the Advance Search icon as shown on the below screen:
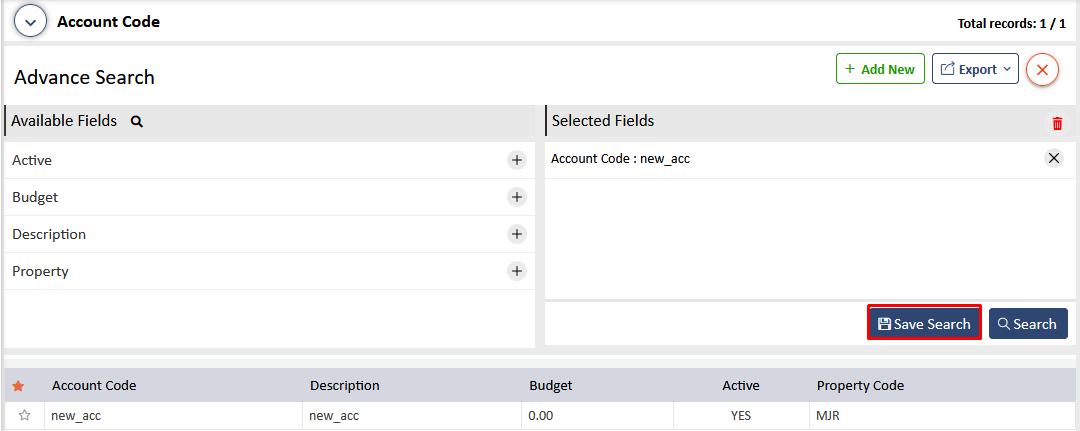
This will give you options to search as per the fields that you choose as shown on the below screen:
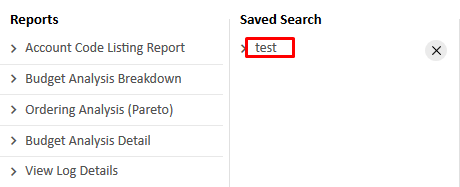
You can select various fields using the icons in the middle and search as shown below:
6. You can import an Excel file into the application. To do so, click on the “Excel Import” button on the Account Code Listing page to see the below screen:
Choose an existing file or download a template or download a pre-loaded template to work on and then import this back into the system. You can also choose to update the existing records.
7. You can also Export Data in Text, XML and CSV formats. To do so, click on the “Export Data” button on the Account Code Listing Page to see the below screen:
REPORTS :
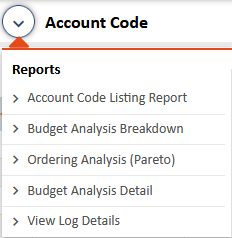
There are 4 reports under Quick Links I Reports as shown below:
a. Account Code Listing Report – This report shows all the categories as per the headers on the Account Code Listing page.
b. Budget Analysis Breakdown Report – This reports shows the account codes with their budgets, committed spend and percentage of budget. This can be generated as per the start and end date and can show as a monthly report.
c. Ordering Analysis (Pareto) – This report shows the account codes used with the number of orders they are used on and the percentage of these orders against all committed orders. It also shows the order value of those orders and its percentage share for the current financial year. This report can be further sorted by the start and end date, top codes by percentage or number and by order value or order line.
d. Budget Analysis Detail – Based on the start and end date, this report will show the budget with its description, the orders its used on, the supplier and buyer name as well as the committed spend.
All the other Account Codes will work the same way as mentioned above. They will each have 3 reports as well with their individual details.
ORDERS
Below are the statuses of Order:
Untransmitted – Any new order gets this status right after it is created. PO created but not transmitted to supplier. This is the case when PO is created to settle some pending invoices..
Transmit Pending – a purchase order was queued for transmission but has not been transmitted yet (is applicable when the purchase orders are transmitted by a job running on the server, such as EDI, etc.)
Transmitted – PO created and sent to supplier. Supplier now need to deliver and submit invoice against the PO which will change status to partial or received.
Partial – Partial quantities/value has been received and PO is still open to receive remaining quantities/value.
On Hold – PO is not cancelled but merely put on hold until further notice. Once hold is cleared, items can be received against the PO
Received – PO fully received and invoice booked. No further receiving could be done against such PO.
Cancelled – PO released but cancelled. No further receiving could be done against this PO
Closed – Closed Purchase orders
This section helps you understand the process starting from when an Order and GR details are synced to creating invoices and completing the flow with the payment details.
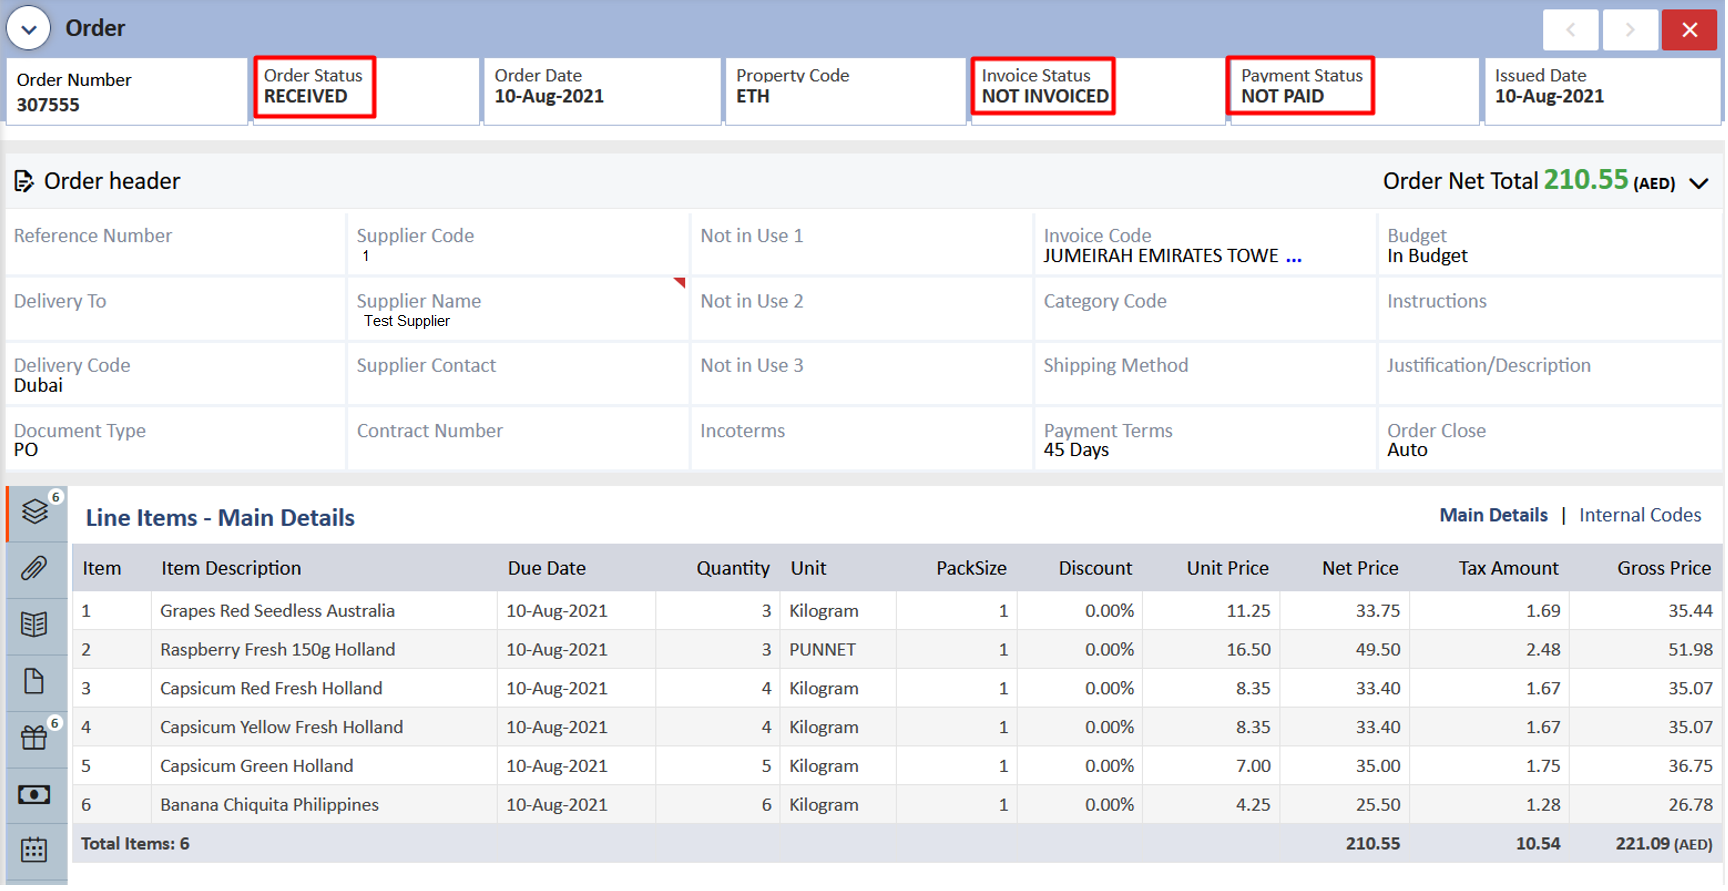
Once the Order and GR data is synced, you will see an order as shown below:
The Order Status here will show as Received and the Invoice and Payment Status will show as Not Invoiced and Not Paid respectively.
The line item details can be seen on the above screen. However, clicking on Internal Codes as highlighted below will show you the account codes and Business Unit on the line items.

You can also see the Goods Received against this order under the GR section as shown below
The Goods Received data seen here is as per the sync that was done earlier.

The next step is to log invoices against this order. To do so, go to Invoices> Invoice Recording/Review. There are two ways you can log an invoice. You can log it manually or by using the OCR technology.
Please note a user who has 'Log Invoice Permission' can log an invoice in the system.

To log an invoice, click on the Log Invoice button to see the below screen.
You can choose to log an invoice against all the items that you see or check the boxes against the items that you wish to invoice for.
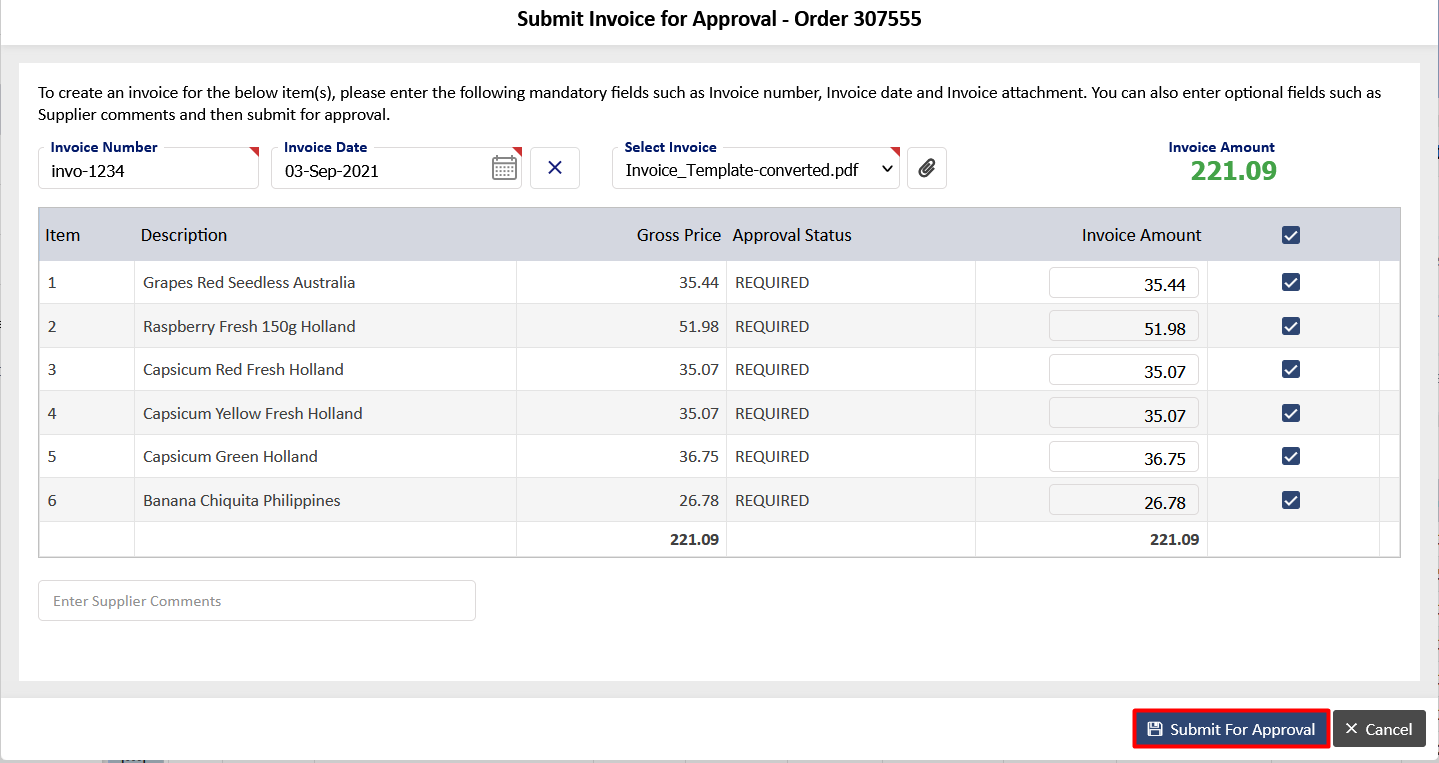
Add the details on this screen and once done, click on Submit for Approval.
An email will be sent to the Validator Group based on the property code of the order as shown below.
There are 3 ways that the Validator Group can approve/reject this order.
(i) In the email, click on the 'Click Here' button to see more details on the email and then click on Approve/Reject button.
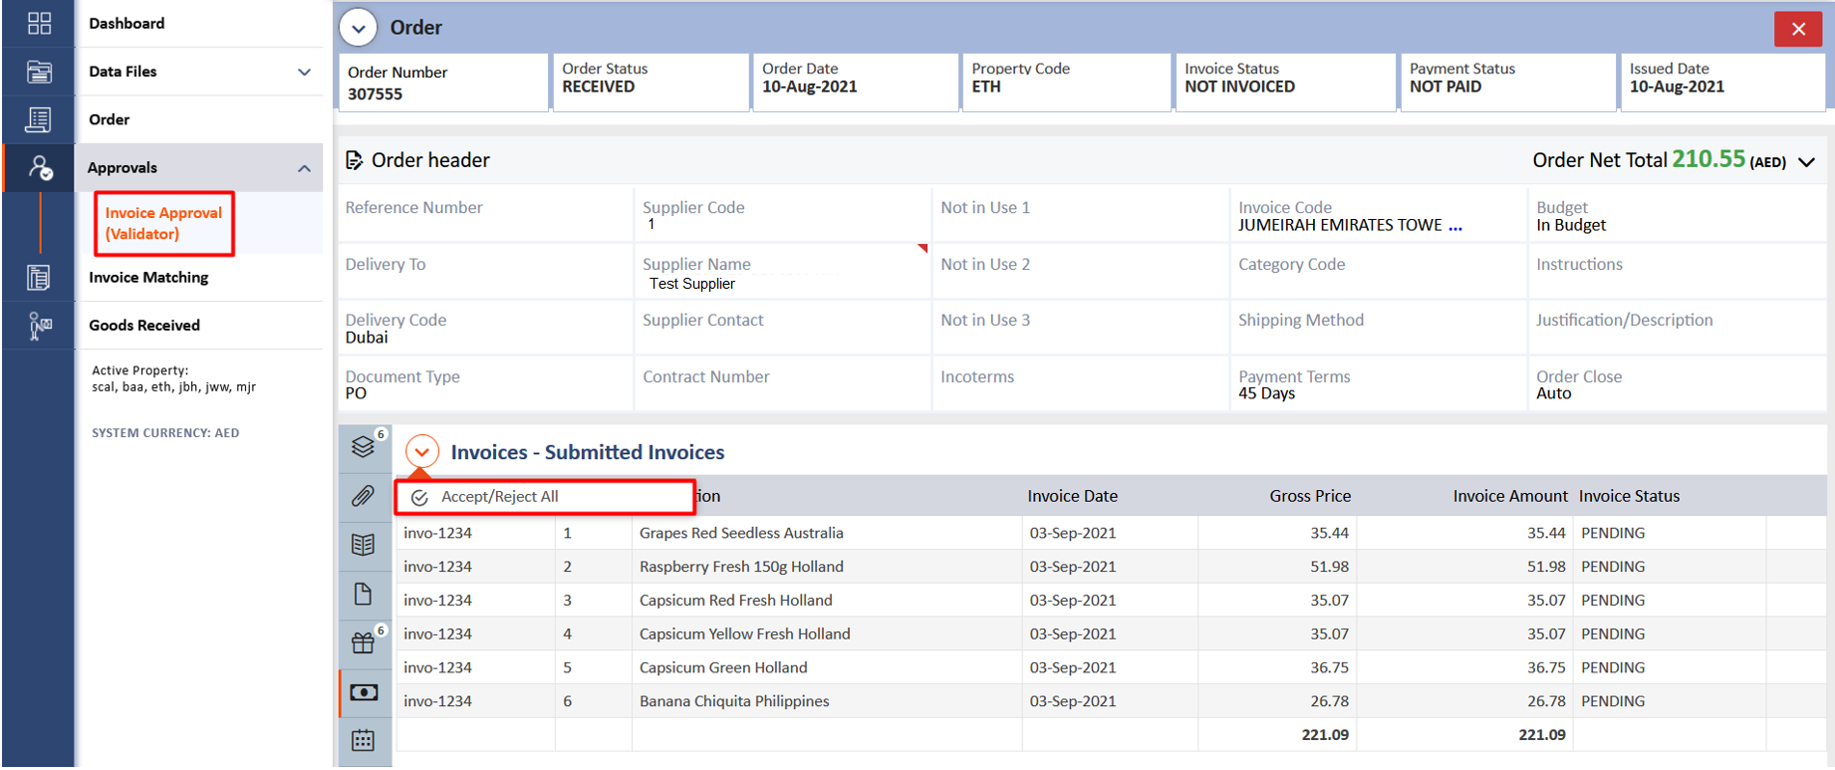
(ii) The Validator Group can click on Approvals tab-> Invoice Approval (Validator), click on the order number, and the user will see the invoice(s) in the Invoices - Submitted Invoices section and click on Approve/Reject All button.
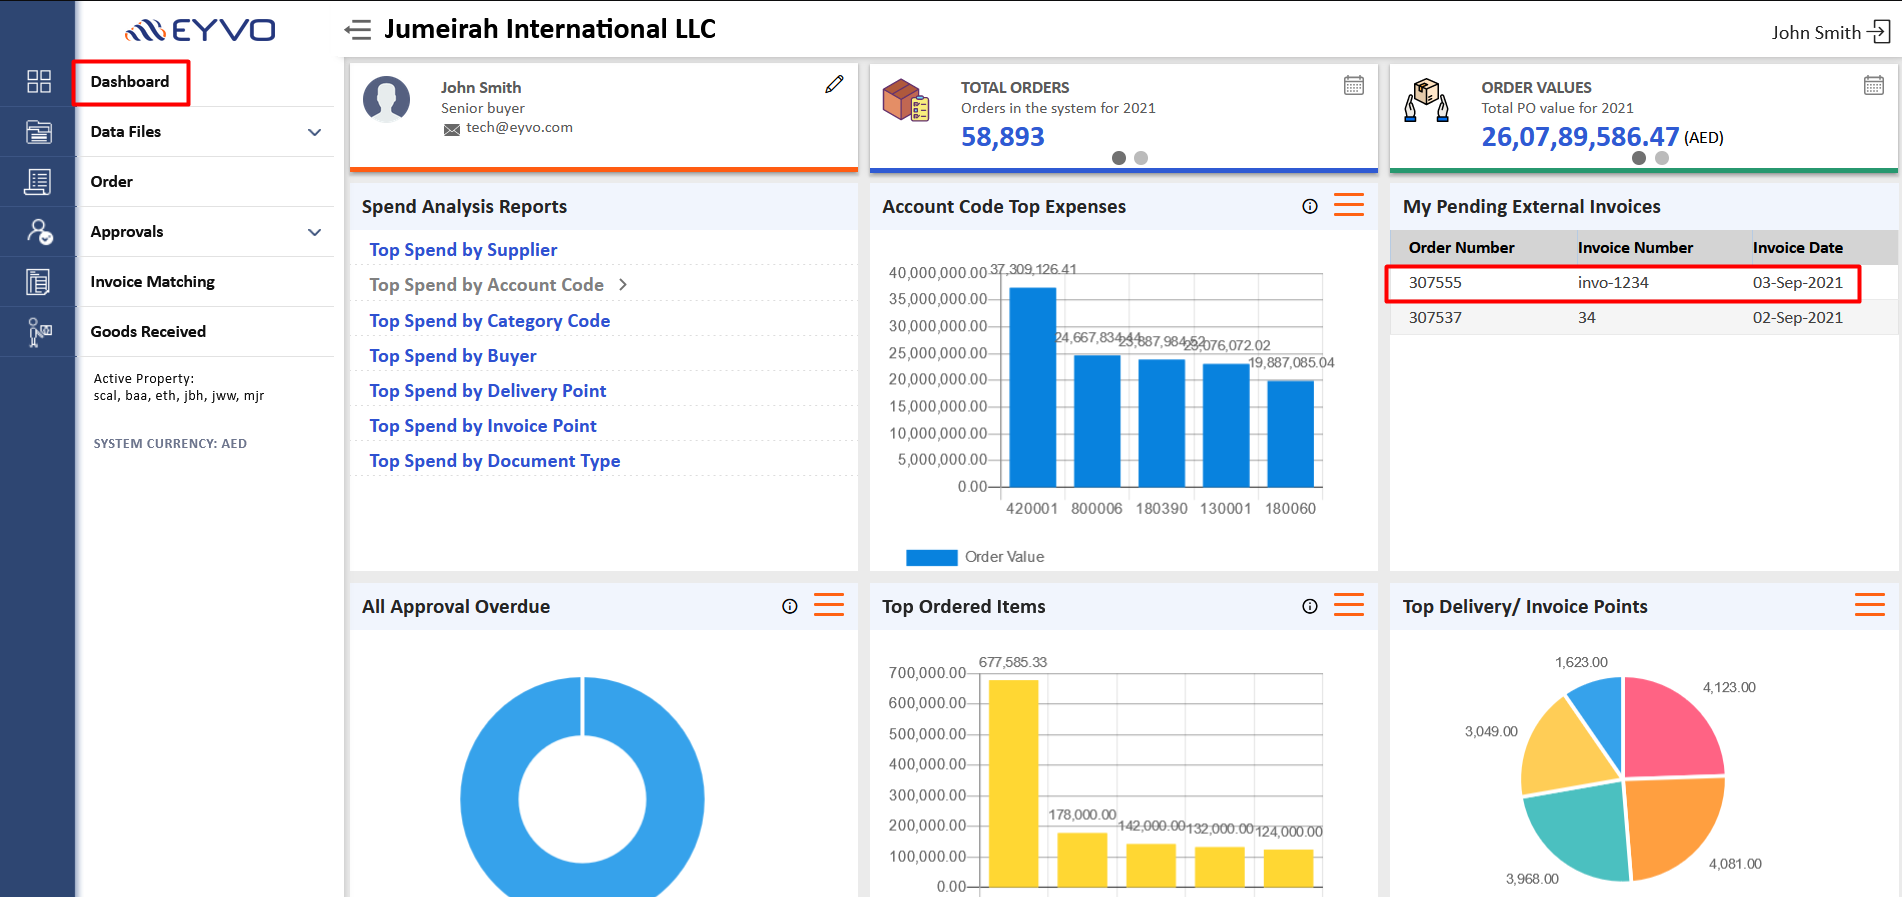
(iii) On the dashboard, click on the 'My Pending External Invoices' widget and the user will be redirected to the Submitted Invoices section of the order.
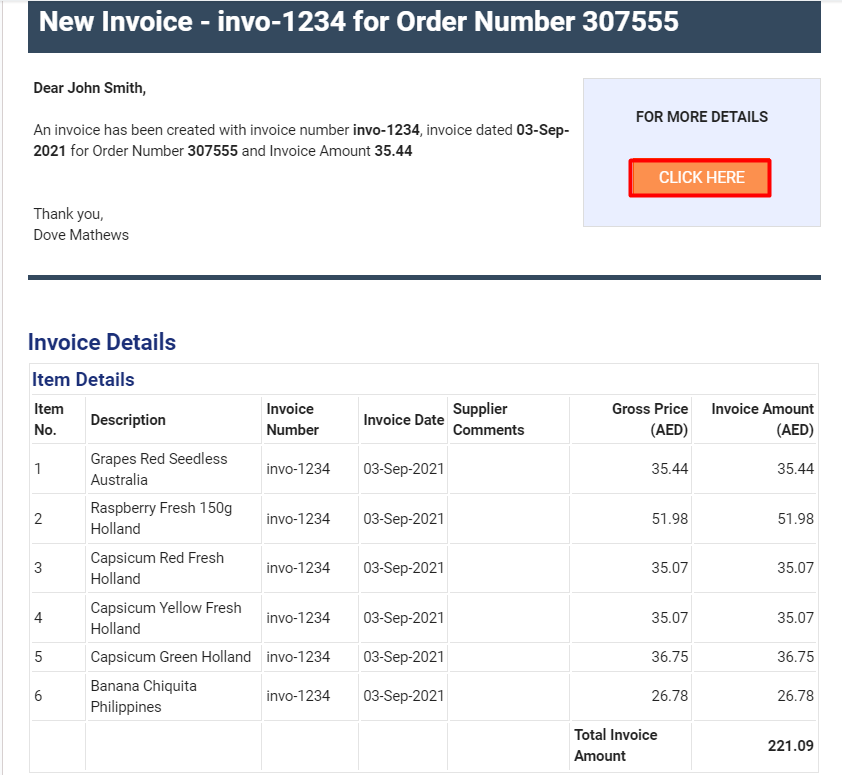
For this example, lets approve the order by clicking on the Approve button on the below screen.

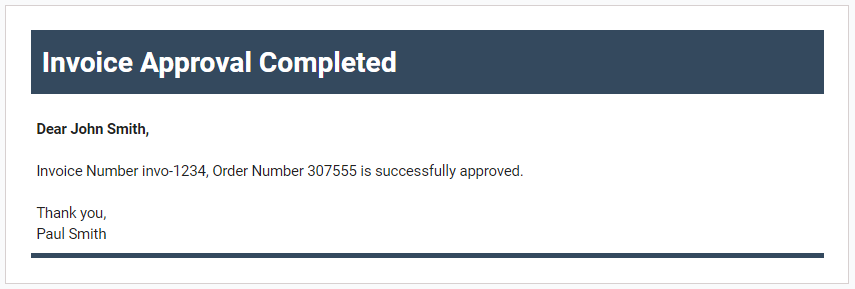
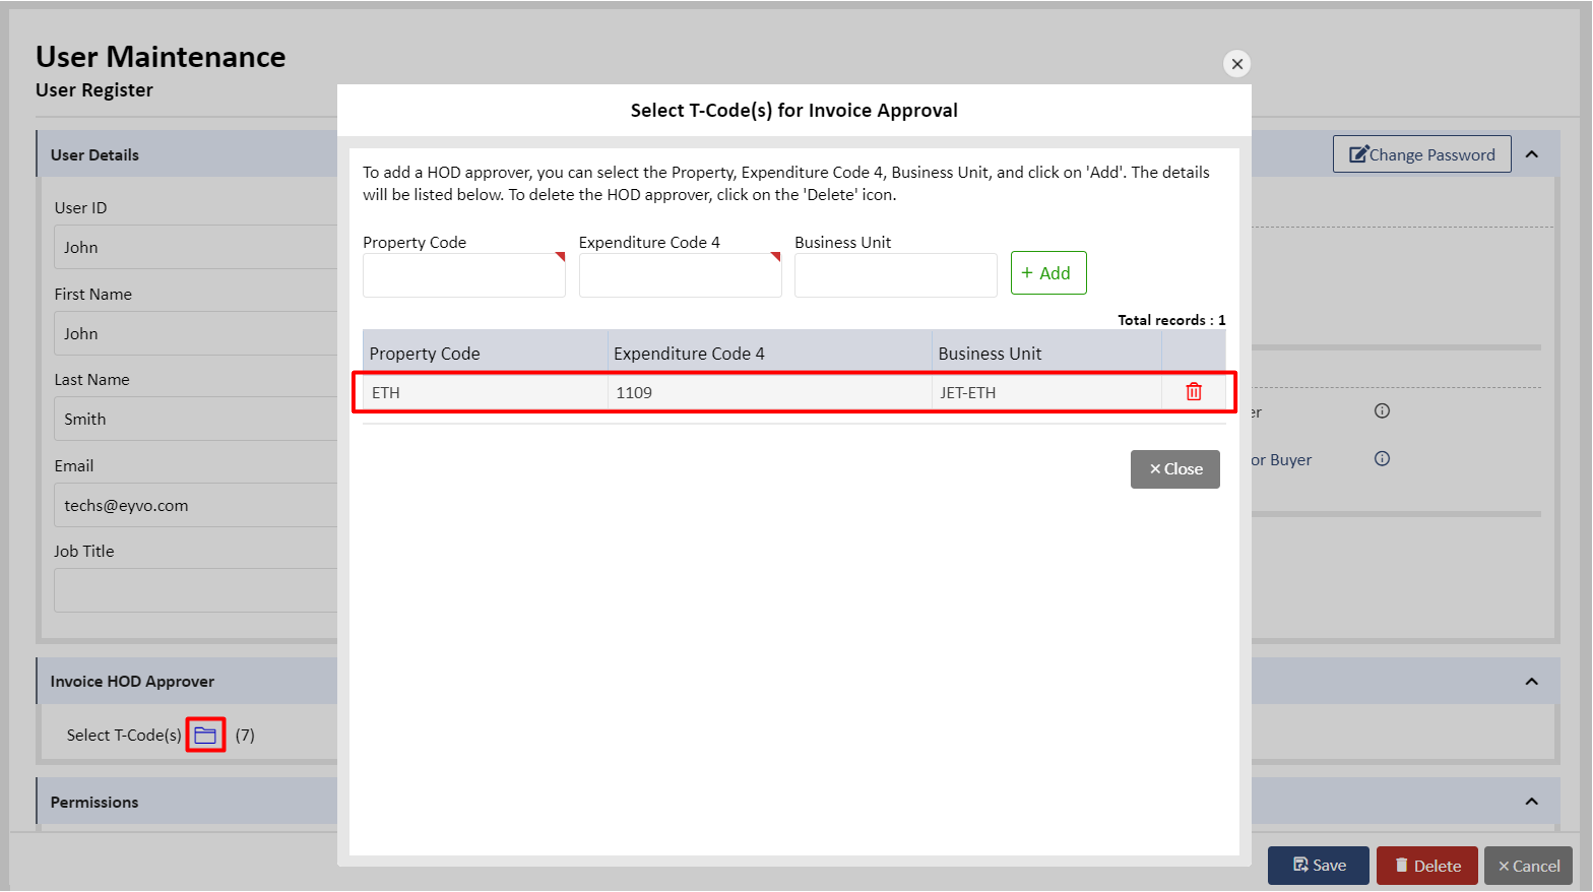
Once the Validator Group has approved the invoice(s). Based on the T-Code in the order i.e. Expenditure Code 4 or the combination of Expenditure Code 4 and Business Unit as shown below:

The user who has the same T-Code selected in the system administration section will be the HOD approver and an email will be fired to that user as shown in screens below:
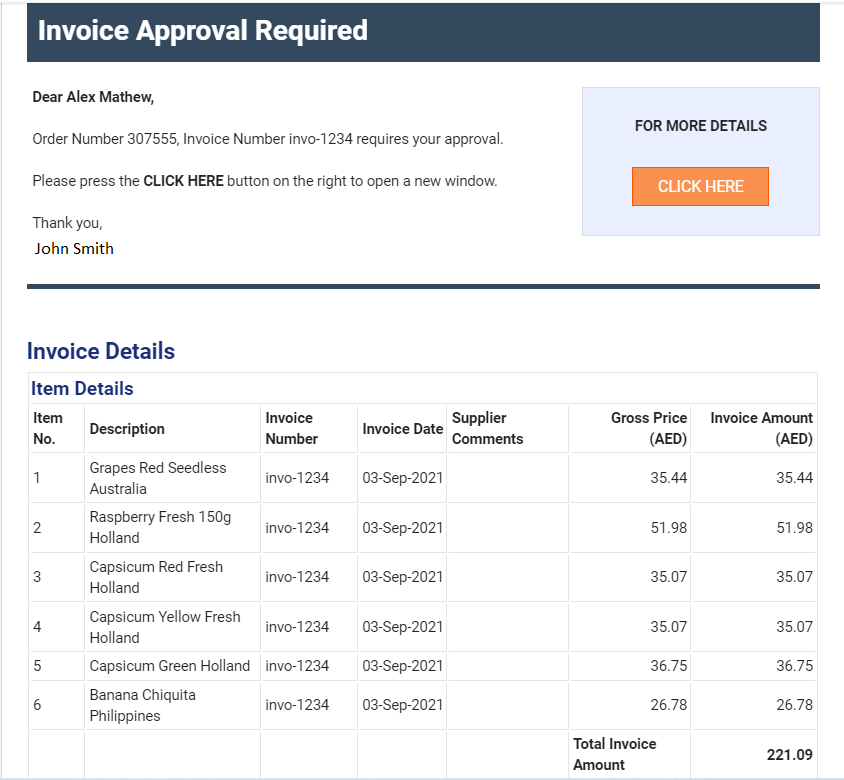
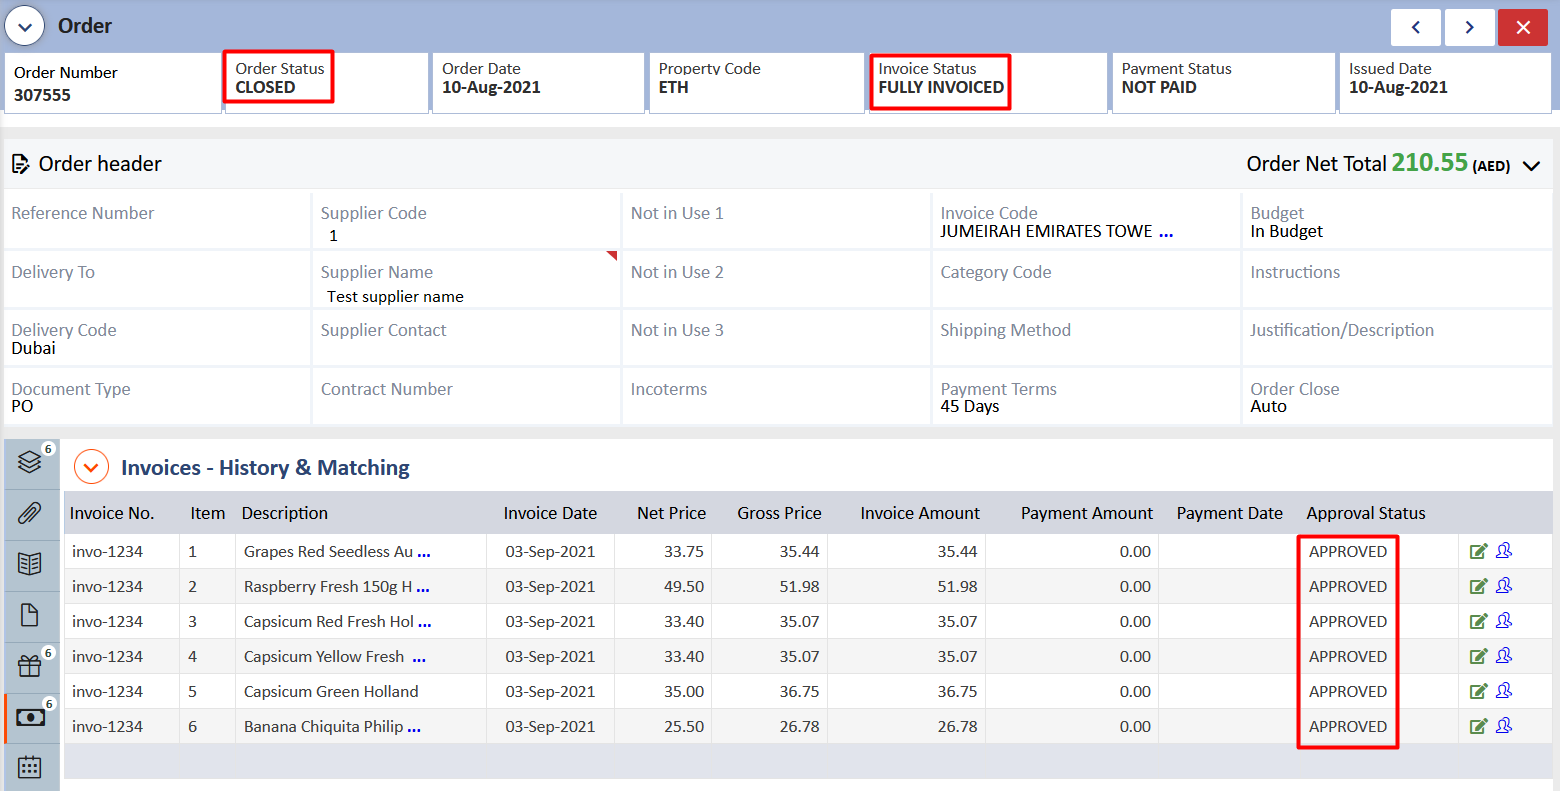
Once the HOD has approved the invoice(s), you will now see that the Invoice Status changes to 'Fully Invoiced', Order Status will change to 'Closed' and the status next to the line items under Invoices> Invoice Recording/Review changes to Approved as highlighted on the screen below.
The second option that can be used to upload invoices is by using the OCR Technology. To do so, go to Invoices> Invoice Recording/Review, click on the arrow next to Invoice Recording/Review and then on Attach with OCR as shown on the below screen.
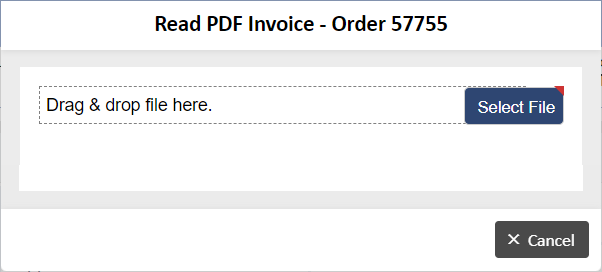
The next screen will ask you to select the invoice file so that the system can read this using the OCR Technology.
The system reads the Invoice No, Invoice Date and Invoice Amount from the invoice file attached. It will also show the invoice file next to the details for comparison and show the Order Value, Received Value and Invoiced Value.
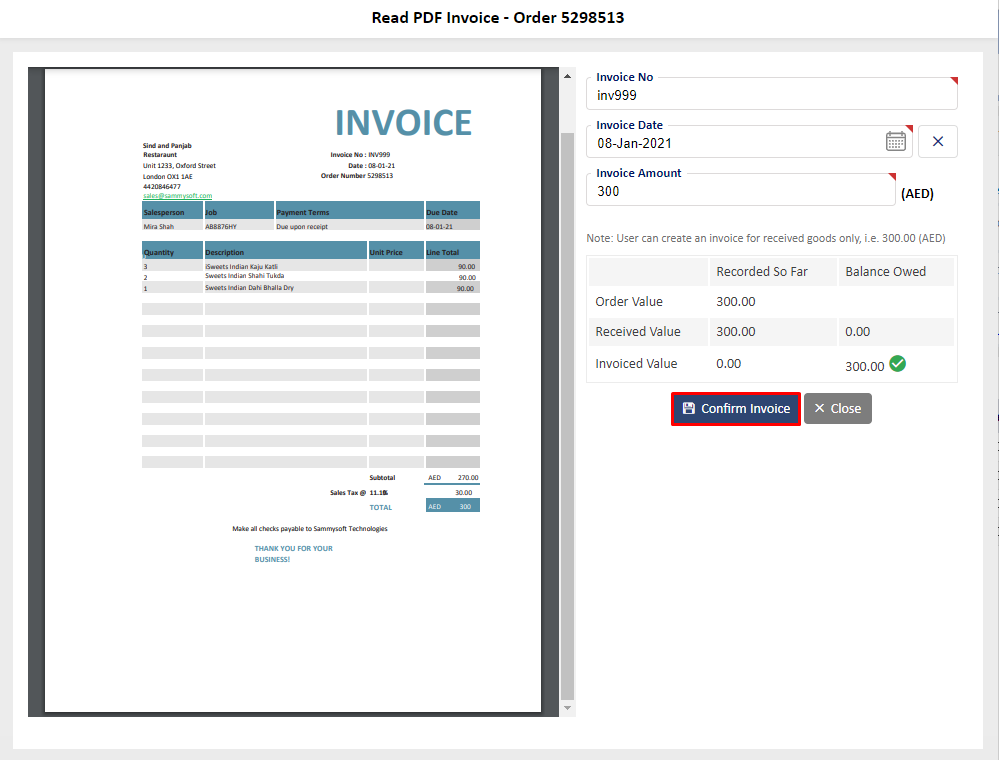
If the details are correct, you can proceed by clicking on the Confirm Invoice button as highlighted on the (above screen). However, if the system is unable to read these details, you will need to manually enter them as these are mandatory fields.
After you click on Confirm Invoice, you will see the next screen as shown below.
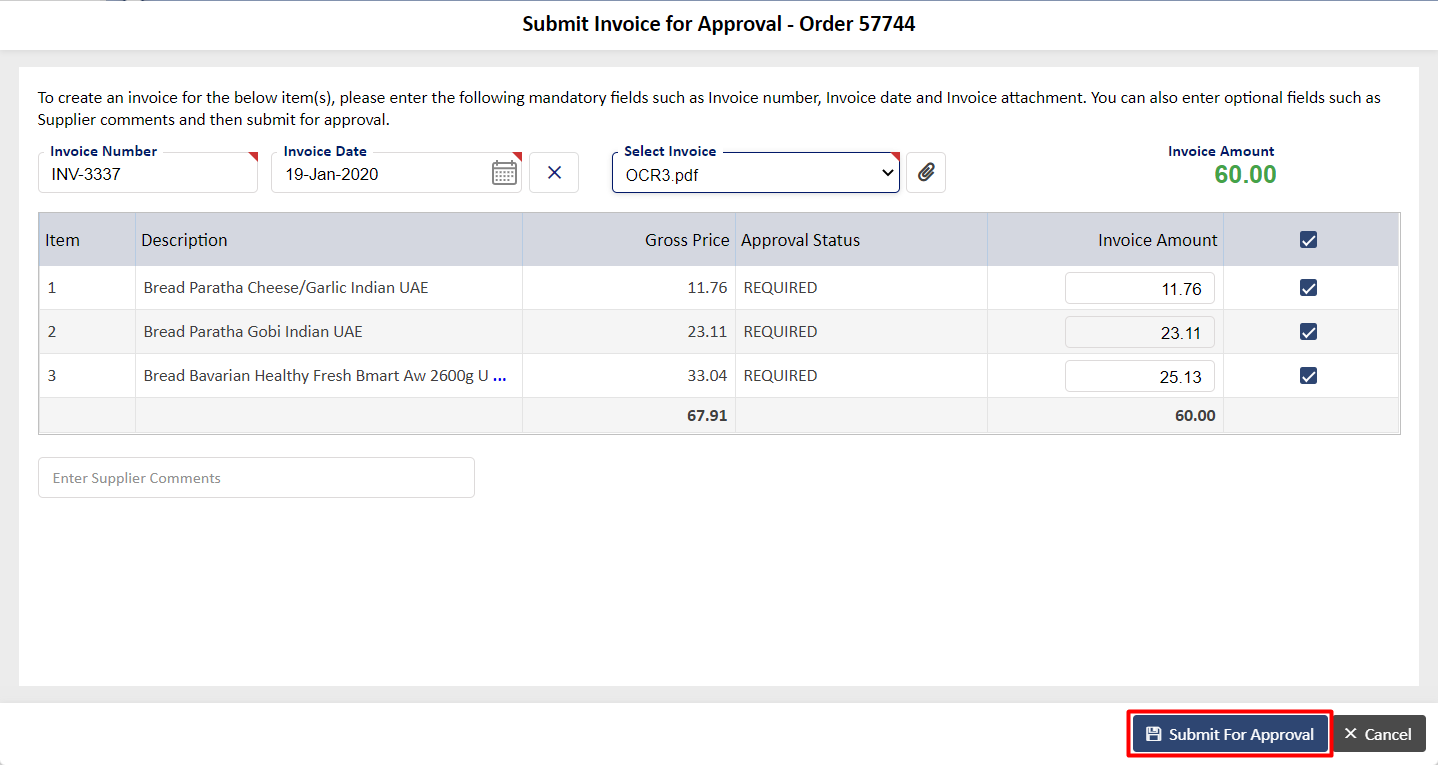
An email will be sent to the Validator Group based on the property code of the order as shown below.
Then the same flow will follow as above. click here to go above
Note: For property code ETH and JWW, once the invoice is approved by Validator Group, it will be sent for approval to HOD. For property code MJR, BAA, JBH, HOD approval will be auto-approved.
When the supplier logs an invoice using the supplier portal, an email is fired to the Validator Group and it will be seen in the order section under Invoices> Submitted Invoices. An example is shown below.
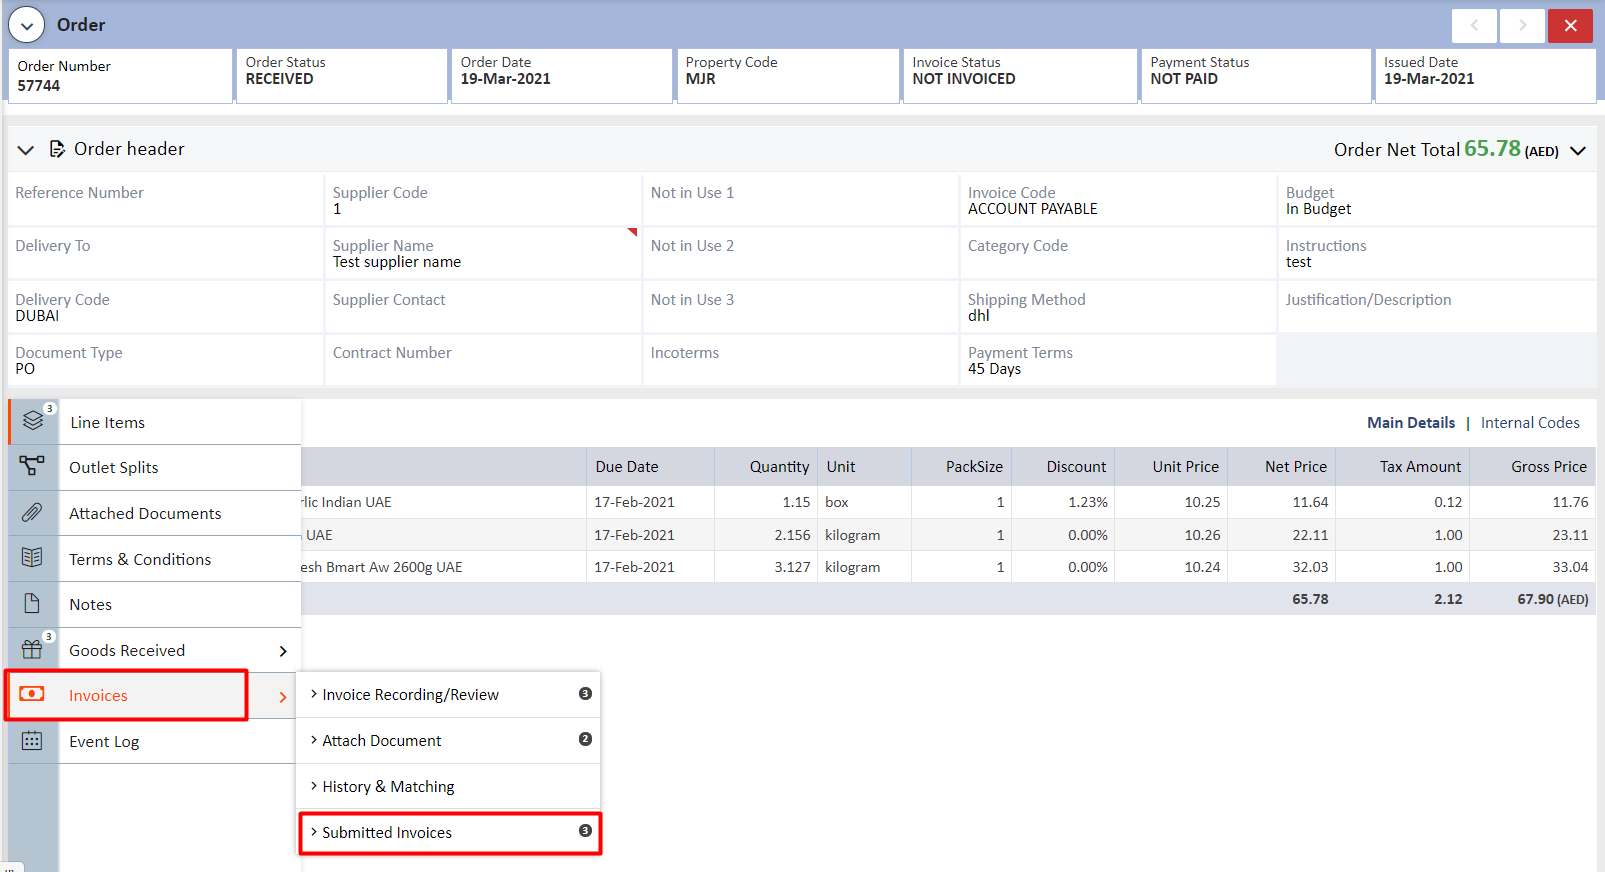
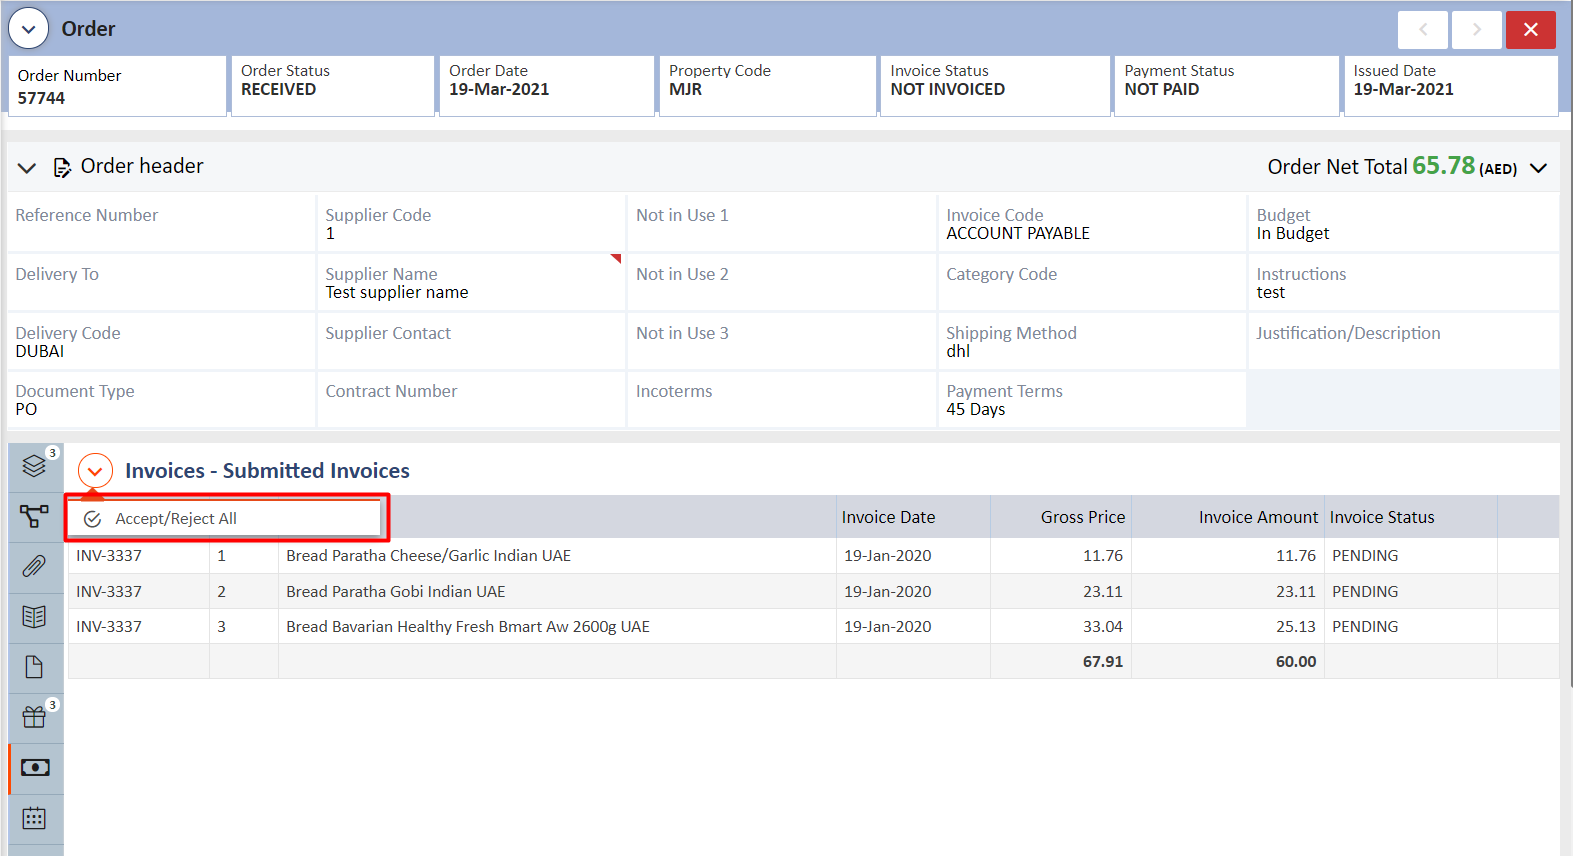
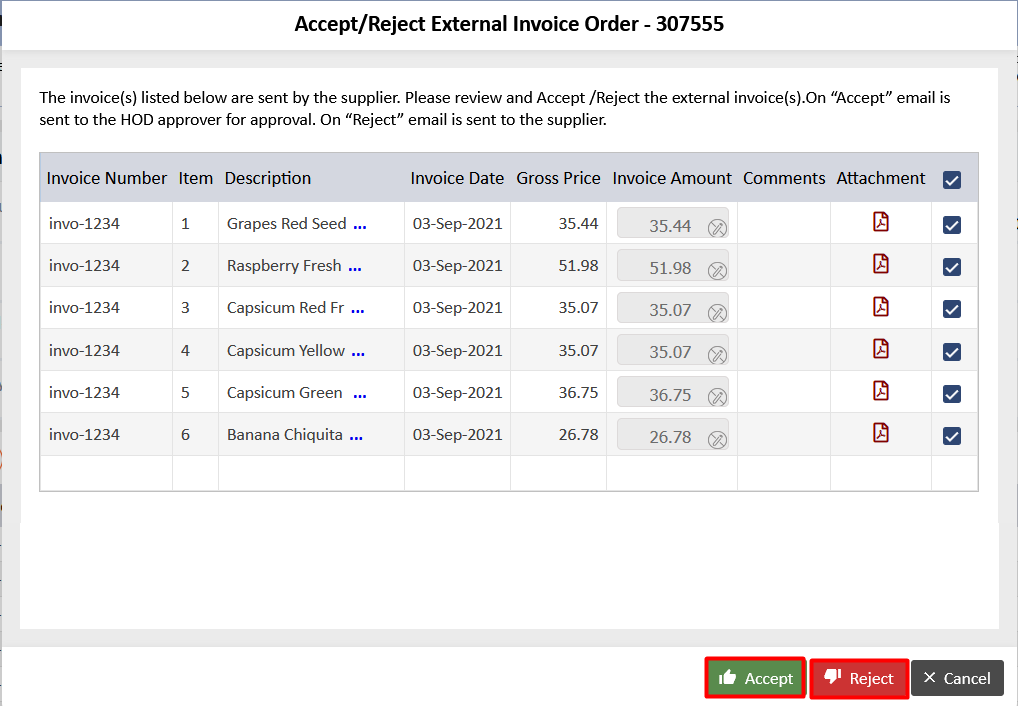
The Validator Group can validate the invoice by clicking on the Accept/Reject All button. The next screen as shown below will allow you to accept or reject.
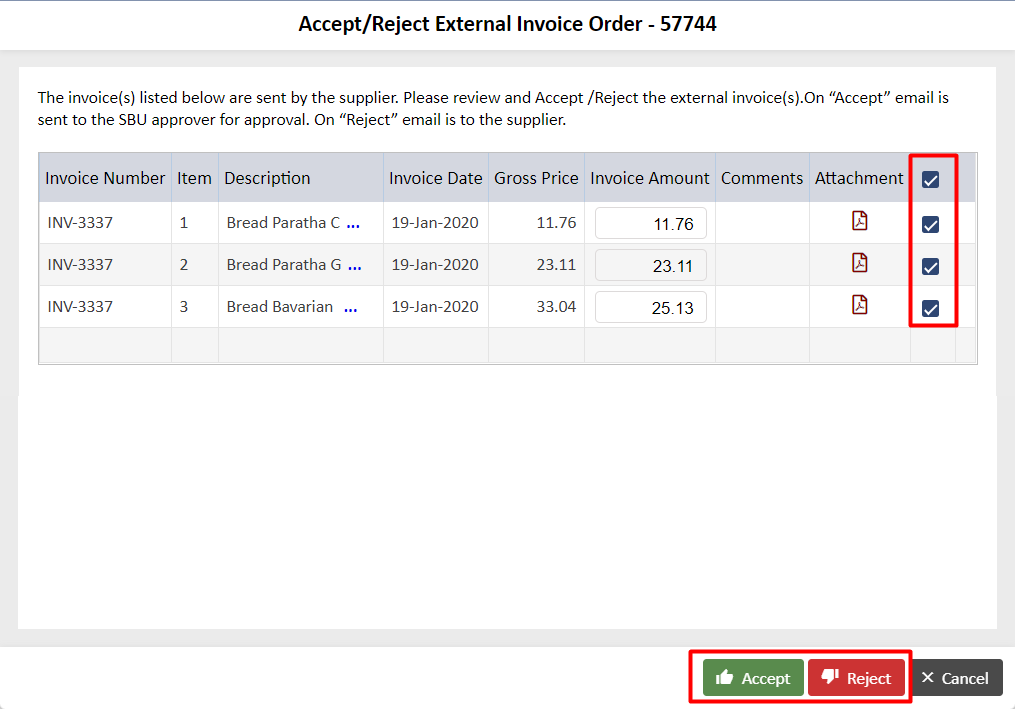
You can also partially accept or reject items by checking the boxes next to them as highlighted in the above screen.
If the Validator Group accepts the invoice, an email will be sent to the HOD approver. Once the HOD approver has accepted the invoice(s), Validator Group will receive an email notification.
If the Validator Group rejects the invoice, it will be sent back to the supplier.
Invoice rejected by HOD approver needs to be re-submitted for approval to the Validator Group.
Validator Group has the option to manually change the order status from 'Received' or 'Partial' to 'Closed' as shown below for their property.
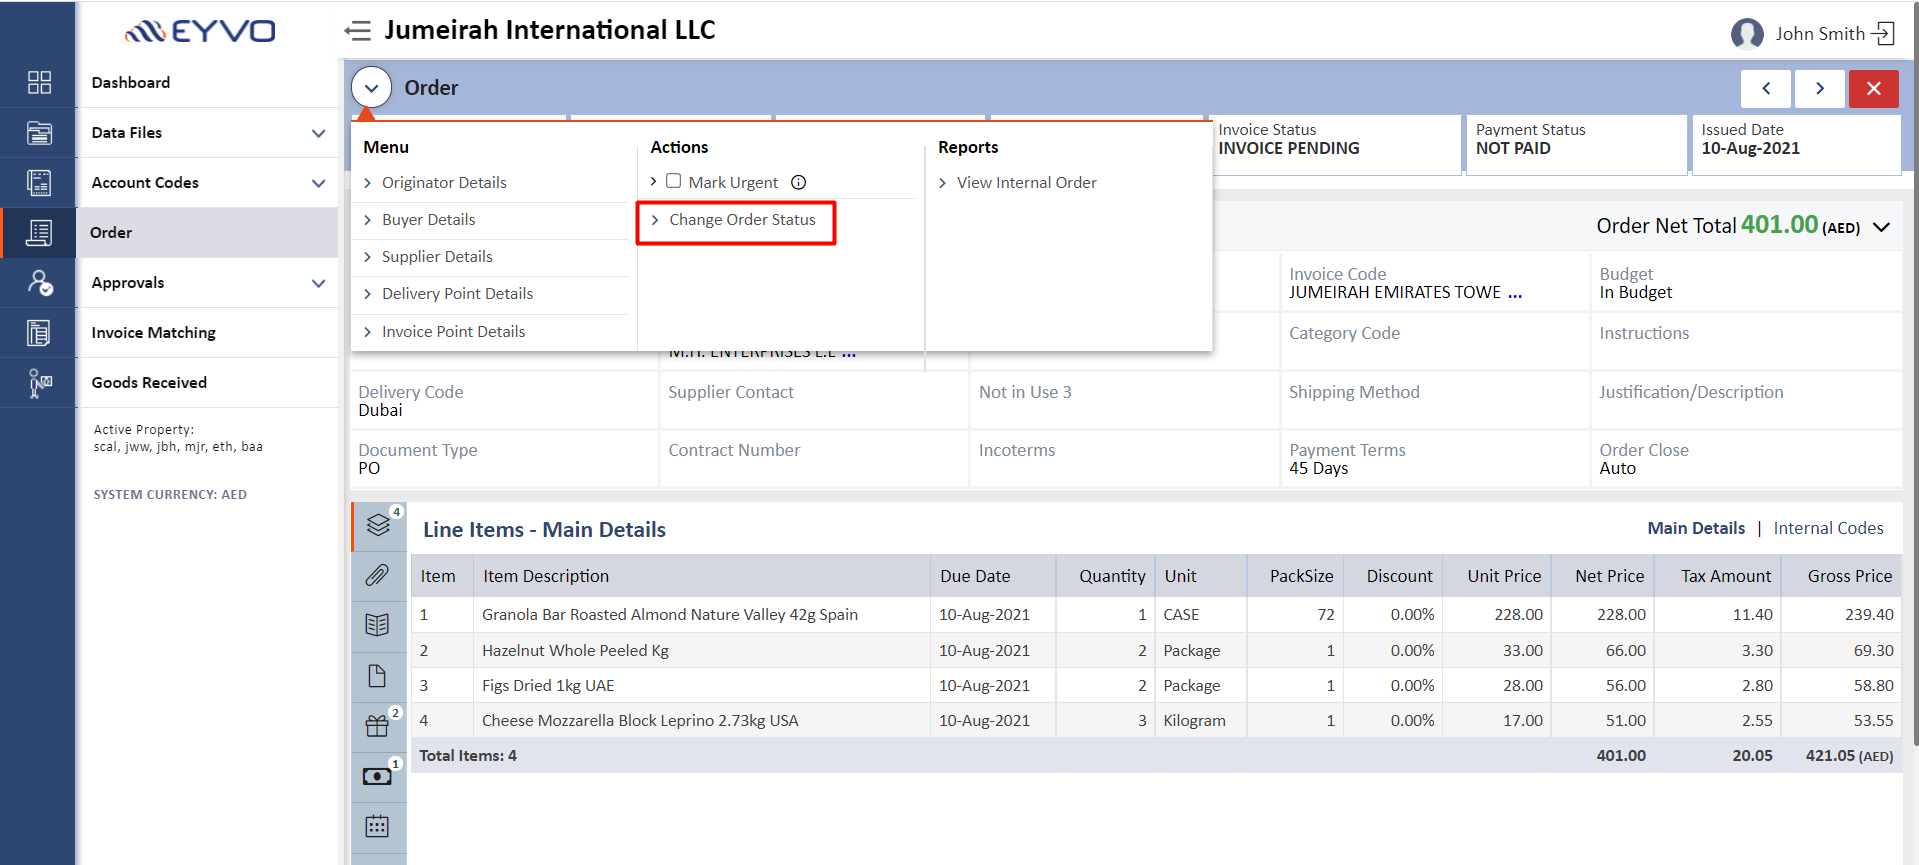
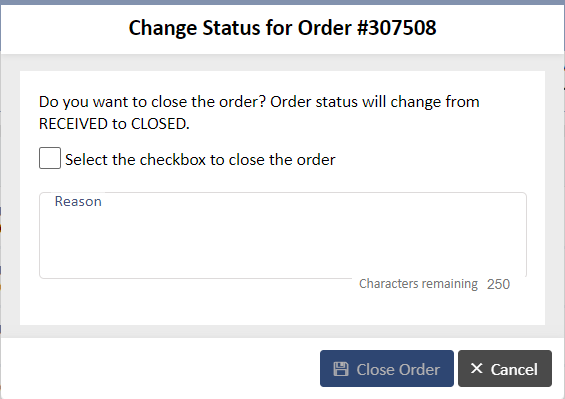
The system will check and alert the user if the order value and total invoice value are not matched as shown below and then will update the status.

The user selected as Master Data Handler in the system administration section can re-open the order for their property and the order status will change from 'Closed' to 'Received or 'Partial' as shown below:
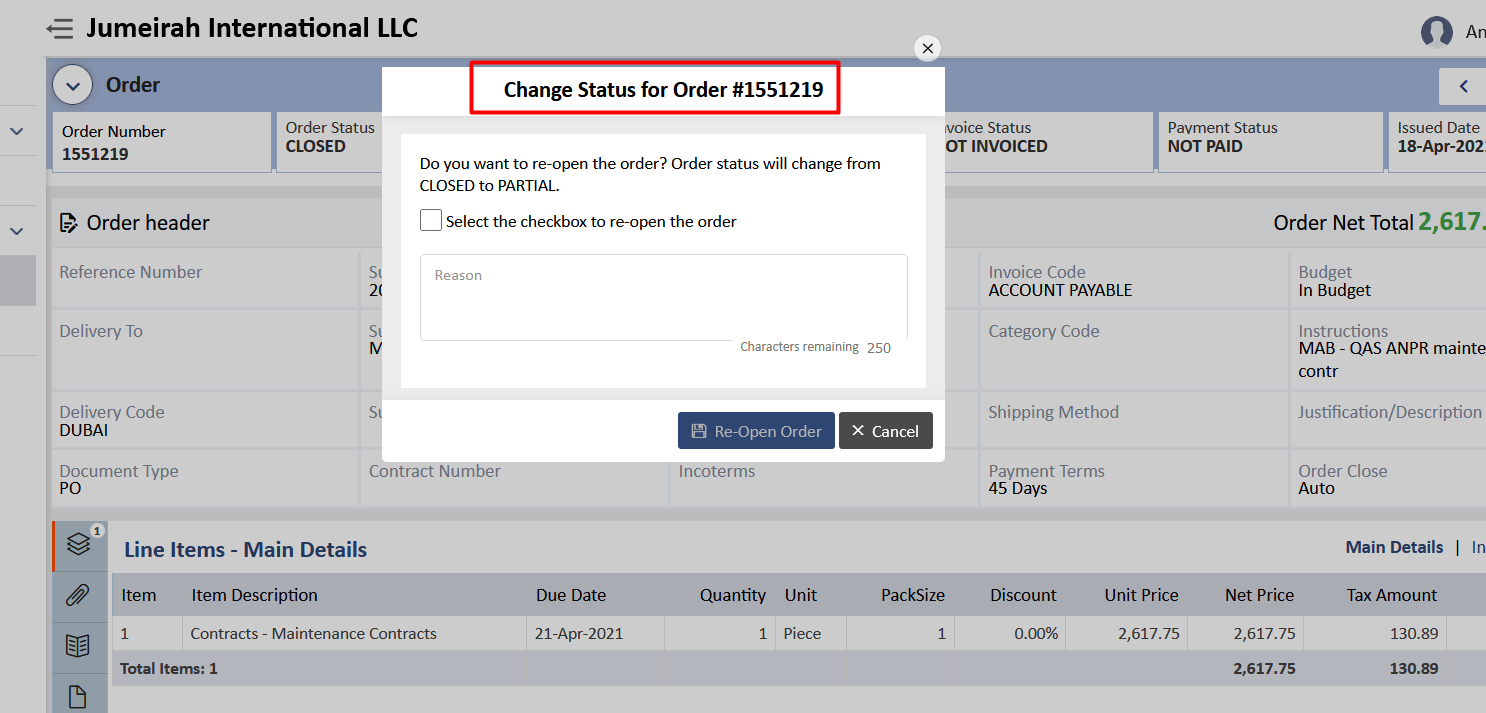
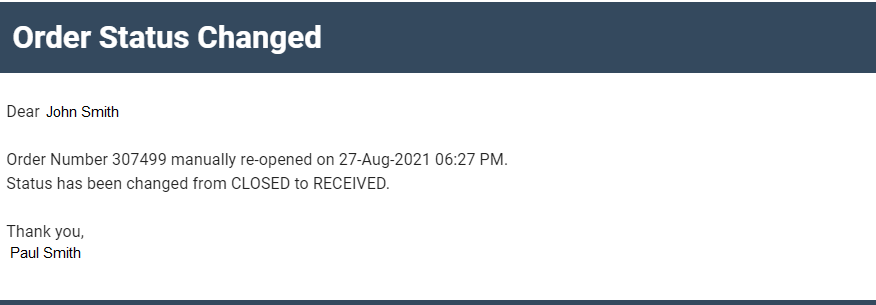
A notification email will be sent to the Validator Group when the order is re-opened.
Once the invoice status is 'Fully Invoiced', the system will check the Order value and Total Invoice value. If they are the same, the system will auto update the order status to 'Closed'.
A new field called 'Order Close' in the order header will show how the Order status is 'Closed'. 'Manually' by the validator or 'Auto' by the system.
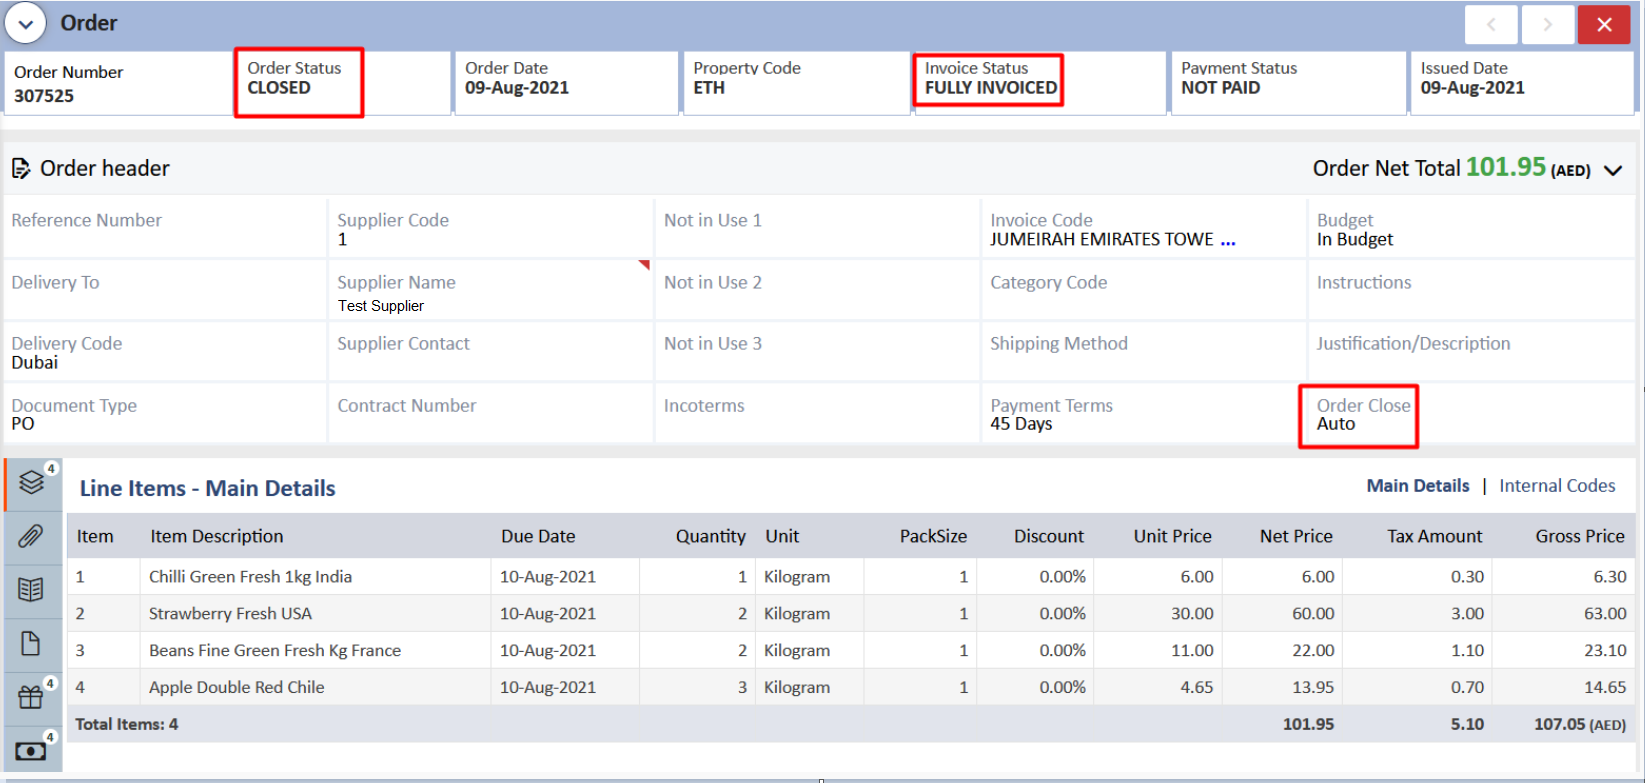
Note: If the order is 'Fully Invoiced' and the order status is auto updated to 'Closed', the option to reopen the order will not be available.
Invoices submitted through the Supplier Portal
When a supplier submits an invoice using the Supplier Portal, the validator group will receive an email such as the one shown below:
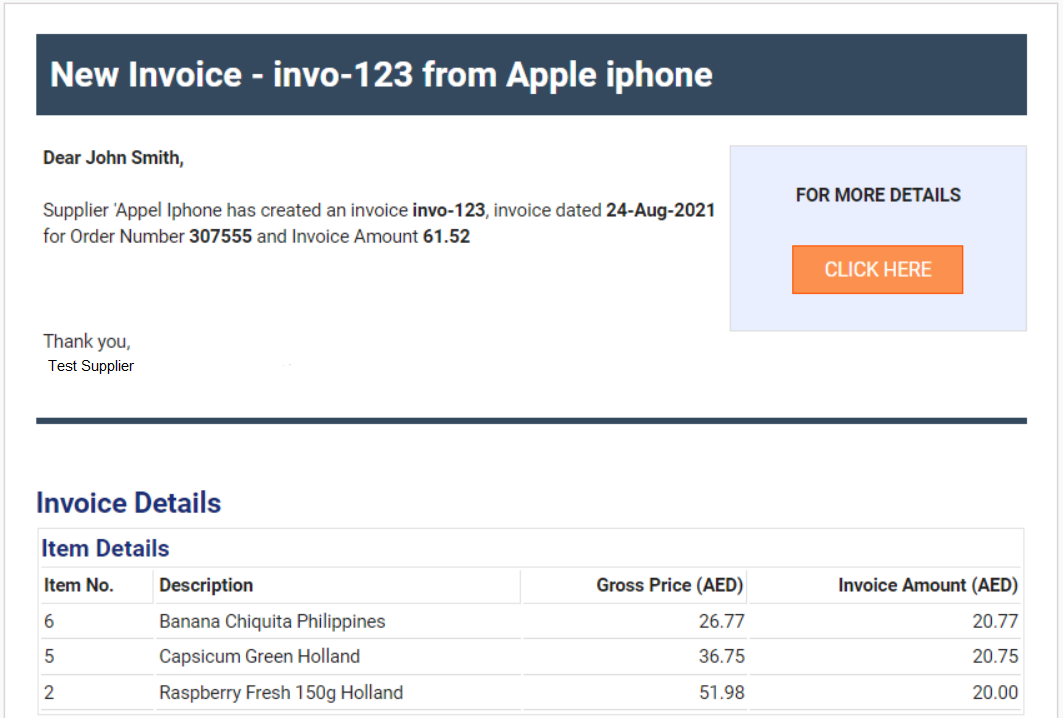
The Validator group can approve or reject by logging into the application or by using the link received in the email. Once approved, the process will work the same way as above.
Once the invoices are logged, we will need to run the sync so that these details can go to Sun Systems. To do so, go to the Dashboard> Profile> Adaco/Sun System Sync> Log Details and click on Sync with Sun System.
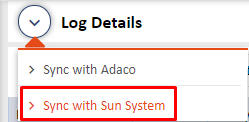
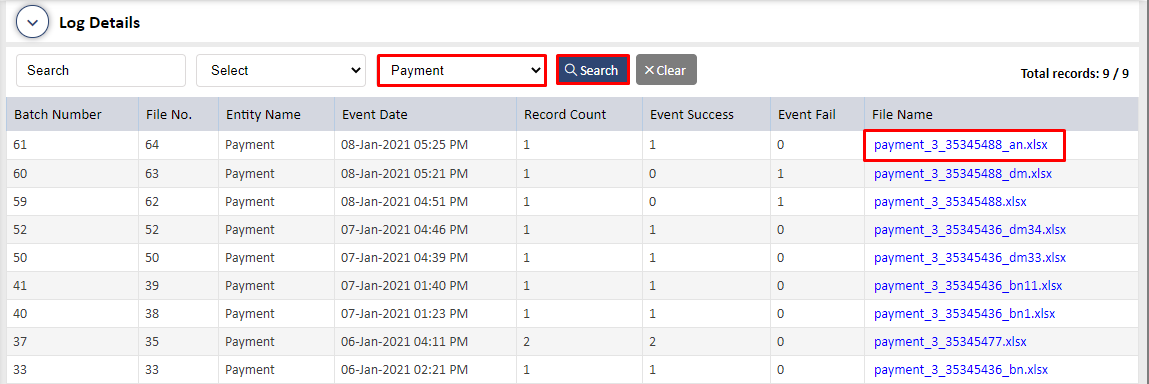
Running the sync will generate an Invoice txt file that can be seen when you filter the file to Invoice and click on Search as highlighted on the below screen.

The Invoice txt file is show below for your reference.

The last step is to import the Payment file that would be received from Sun Systems into our application. The payment file is shown below for your reference.

To import this, click on Sync with Sun Systems again. You will see the Payment file import as highlighted below.
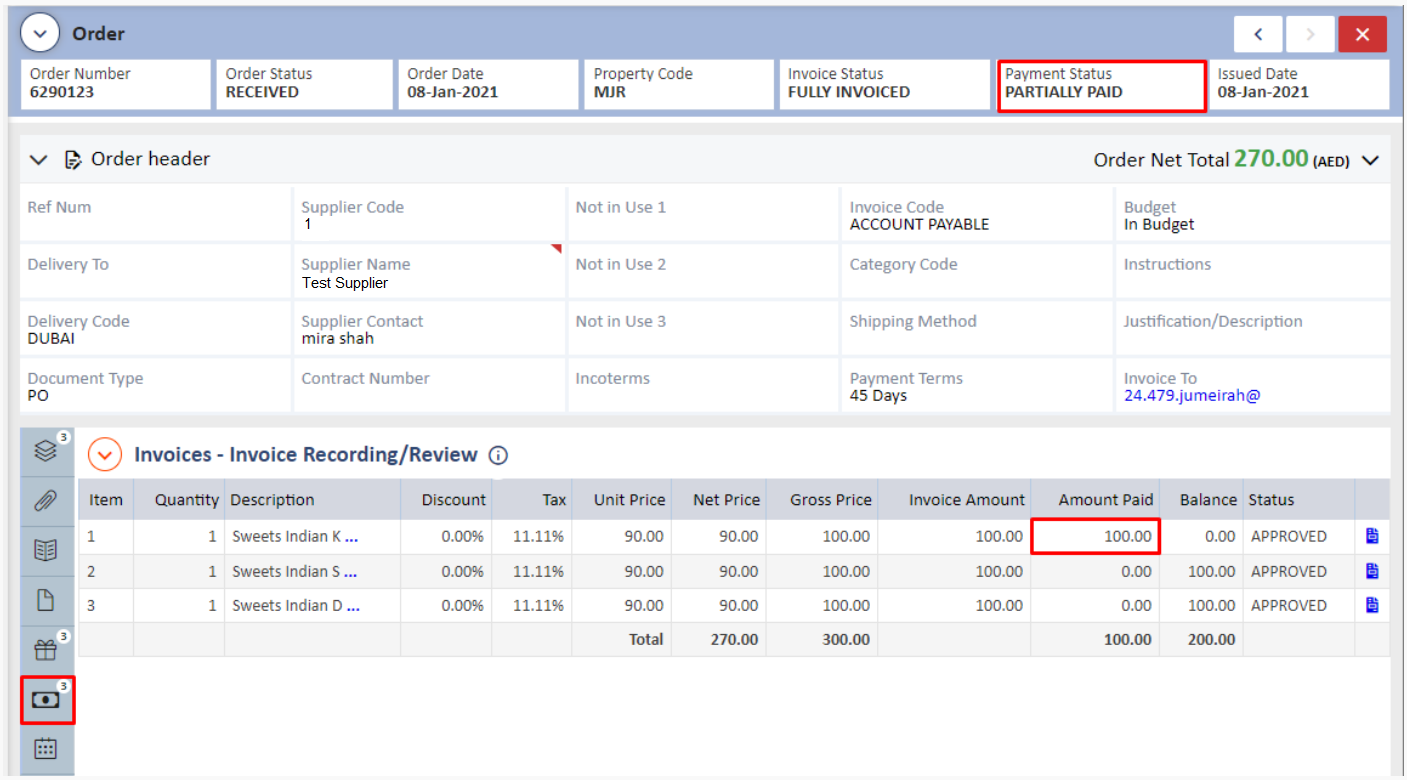
To see the payment received, go to that Order> Invoices> Invoice Recording/Review to see the payment amount and the Payment Status as highlighted on the below screen.
ORDER QUICK LINKS I REPORTS:
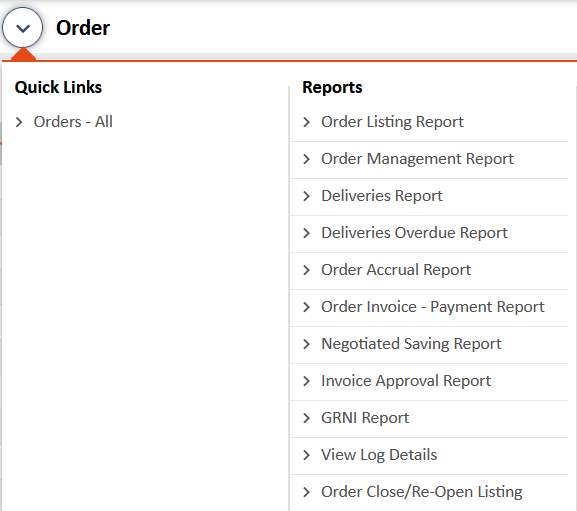
The following can be found on the Order Listing Page under Quick Links I Reports:
QUICK LINKS :
a. Orders – All – This will sort the listing page so that all orders are shown to you.
b. Orders – Personal – This will sort the listing page in such a way that only your own created orders are shown to you.
b. Orders - Archived - This report will show all the archived orders done by the System Administrator. You will be able to see this option only if you have been given permission to access them by the System Administrator.
REPORTS :
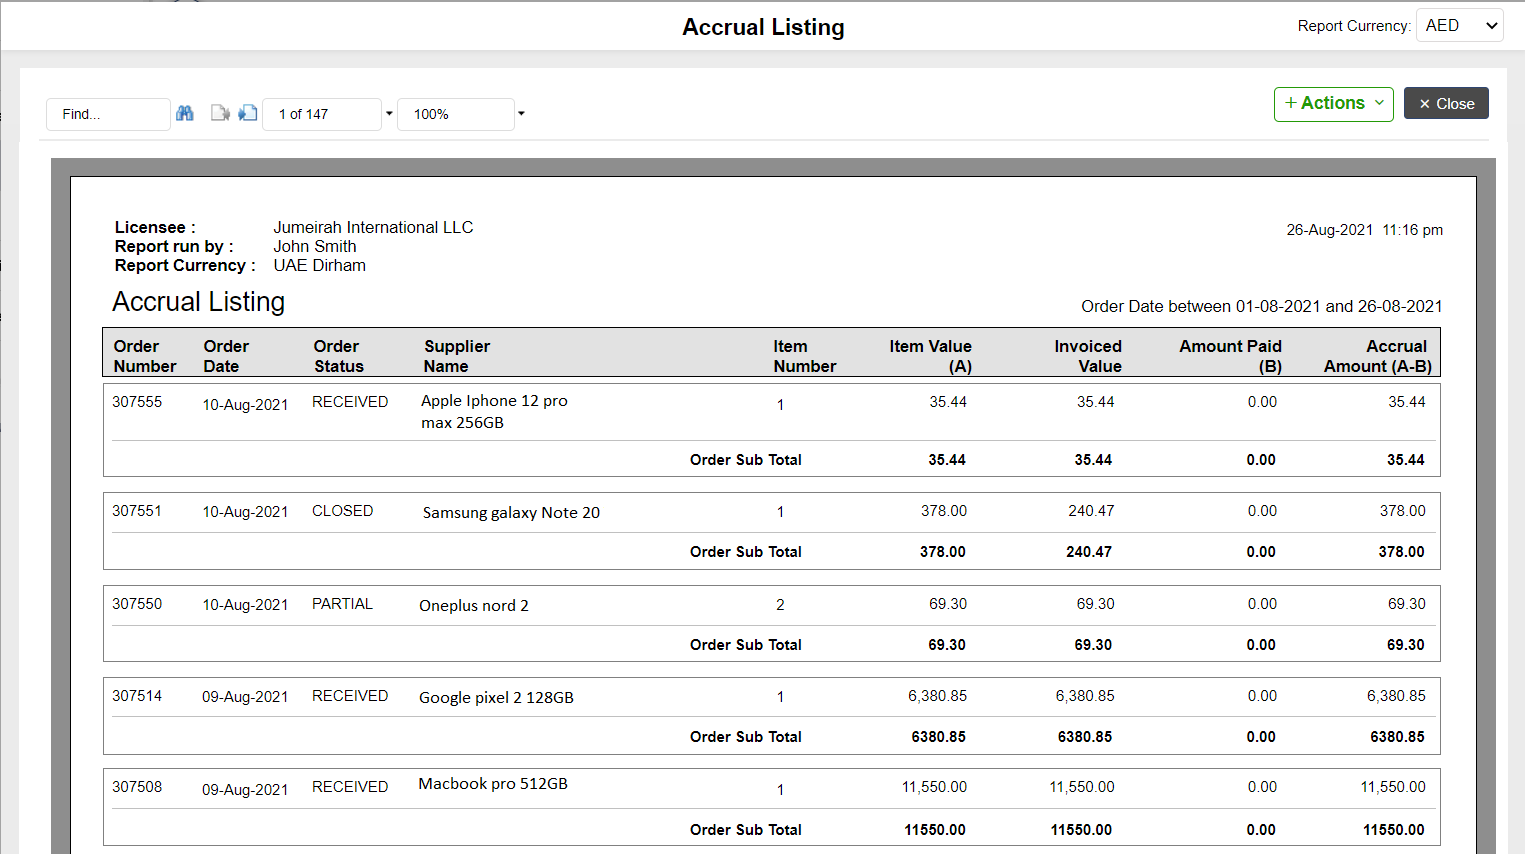
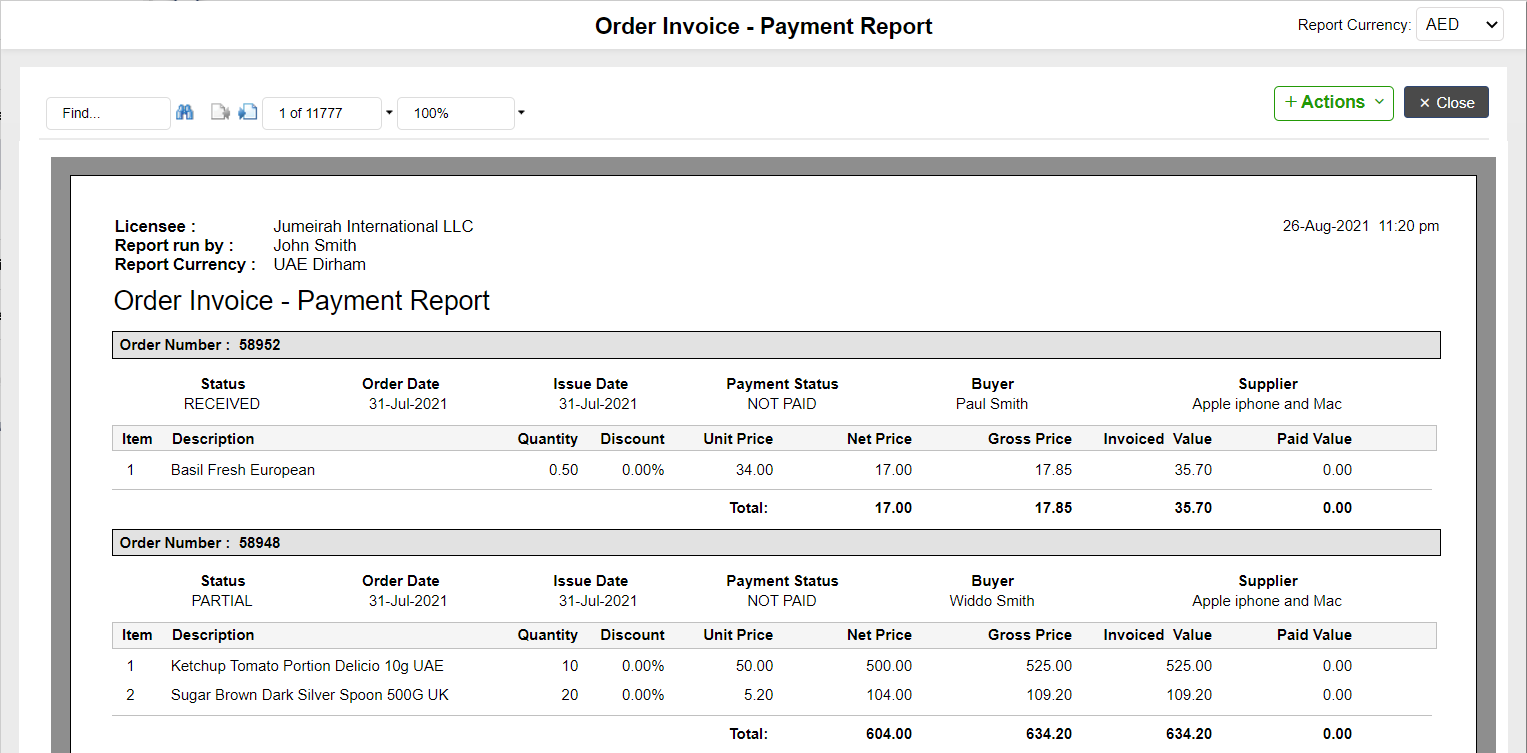
a. Order Listing Report – This report lists all the orders as per the headers on the Order listing page.
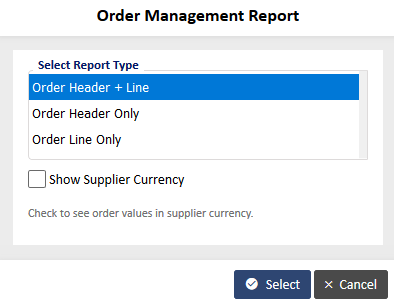
b. Order Management Report – This report can be generated using 3 criteria’s as shown below:
-
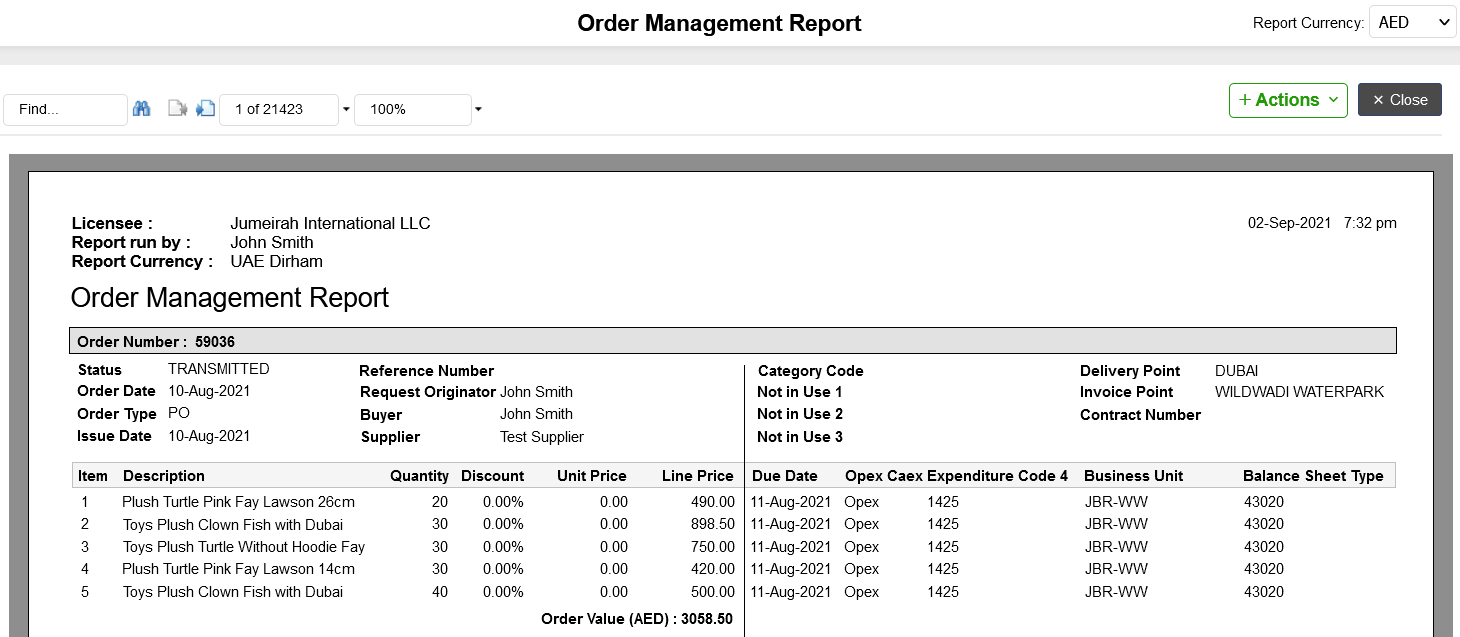
Order Header + Line will show all the details of the order header and line items as shown below:
-
In the same way, selecting order header only will show the order header details and selected order line will show line item details.
- Checking the box for supplier currency will show the currency on the reports in the supplier’s currency. When the box is unchecked, the currency shows in the base currency of the system.
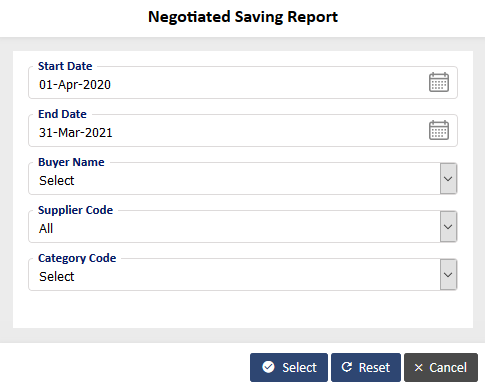
g. Negotiated Savings report – This report will show the savings on your orders. You could narrow the search by entering the start and end date and further by selecting the Buyer Name, Supplier Code and Category Code as shown below:
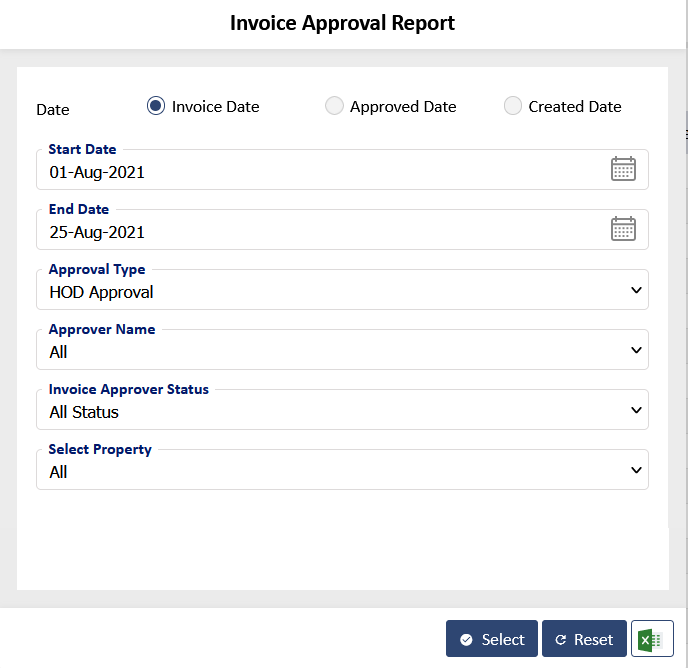
h. Invoice Approval Report – This report will show invoice approval details based on Invoice Date, Approved Date and Created Date. You can search by entering the start and end date and further by selecting the Approval Type, Approver Name, Invoice Approver Status and Property as shown below:
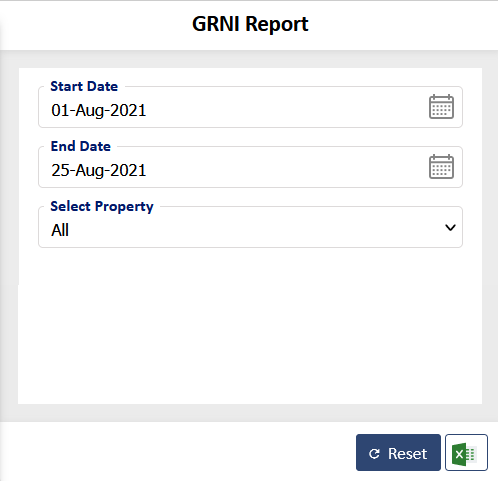
i. GRNI Report – This report will show the order, gr and invoice details in excel format. You can search by entering the start and end date and Property as shown below:
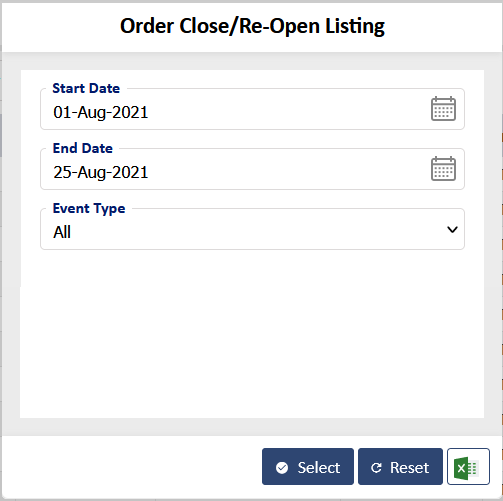
j. Order Close/Re-Open Listing – This report will show the order closed or re-opened details. You can search by entering the start and end date and Event Type as shown below:
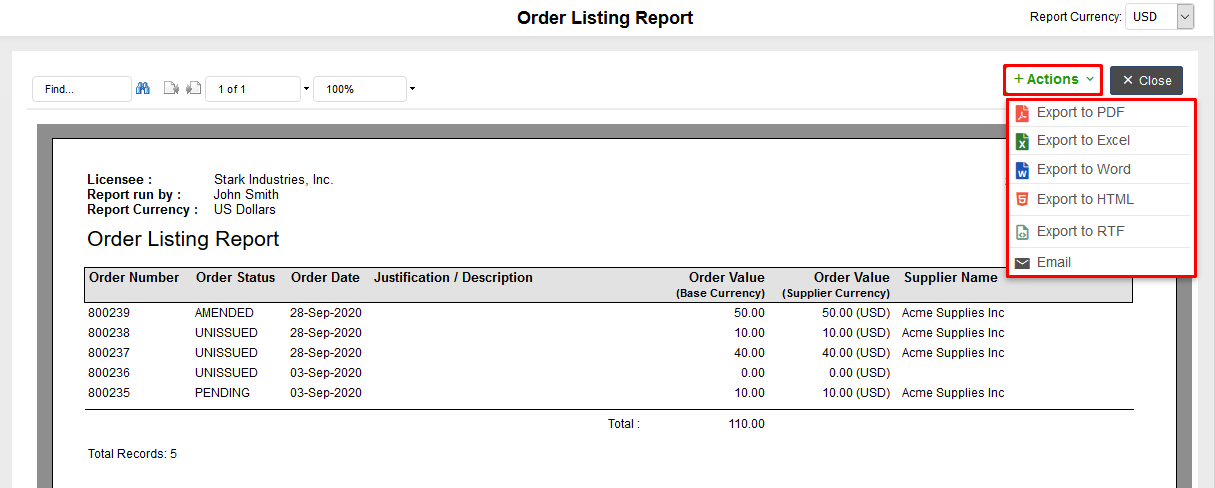
- All the reports mentioned can be exported to a PDF, Excel, Word, HTML or RTF and can be printed or emailed as shown on the below screen:















.png)



.png)
